
Nickel strips, or what is used to connect cells in battery packs
$52.19 - 77.13 (за 1кг)
I’ve often seen people ask what’s used to weld battery packs. Obviously, you use special strip, but what kinds are there, how do they differ, and which one is best? That’s what I’ll try to explain today.
First, a quick note about the price in the title. The strip is usually sold either by weight or by length. In this case, I bought 1 kg lots, each costing around $52–53 regardless of width or thickness. The exception is the wide strip, which costs more per kilogram; I’ll cover that too.
As far as I know, strip is made from a few different materials: nickel and nickel-plated steel. The second option is understandably a little cheaper, but it has some drawbacks:
1. Slightly higher resistance.
2. Prone to corrosion.
The difference in resistance isn’t particularly significant, but the material itself can be critical. When building battery packs for electric scooters, bikes, and similar equipment (which use a lot of strip), you need to consider the conditions they’ll be used in. Nickel is chemically quite inert, so it doesn’t corrode. Steel strip is also nickel-plated for the same reason, but the edges of the strip—and especially the weld points—are left exposed. That may not matter in a laptop battery, for example, but a Segway battery is used in damp conditions, and sooner or later the contact points may simply rust through.
Also, don’t forget that nickel is usually pure, while steel is an alloy, and nobody knows what’s mixed into it. I’m sure many of you have heard about secret alloy recipes like “foil and cardboard” :)
Shipping and packaging. Five stars here: not only did the seller pack everything pretty well, they also shipped it via DHL. I placed two orders, each for 2 kg, and they arrived in separate parcels. The only minor complaint is that the seller took a little while to ship, but it still arrived in a fairly short time.
I think the seller simply collects orders for strips of different widths, then sends a large batch out to be cut and ships the pieces to customers.
The strip was tightly wrapped in plastic, then wrapped in bubble wrap several times and packed snugly into a cardboard box.

The strip is available in several thickness/width options:
0.1x5mm
0.1x6mm
0.1x8mm
0.1x10mm
0.15x5mm
0.15x6mm
0.15x8mm
0.15x10mm
0.2x5mm
0.2x6mm
0.2x8mm
0.2x10mm
0.15х7х27mm
I’ve highlighted the options featured in today’s review.
The material is listed as 99.96% nickel. I’ll try to verify that a little later, but first, some general information about the product.
As I mentioned, I placed two orders: one for myself and one for a friend. I didn’t actually need the strip myself, and I split the order into two parts partly because of the price and partly because I wanted to check the quality when the first batch arrived before ordering the second.
I’ll start with the 0.2x8mm and 0.15х7х27mm strips.

Each roll is wound around a plastic core. The narrow roll is 165mm in diameter, and the wide one is 137mm.

It’s wound very tightly, and each roll is individually wrapped in addition to the outer packaging.

The weight seems fair to me: each roll weighs a little over a kilogram, so the seller is counting the material’s weight, not the total weight of the roll.

The 0.2х8 strip. Its width and thickness match the stated dimensions, within the caliper’s measurement error.

The second strip is much more interesting. It looks like photographic film.

This type of strip is designed to make it easier to connect large battery packs, especially those used in electric vehicles. For example, you can weld four cells together with a single piece, which makes the job both easier and more reliable. Unfortunately, the strip itself costs almost one and a half times as much.

Measured dimensions of the strip.

I measured the thickness using the narrow part of the caliper jaws.

The seller’s drawing. My measurements came out a little different, especially the width of the inner crosspiece. According to the calculations, it should be 6mm (20.2-14.2=6), but for some reason I got 7.22.

Let’s move on to the tests.
First, I tried soldering it. The result was excellent. I soldered using only the flux in the solder itself. The joint looks good, and soldering is very easy: I simply picked up the solder, touched it with the iron, and got the result shown in the photo.

But soldering doesn’t actually prove anything. Nickel-plated steel would most likely solder just as easily.
Unfortunately, I’m no chemist who can identify a material within a minute or two of applying chemicals, so I’ll have to check it in a few other ways.
Method 1.
First, cut a piece about 110–120 cm long from each strip.

Then mark off one meter on each piece with a marker, leaving roughly equal “tails” at both ends.

Connect a variable power supply to the ends of the strip. You can also simply connect a load through the strip; you’ll just need to know the current flowing in the circuit, and will probably need an ammeter as well. A variable power supply is simply more convenient.
Connect the tester probes to the points marked earlier and apply current.
First I tested it at 1 A, then at 5 A. This gave me a voltage drop across the strip—in this case, 54.95 mV at 1 A. At 5 A, the strip starts heating up and the voltage rises. In general, the lower the current, the better, but then you need a voltmeter capable of measuring very low voltages, or a longer strip.
So the resistance of a one-meter piece of strip is almost 55 mΩ. If you use a different current, simply divide the measured voltage by the current. For example, if you get 123 mV at 0.45 A, then 0.123/0.45 = 0.273 Ω, or 273 mΩ.
I measured the resistance of the second piece in exactly the same way, though this time for slightly different reasons. I got 40.9 mΩ.

Just to double-check, I connected the meter I wrote about not long ago. Taking into account the measurement error of both the first test and the meter itself, we get practically the same values: 53.7 and 40.4 mΩ.

Now let’s convert the measured resistance to a cross-sectional area of 1 mm². The narrow strip was 0.2 mm thick and 8 mm wide, giving an area of 1.6 mm² (0.2 × 8 = 1.6). Multiply the resistance of 54–55 mΩ by 1.6, and we get 86.4–88 mΩ.
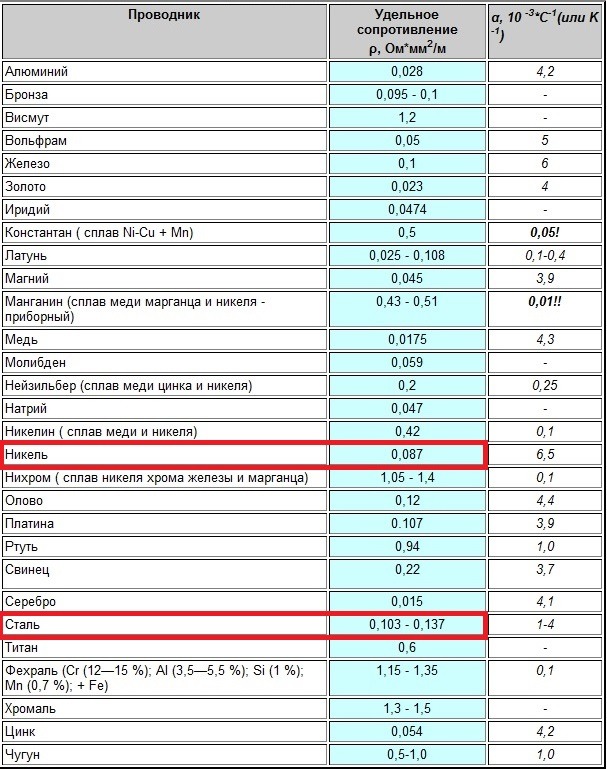
Looking at the table, we can see that nickel has a resistance of 87 mΩ per meter at a cross-sectional area of 1 mm², which matches the measurements above.
By the way, about the steel I mentioned earlier: the table gives a range of resistance values for it because steel is an alloy, so its resistance depends on what’s mixed into it.
Above, I also measured the resistance of the wider strip, but for a slightly different reason: I just wanted to find its cross-sectional area, since calculating it mathematically isn’t very convenient.
Nickel has a resistance of 87 mΩ, so with a measured resistance of 40.4 mΩ, the strip’s cross-sectional area is about 2.17 mm².
Method 2.
You can also check the material by its density.
For this, I cut exactly one-meter pieces from the previous “test subjects.” Luckily, they already had the marks I’d made before measuring their resistance.
Then I simply weighed them on my scales. They’re not perfect, of course, but accurate enough for this kind of measurement.

Next, we calculate the volume of the weighed strip. First, we convert the strip to a width of 10 mm: multiply 100 cm by the width of 0.79 cm, giving 79 cm at a strip width of 10 mm.
The strip is 0.2 mm thick. Multiply that by 79 and we get 1.58 cm, or 15.8 mm. That would be the thickness if we cut our 10 mm-wide strip into 10 mm-long pieces and stacked them together.
So now we divide the weight of 1 m of strip by 1.58 to get the density converted to 1 cm³.
13.93/1.58 = 8.816
According to information I found online, nickel has a density of 8.907. I got 8.816, which is a little lower, but measurement errors play a big role here, especially the strip’s thickness. In any case, this is clearly higher than the density of steel, which ranges from 7.7 to 7.9 g/cm³.

There’s also a third, relatively simple way to check, but I didn’t try it. Nickel is magnetic, but its Curie point is 358 degrees, while steel’s is over 800. So if you heat a nickel strip above 358 degrees, it will lose its magnetic properties.
I decided to end the experiments there, but my friend went further. He wanted to know how much pure metal he’d actually received. I didn’t try to remove the plastic spool, but he took the risk out of sheer curiosity.
It turned out to weigh about 65 grams. The spool weighed 1053 grams in total, so the net weight comes to 988 grams. Less than advertised, but not a big deal in my opinion.

But now the second pair of ordered spools has arrived. Shipping was also via DHL Express, which, for a 2 kg package, isn’t exactly cheap, as I understand it.
I ordered 0.1x5mm and 0.15x6mm strips. The rolls weighed 1070 and 1005 grams, respectively. The first was slightly overweight, the second underweight, averaging about 1 kg per roll.
Rather than haul all of this home and repeat the whole process, I simply asked them to cut me a couple of 120 cm pieces.

Next, I repeated the same test sequence, measuring resistance. I can note that at 5 A, the resistance of the 0.1x5mm strip starts to rise significantly. No surprise: at 5 A, it dissipates about 4 W, and although the strip doesn’t feel warm to the touch, its resistance increases.

The calculated cross-sectional areas of the first and second strips are 0.5 and 0.9 mm², respectively. The measured resistance is 153x0.5=77 mΩ for the first and 76.3x0.9=68.7 for the second, versus a nominal value of 87. Something doesn’t add up.

Let’s weigh them. Even a rough estimate shows that what we’re seeing isn’t quite what we should be. The strips have cross-sectional areas of 0.5 and 0.9 mm², but for some reason their weights differ by a factor of two.

We measure them and find that the first strip is the correct size, while the second is a full 7 mm wide instead of 6 mm. The seller doesn’t list a strip of this size; after 6 mm, the next size is 8 mm.
I kept waiting for the catch, because things never go this well: the price is right, shipping is by DHL, and the material is as described. As it turned out, one of the strips was made to the wrong width. It’s not a major problem, but when you calculate the strip’s length, it turns out there’s about 15% less of it.
And what about the calculations? The density is roughly as expected, but for some reason I measured resistance values even lower than specified: 76 mΩ for the first strip (0.1x5) and 73 for the second (0.15x7). In this case, I suspect measurement accuracy is to blame. The strip is very thin, so natural measurement errors are possible. Even a 0.01 mm error when measuring a thickness of 0.1 mm already means a 10% error, which is quite a lot.
But I can say with confidence that this isn’t nickel-plated steel: its density is higher than steel’s, its resistance is lower, and it doesn’t spring back.

The second part of the experiments took place at a friend’s workshop, where we decided to try spot-welding these strips to batteries.
We used five strips for the experiment: the four from the review, plus an extra, very narrow 0.1x4mm strip.

We also used a number of batteries, some new and some used. We welded 0.1 mm-thick strips to the smaller batteries, and 0.15 and 0.2 mm strips to the 18650s.

While we were getting ready, my friend showed me a little “trick” I hadn’t even thought of. The wide strip isn’t just designed for welding several batteries at once; its dimensions are also chosen to fit the battery holders I’ve already written about, so the strip sits neatly in the slots provided.

We did the welding with a machine using a controller from Yurok, which I helped assemble. We used different settings for each strip, depending on its thickness, the type of battery, and the material of its contacts.
The 0.1 mm-thick, 4 mm-wide strip ended up welded so firmly that it was extremely difficult to tear off.

The 0.1x5mm strip bought on AliExpress performed similarly.

The results were a little worse with the larger batteries and thicker strips; we managed to tear the strip off in one piece. But my friend explained why that happened. For a good weld, you need not only a machine that’s convenient to use, but also good pressure. Since the machine was just sitting on the table and I was filming at the same time, the result was a little worse than planned.
Still, we got the job done. For example, the photo shows a 6P1S pack.


At first I thought we should weld it as shown on the left, but my friend said the results are better if you position the contacts so the current flows along the line shown on the right.

Test videos. We tried welding the strips in sequence: 0.1x4, 0.1x5, 0.15x6(7), 0.12x8, and 0.15x27. At times, you can clearly see the spot welder lifting during welding. That’s what I mentioned above: welding under these conditions was extremely inconvenient, which had some effect on the results.
While I was at it, I decided to take a group photo of the tools used for the job. Each holder is designed for specific battery pack assemblies, power tools, radios, and even electric shavers. The clamp shown above is simply for working with long packs. What’s more, holders that look identical can also differ in their inner diameter, since the batteries need to fit snugly, and sometimes must be positioned in a specific way relative to one another.

That’s probably about it. I can say that, overall, the product fully matches the description, shipping was fast, the packaging was fine, and the price is clearly lower than buying it by the meter. The only thing that slightly spoiled the overall impression was an error in the width of one of the strips: it was 7 mm instead of 6 mm :(
Strips from the review - link
Wide strip, 0.5 kg - link
Wide strip, 1 m - link
Regular strip, cut into pieces - link
Single nickel tabs - link
Double nickel tabs - link
As usual, I’ll be happy to answer questions. I’ll explain what I can, and ask a friend about anything I don’t know.
$52.19 - 77.13 (за 1кг)
This page was found when searching for:
никелевая лента как работает, чем паять батарейки 18650, соединение никель кадмиевых аккумуляторов при помощи пластины, чем замотать вскрытый аккумулятор самоката, никелевая лента для пайки акб как пользоваться, допустимый ток для никелевой ленты, лента для аккумуляторов 0,2 12 мм, чем скрепляют аккумуляторы в сборках, какую ленту использовать в аккумуляторах шуруповерта, какой ток выдерживает никелевая лента 10мм 0.12, какой лентой спаять аккумуляторы в шуруповерте, чем стянуть аккумуляторную сборку, герметик для сборки аккумуляторов 18650, каким флюсом паять никелированную ленту , 2, оптимальный размер никелевой ленты для пайки аккумуляторов 18650, какие пластины лучше для сборки аккумулятора для электроинструмента, никелированная лента сварка или пайка, иожно ли припаять к аккумулятору никелевую ленту, какую никелевую ленту использовать для 18650, можно ли спаять никилевую ленту, Никелевые ленты или медные провода нужны для спайки элементов?, соединение аккумуляторов 18650 никелевыми, как приварить никелевую ленту самодельной сваркой, какакая лента нужна для сварки аккумуляторов в шуруповерте, никелевая лента для аккумуляторов, как соединить аккумуляторы, лента для соединения аккумуляторов
никелевая лента как работает, чем паять батарейки 18650, соединение никель кадмиевых аккумуляторов при помощи пластины, чем замотать вскрытый аккумулятор самоката, никелевая лента для пайки акб как пользоваться, допустимый ток для никелевой ленты, лента для аккумуляторов 0,2 12 мм, чем скрепляют аккумуляторы в сборках, какую ленту использовать в аккумуляторах шуруповерта, какой ток выдерживает никелевая лента 10мм 0.12, какой лентой спаять аккумуляторы в шуруповерте, чем стянуть аккумуляторную сборку, герметик для сборки аккумуляторов 18650, каким флюсом паять никелированную ленту , 2, оптимальный размер никелевой ленты для пайки аккумуляторов 18650, какие пластины лучше для сборки аккумулятора для электроинструмента, никелированная лента сварка или пайка, иожно ли припаять к аккумулятору никелевую ленту, какую никелевую ленту использовать для 18650, можно ли спаять никилевую ленту, Никелевые ленты или медные провода нужны для спайки элементов?, соединение аккумуляторов 18650 никелевыми, как приварить никелевую ленту самодельной сваркой, какакая лента нужна для сварки аккумуляторов в шуруповерте, никелевая лента для аккумуляторов, как соединить аккумуляторы, лента для соединения аккумуляторов
The figures from this review are in the measurement database: Other devices
Calculate manuallyAll calculators
Discounted products
You may be interested in


Discounted products
Support the project
All the content on the site and the advice are free, but we’d be grateful for your support of the project and the channel!
Comments23
Discuss on the forumHave a question or some experience to share? Discuss the article with the author and readers: the forum is a convenient place to share schematics and photos.
Go to the forumOnly registered readers can comment. It takes a minute to sign up, and you can log in with the same account you use on the forum.
Log inRegister
Comments are published in their original language.