
Small FNIRSI DSO510 Oscilloscope + Generator
$34.91
To stay up to date with new posts on the blog, I recommend following me on Instagram. I'll post notifications about every new article there, and might also write about something interesting from time to time - link to my account
You can also subscribe to updates and new articles on the Telegram channel - https://t.me/KirichBlog
Many years ago, I reviewed a kit that you could use to build a very basic oscilloscope. I think its bandwidth went up to 200 kHz. I also reviewed a ready-made basic oscilloscope with a maximum frequency of, I think, 1 MHz, and something told me that for $30 I probably wouldn't get anything dramatically better. But it turned out to be not so bad after all.
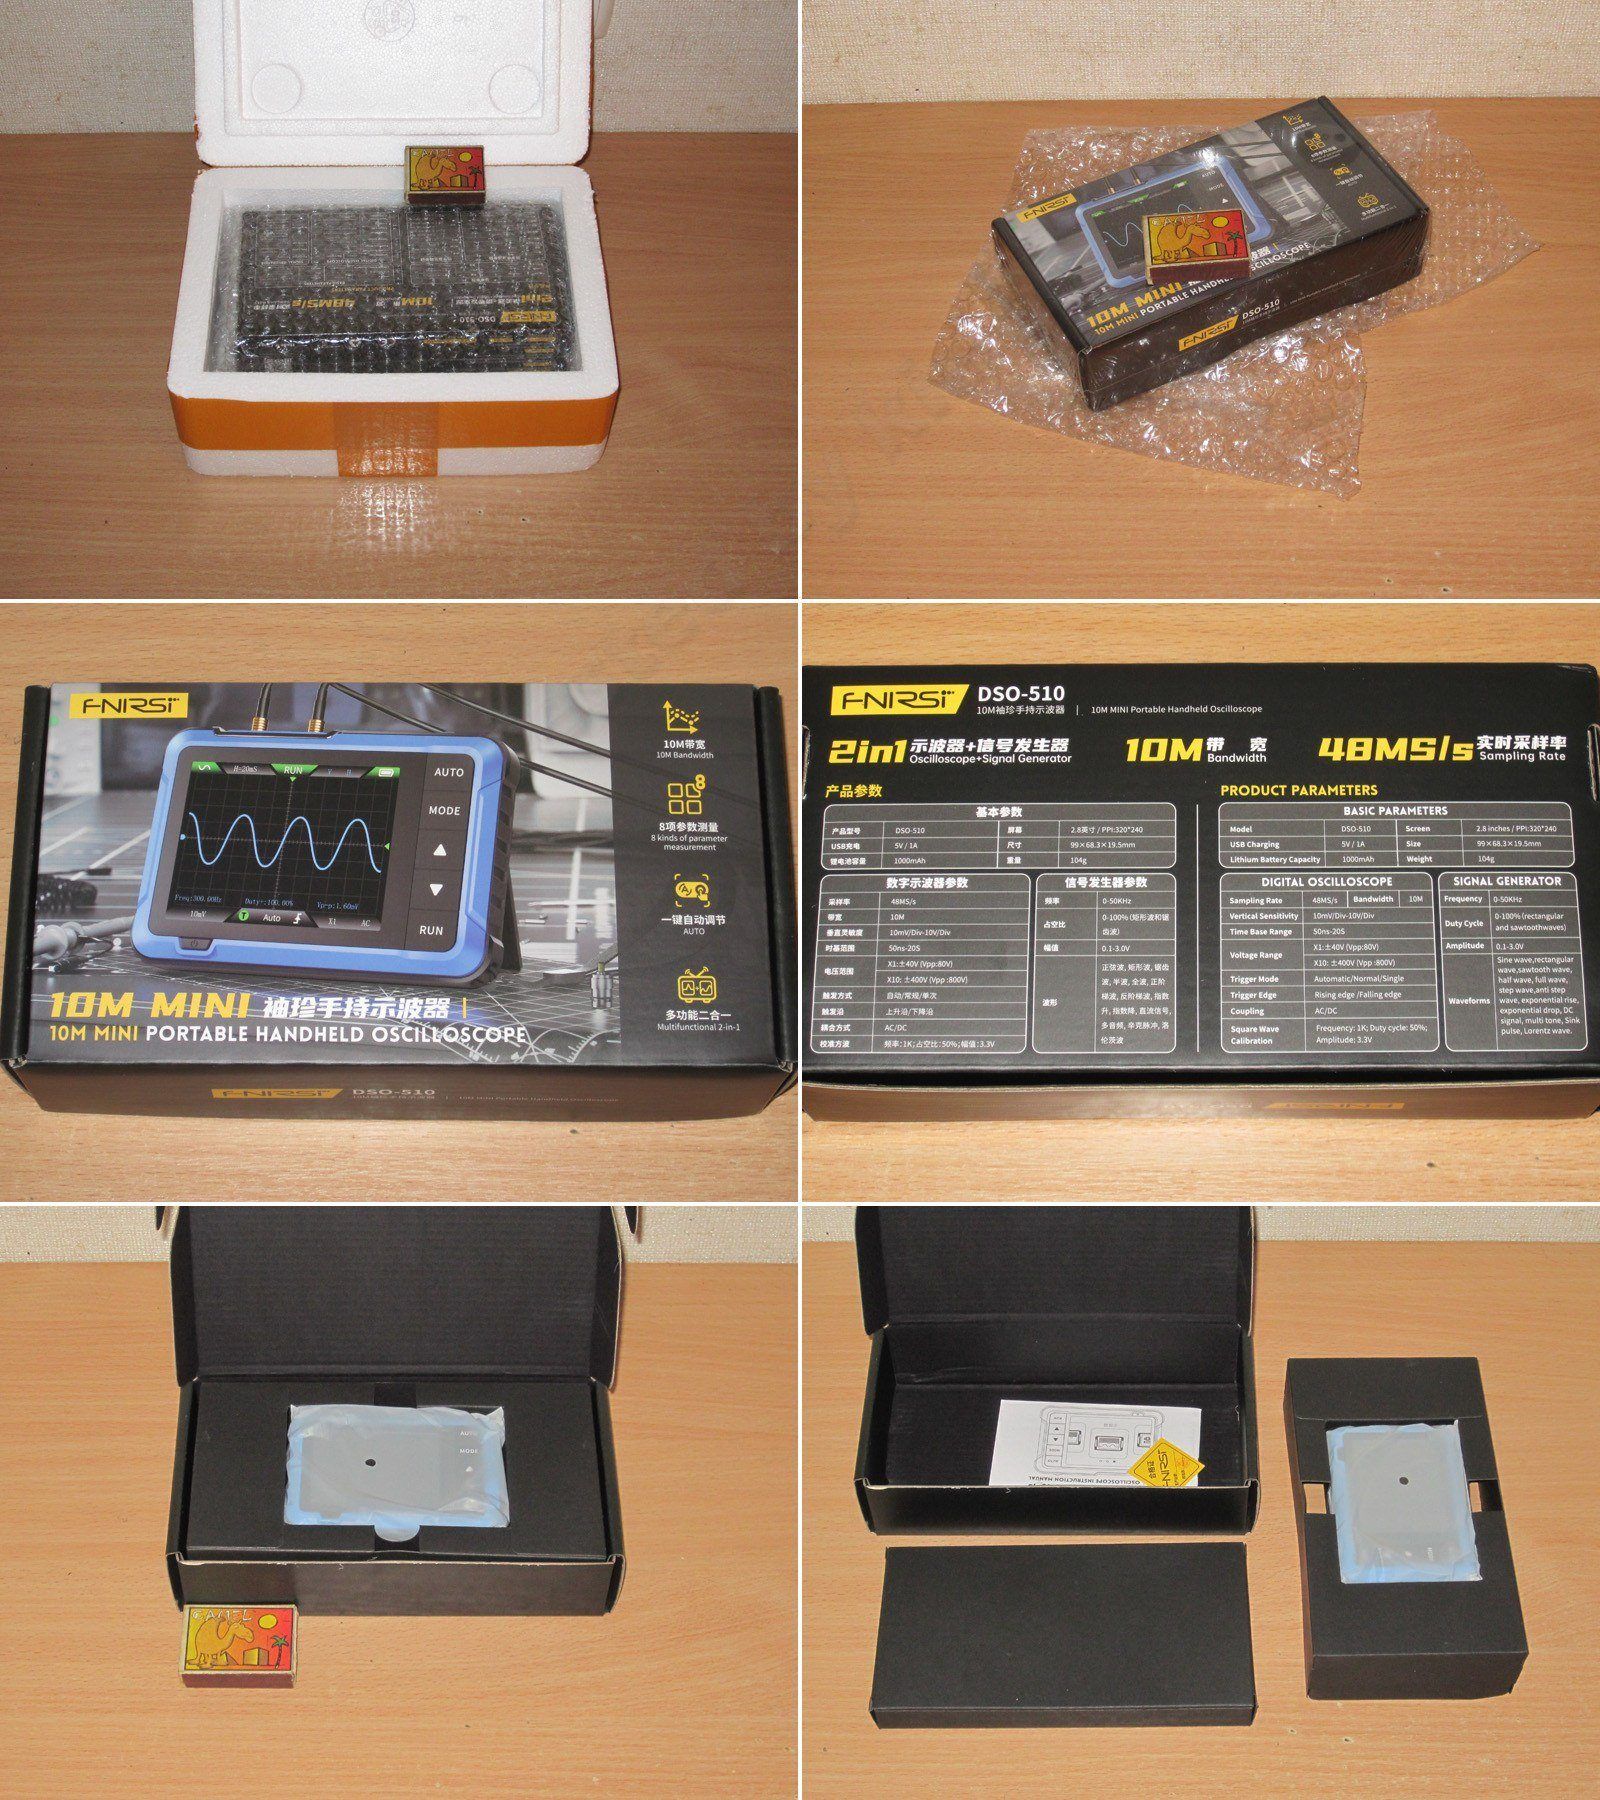
The order arrived in a large Styrofoam box, which contained a relatively large cardboard box, which in turn held a very small device. So the chances of it getting damaged in transit are close to zero.
The box shows what it looks like and lists all the main specs and features. Overall, I have no complaints here.
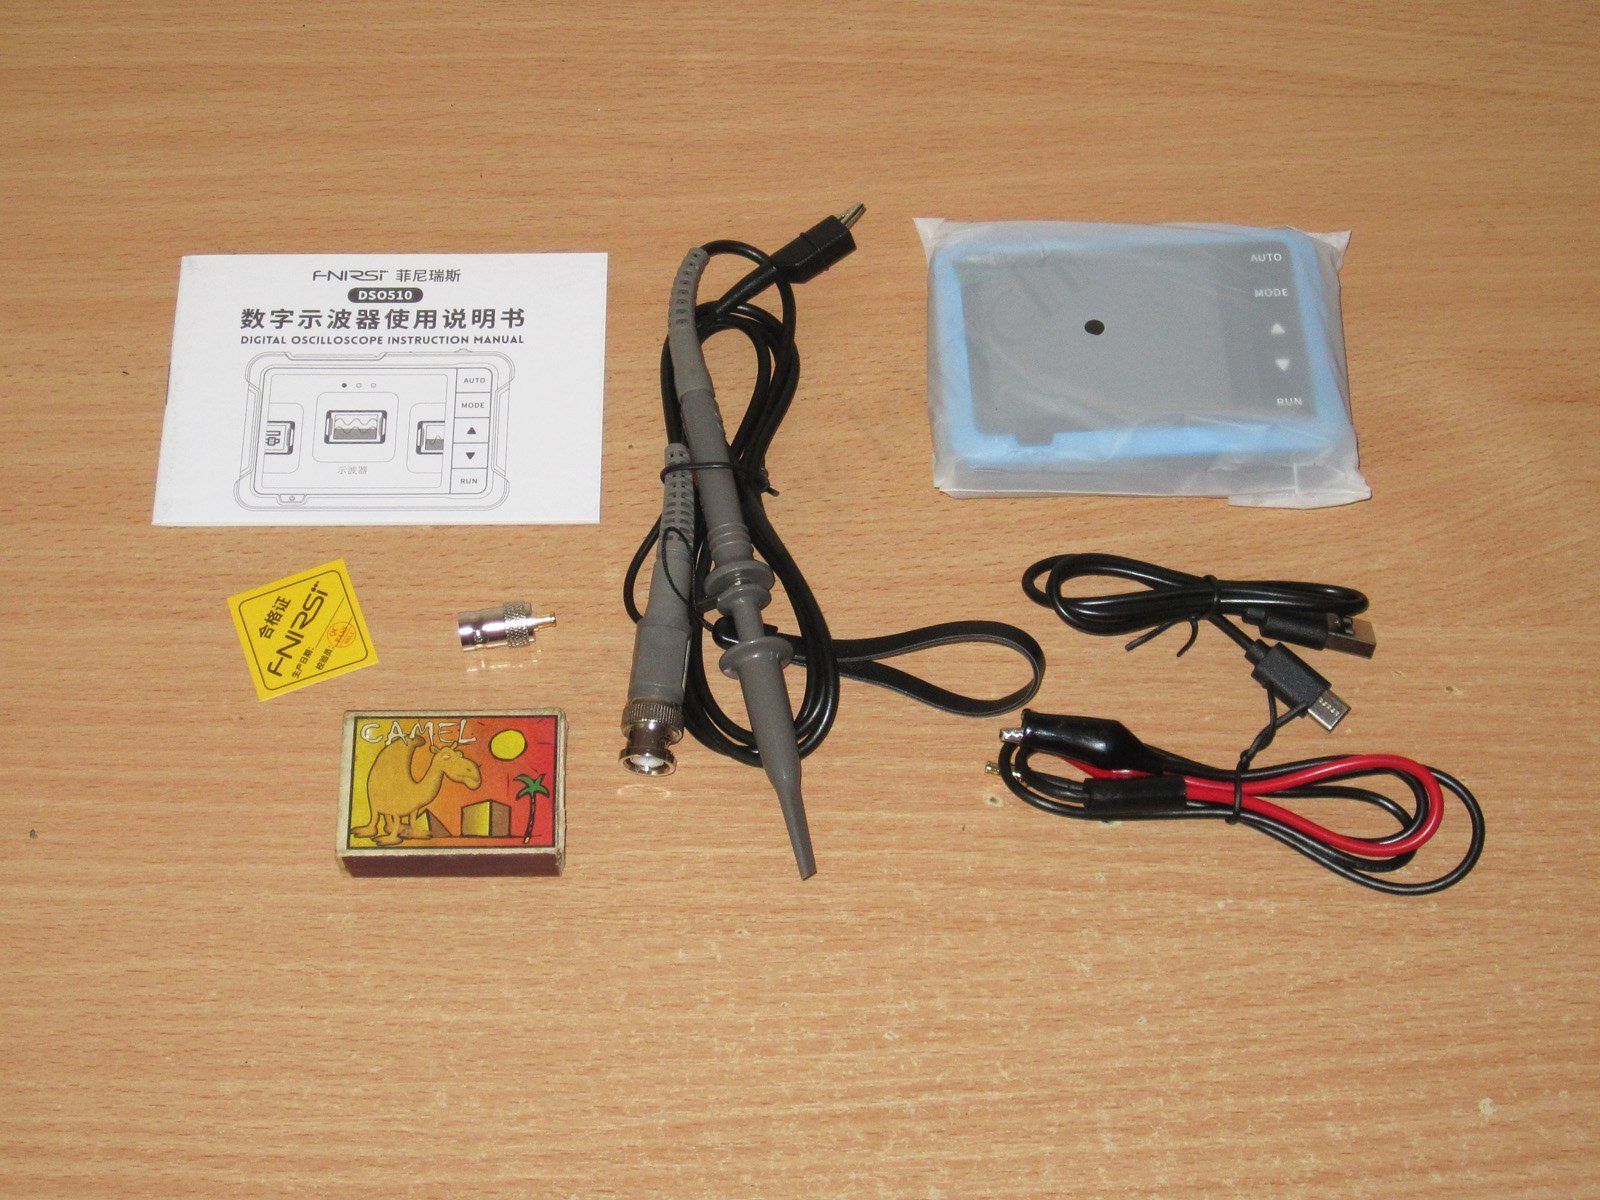
The package includes:
1. DSO510 oscilloscope
2. Manual
3. Oscilloscope probe
4. Test leads with alligator clips
5. USB charging cable
6. BNC-MCX adapter
7. Wrist strap
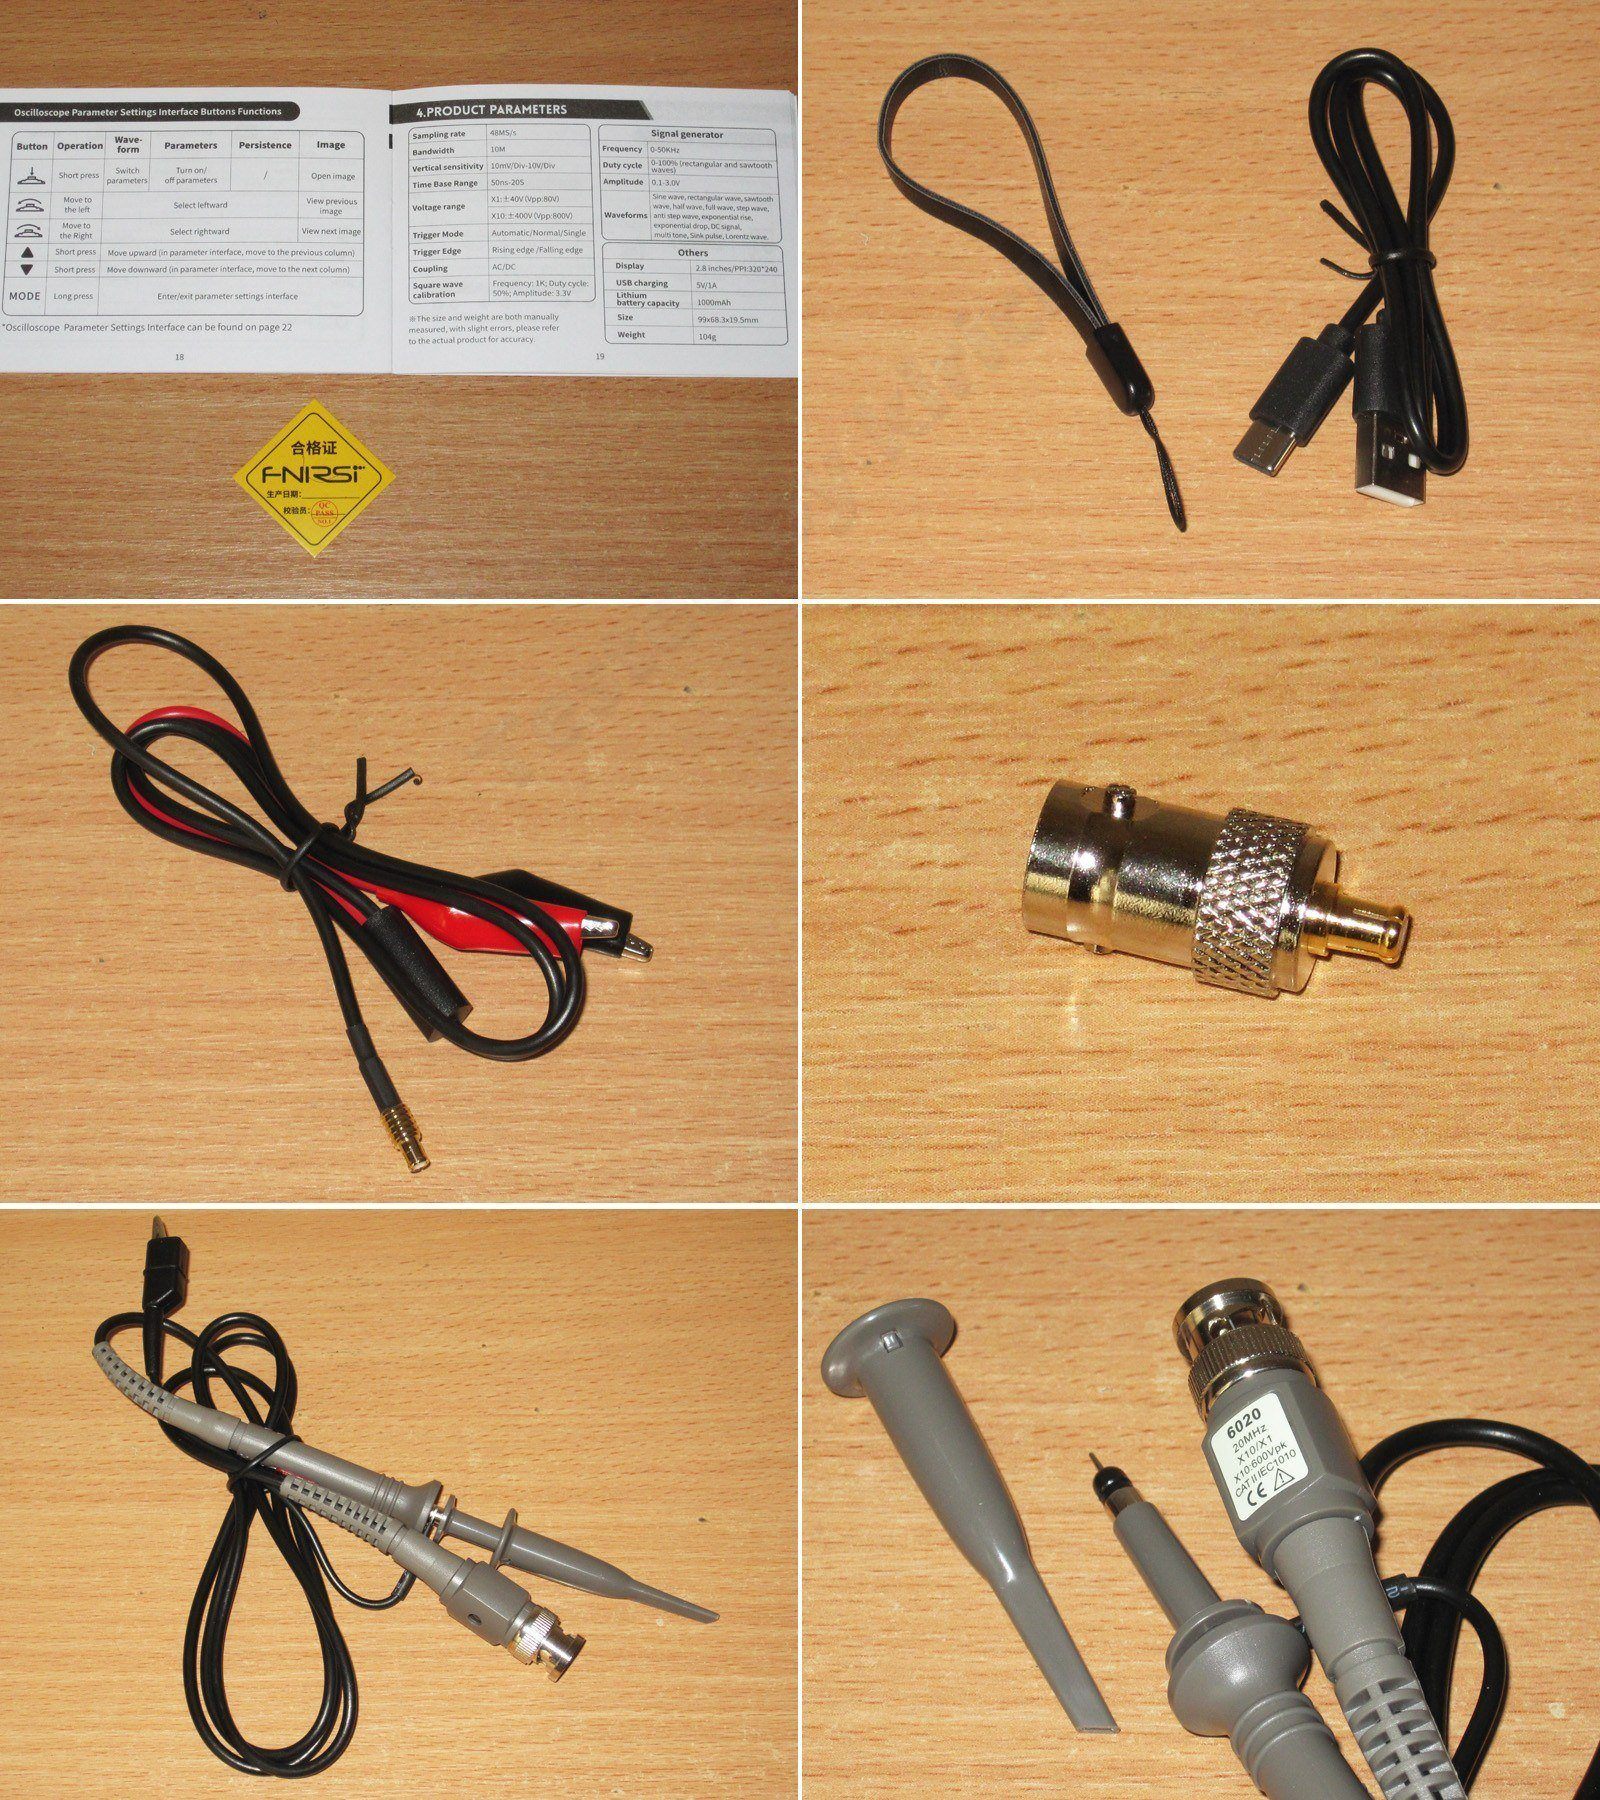
1. The manual is in Chinese and English and includes illustrations. You should be able to figure things out even with only a basic grasp of the language.
2. A wrist strap for carrying the oscilloscope on your wrist and a charging cable—nothing unusual.
3. Test leads with alligator clips. Handy, but probably not suitable for high frequencies; they can be very useful in some situations.
4. BNC-MCX adapter. The included probe is a standard one with a BNC connector, so you need an adapter to connect it to the oscilloscope. You'll also need it to connect cables with BNC connectors, so don't lose it—it's essential.
5, 6. The probe is nothing unusual either, just a typical one, rated for frequencies up to 20 MHz. It has an attenuation switch, and in the 10× mode the maximum voltage for the probe is 600 V.
And here's the device itself. Yes, calling it a measuring instrument would probably be inaccurate, while “display box” sounds a bit harsh, so let's just call it a little device.
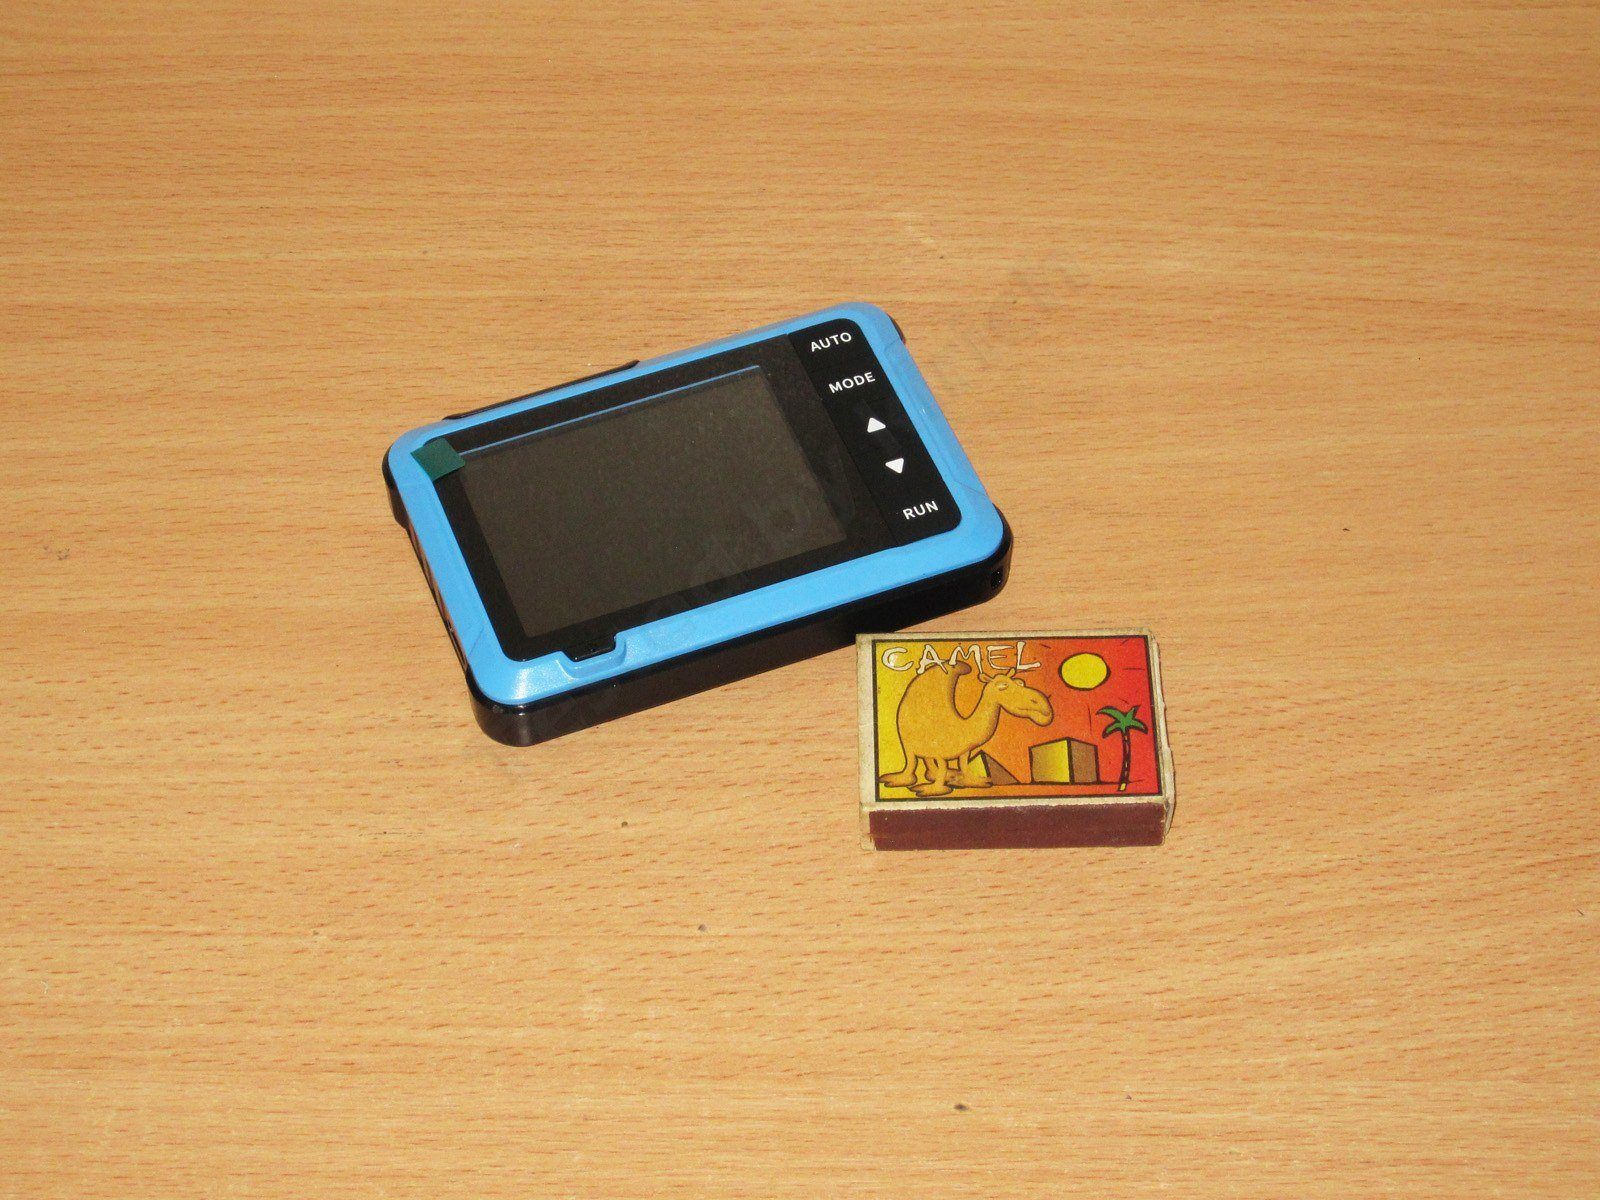
I have to say, it may not look stylish, but the device is neatly made and feels nice in the hand. The power button is at the bottom left, with the control buttons on the right. They have a nice, crisp click. The display is 2.8 inches and takes up most of the front panel, if you can call it that.
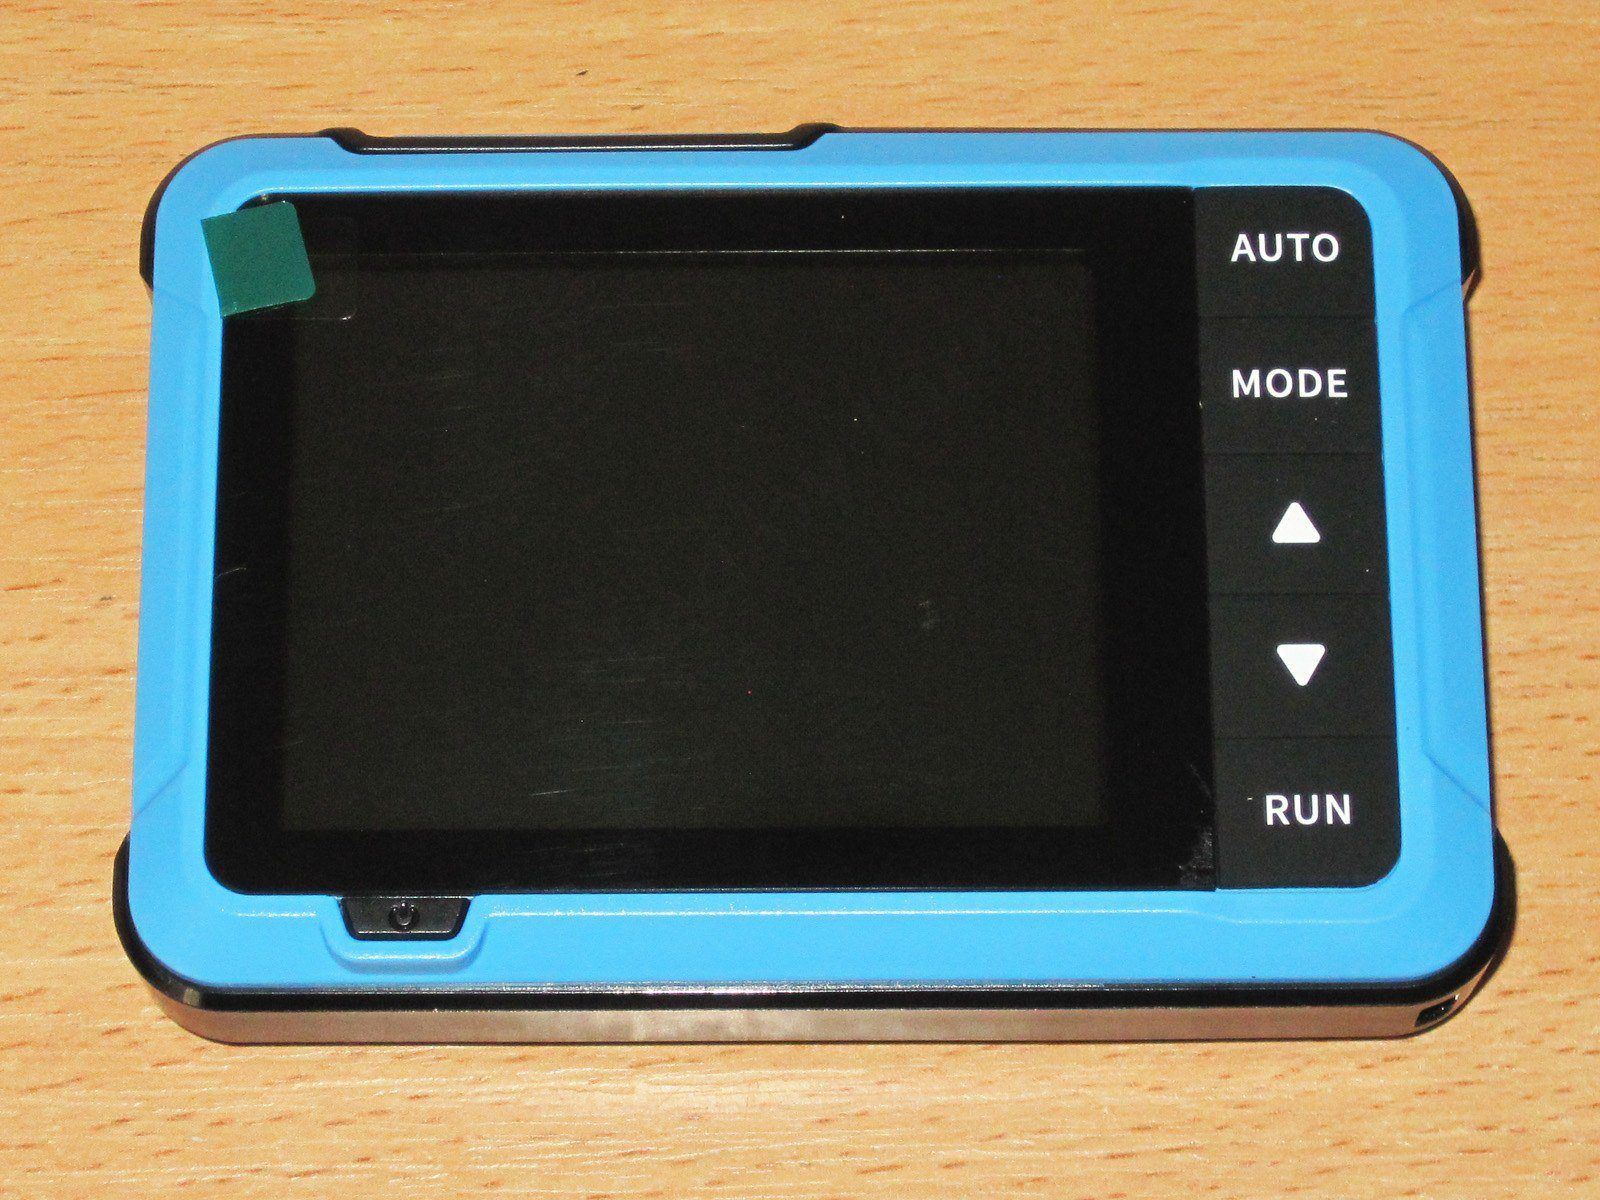
The product page describes the control buttons, but to get ahead of myself, I’ll say that the description is sparse. Also, the controls aren’t always intuitive, especially in the menus, where you navigate with the up/down buttons but make selections with the joystick.
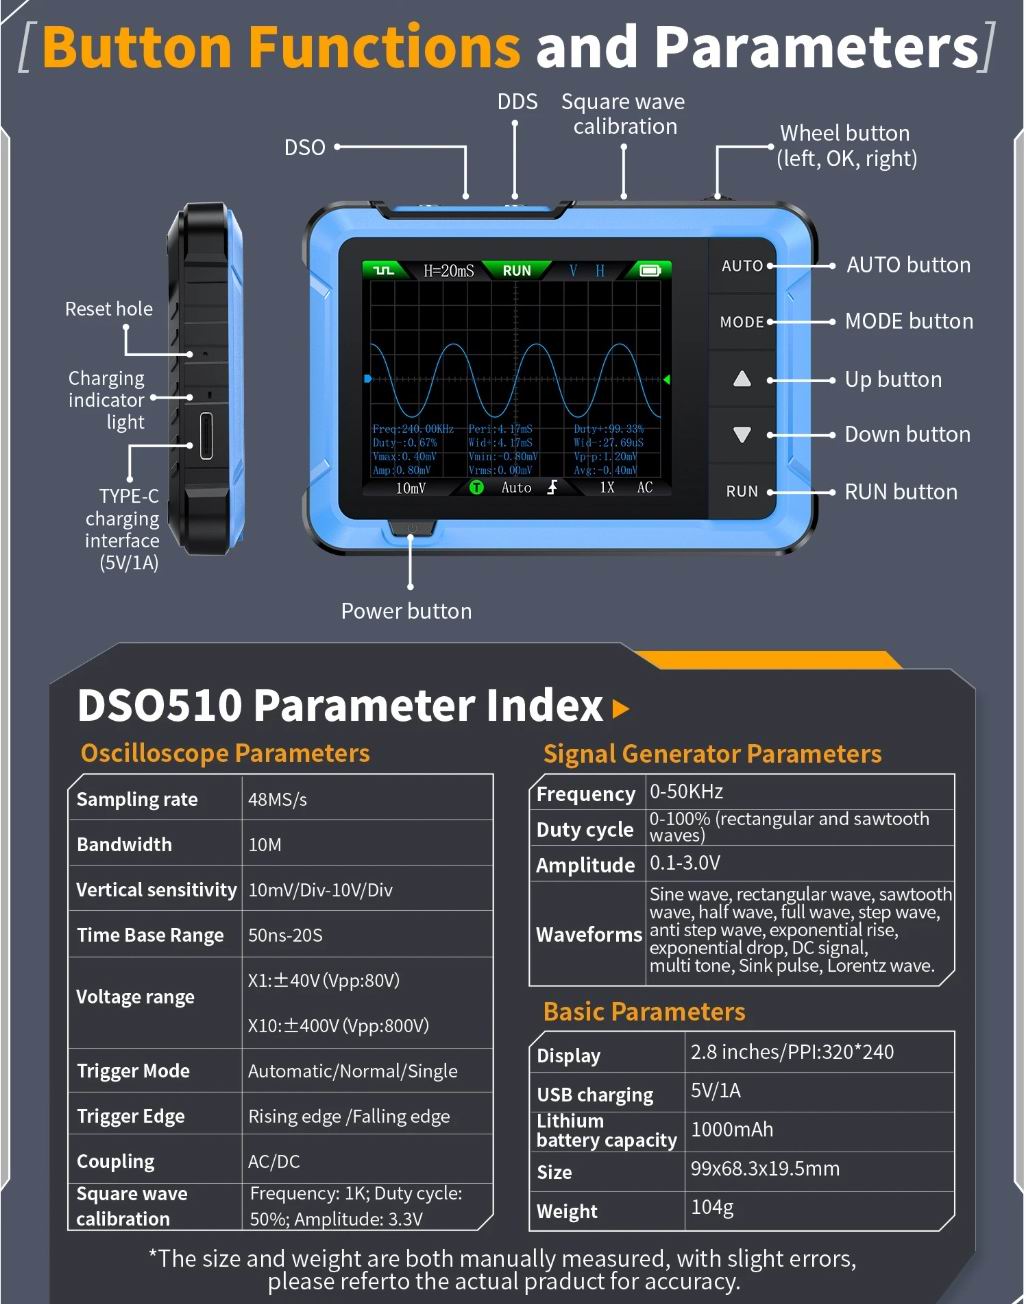
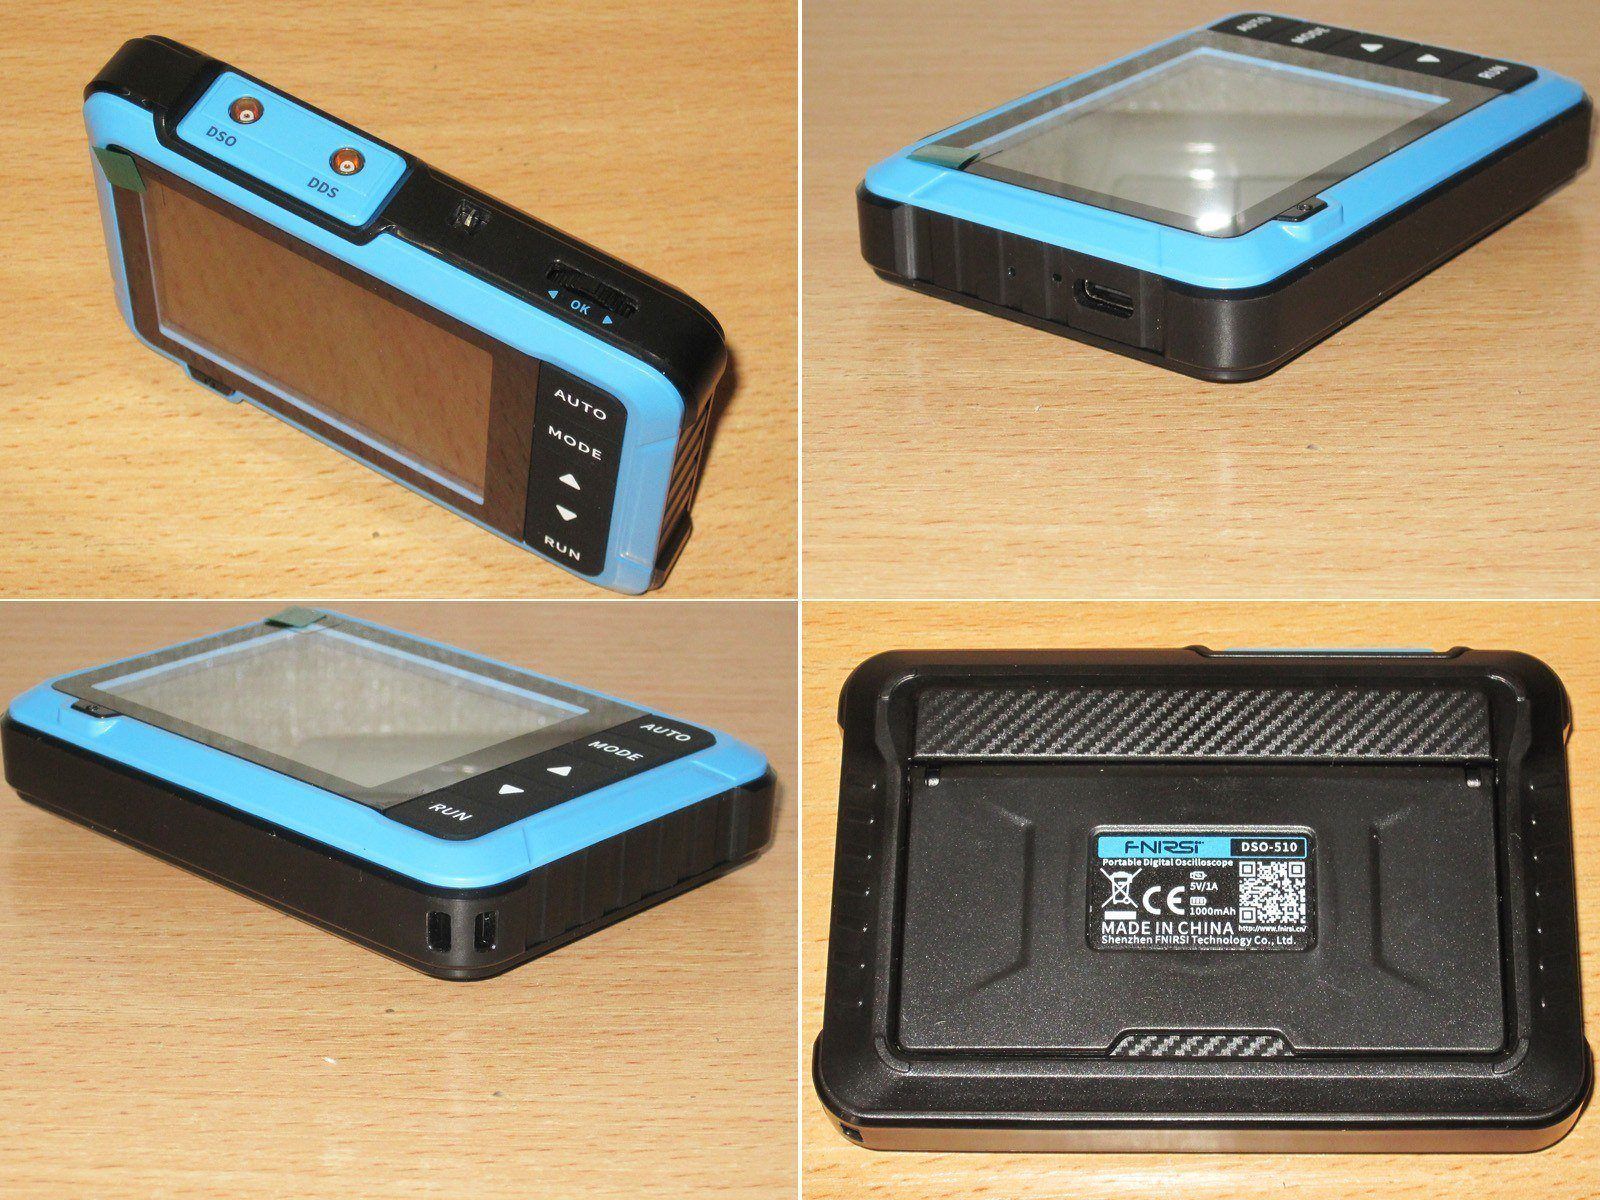
The top edge has the oscilloscope input, generator output, a test-signal terminal for probe adjustment, and another control: a joystick that essentially moves left and right and has a button.
The left edge has a reset-button hole, a charging indicator, and a USB-C port, used both to charge the battery and to transfer screenshots and update the firmware.
There’s a lanyard hole at the bottom right.
Nothing interesting on the bottom, just a little sticker with the model number.
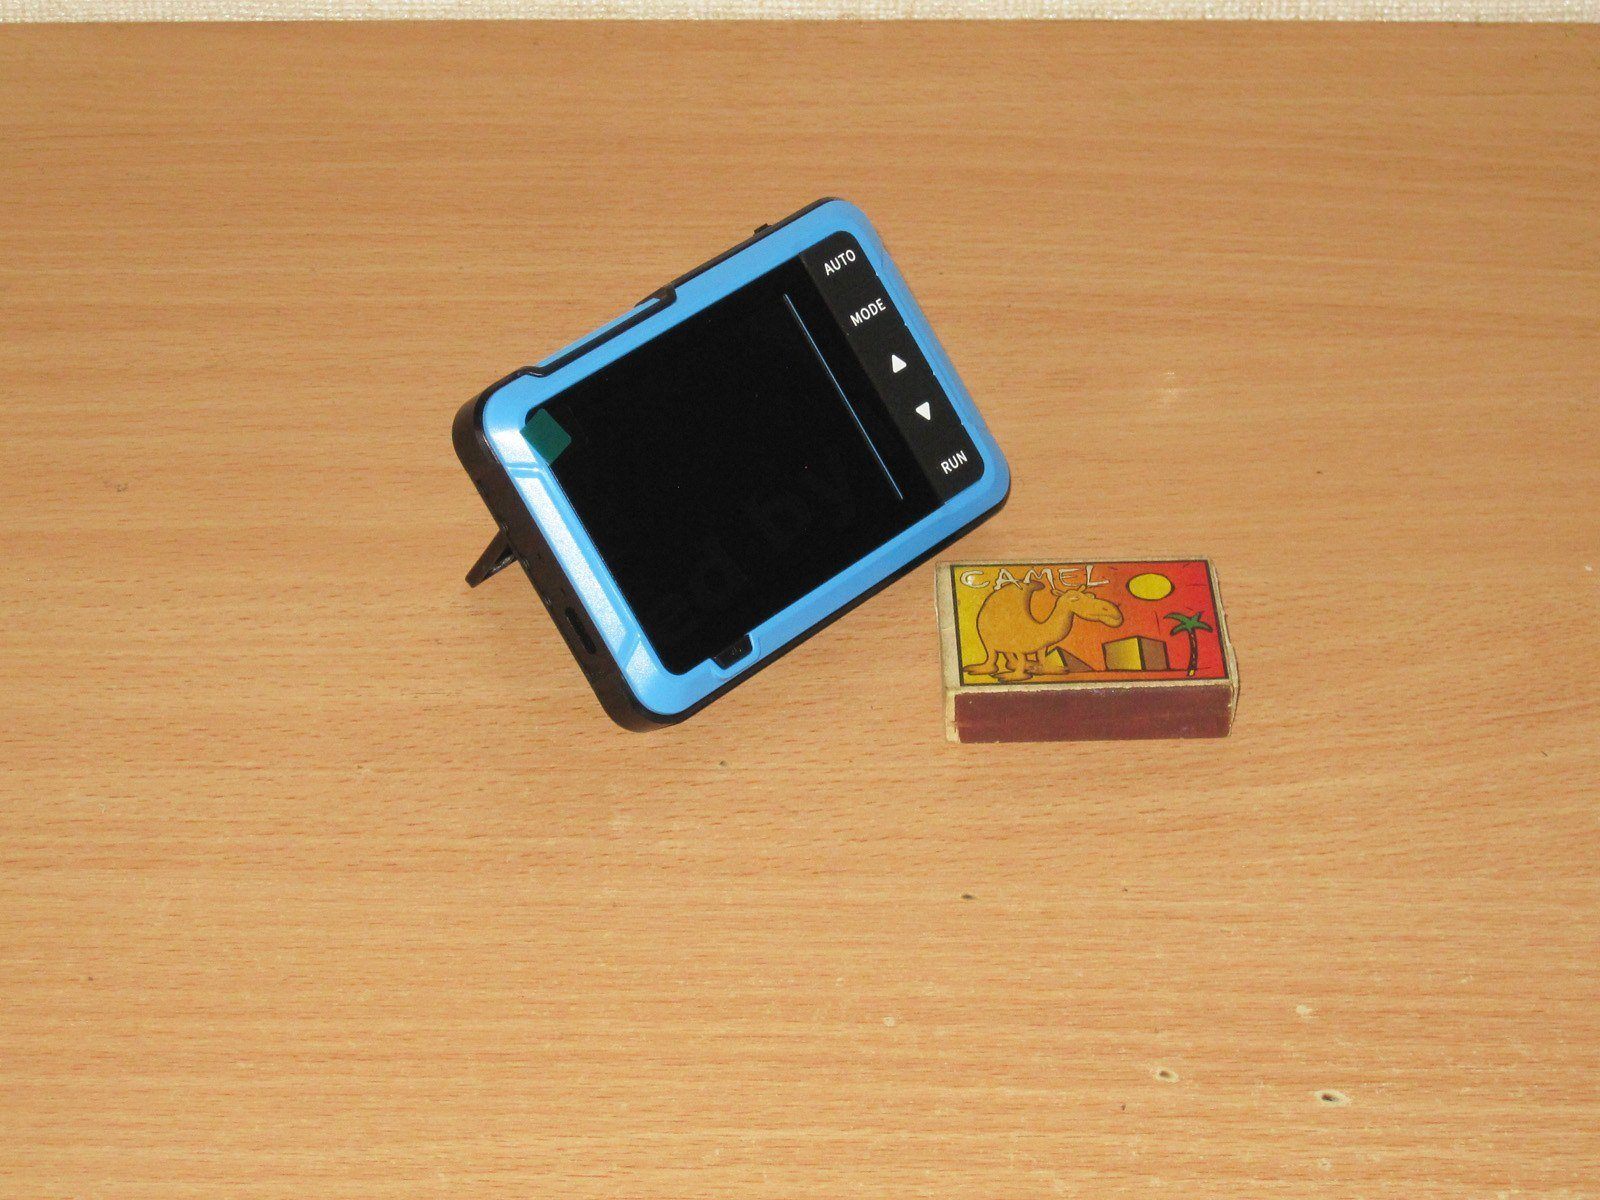
But the description says there’s also a stand on the bottom :)

And yes, it has a very handy stand—or rather, a kickstand. I really missed having one on the DS-203. Seriously, good job adding it.
There are actually three models in this lineup. They’re very similar, but the one I’m reviewing is the “top” model. Looking at the specs and prices, I can already say there’s no point even considering the others.
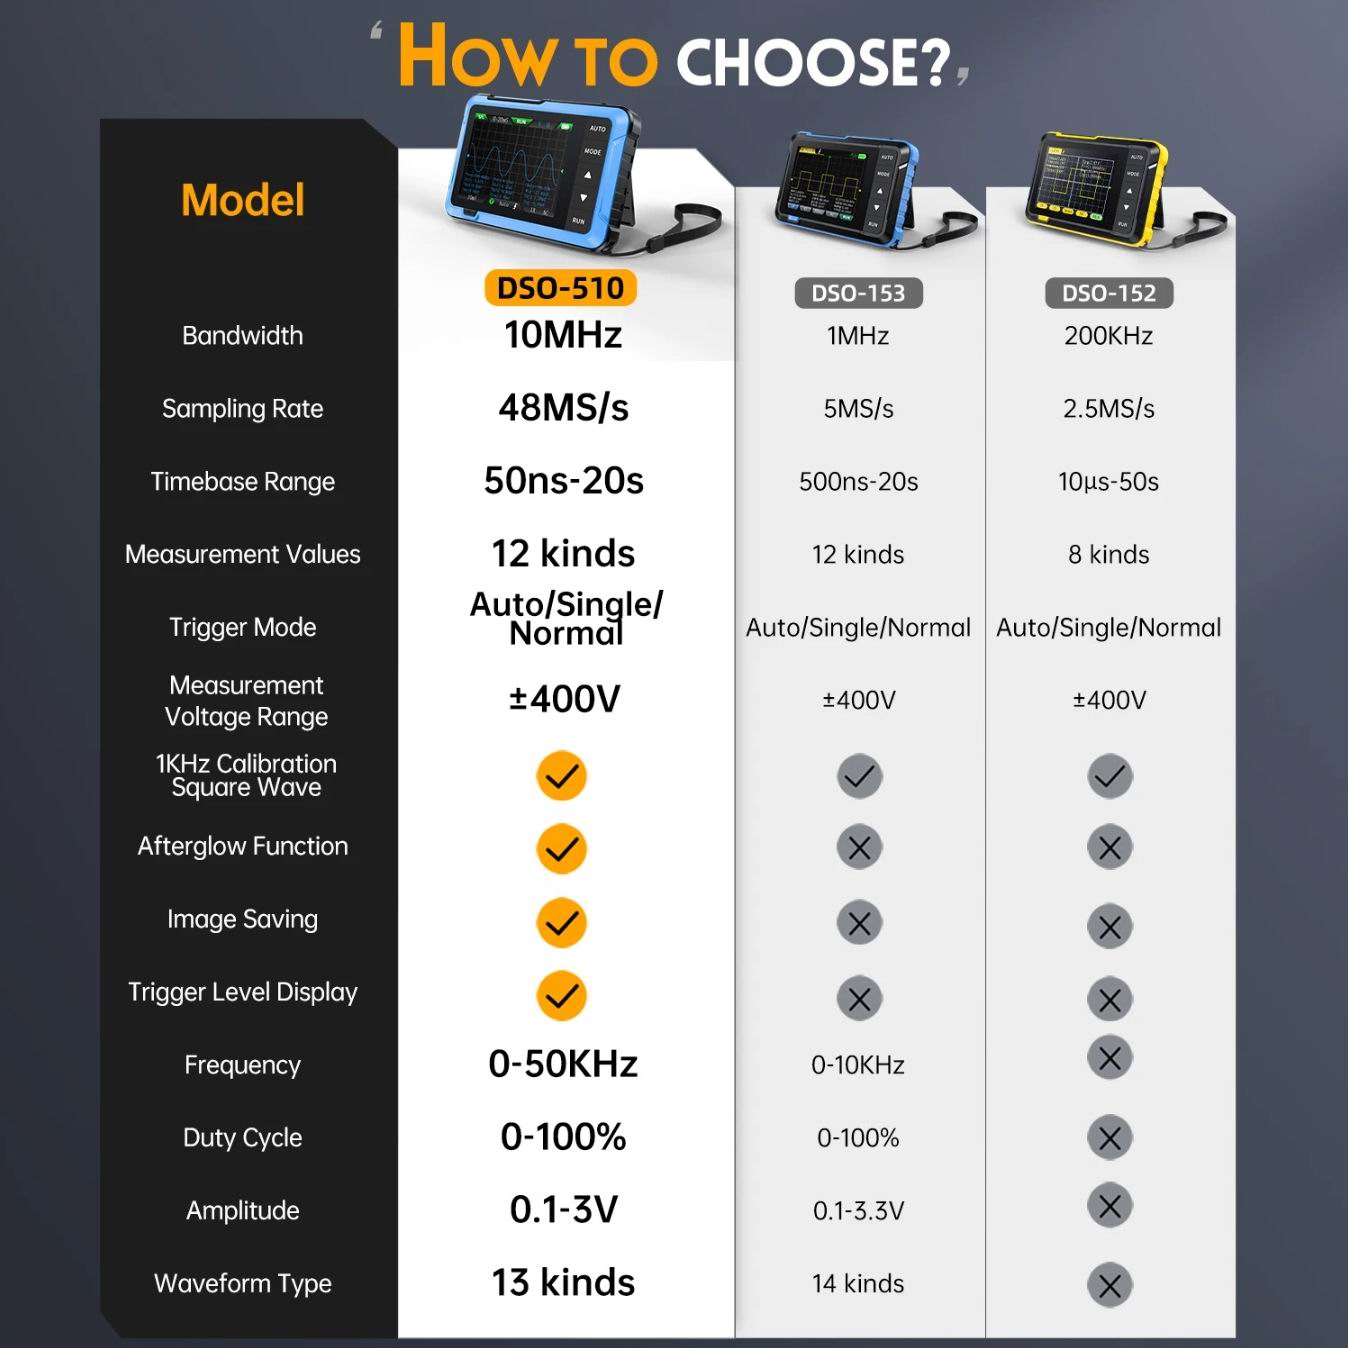
Advertised specifications:
DSO510 2 IN 1 —— 10MHz Bandwidth
* Mini Oscilloscope *
Channel:1
Sampling rate:48MSa/s
Vertical sensitivity:10mV/Div-20V/Div(Progress according to the 1-2-5 way)
Time base range:50ns/Div-20s/Div(Progress according to the 1-2-5 way)
Voltage range:X1:士40V (Vpp:80V) X10: 士400V (Vpp :800V)
Trigger method:Auto / Normal / Single
Coupling method:AC/DC
* Signal generator *
Frequency:0-50KHz
Duty cycle:0-100% (rectangular and sawtooth waves)
Amplitude:0.1-3.0V
Waveforms:Sine wave, rectangular wave, sawtooth wave, half wave, full wave, step wave, anti step wave, exponential rise, exponential drop, DC signal,
multi tone, Sink pulse, Lorentz wave.
* Other Parameters *
Display:2.8 inches/PPI:320*240
USB charging:5V/1A
Lithium battery capacity:1000mAh
Size:99x68.3x19.5mm
Weight:104g
All right, let’s turn it on and take a look. I have to say, the screen is good—not exactly premium, but bright enough, sharp, and with good viewing angles.
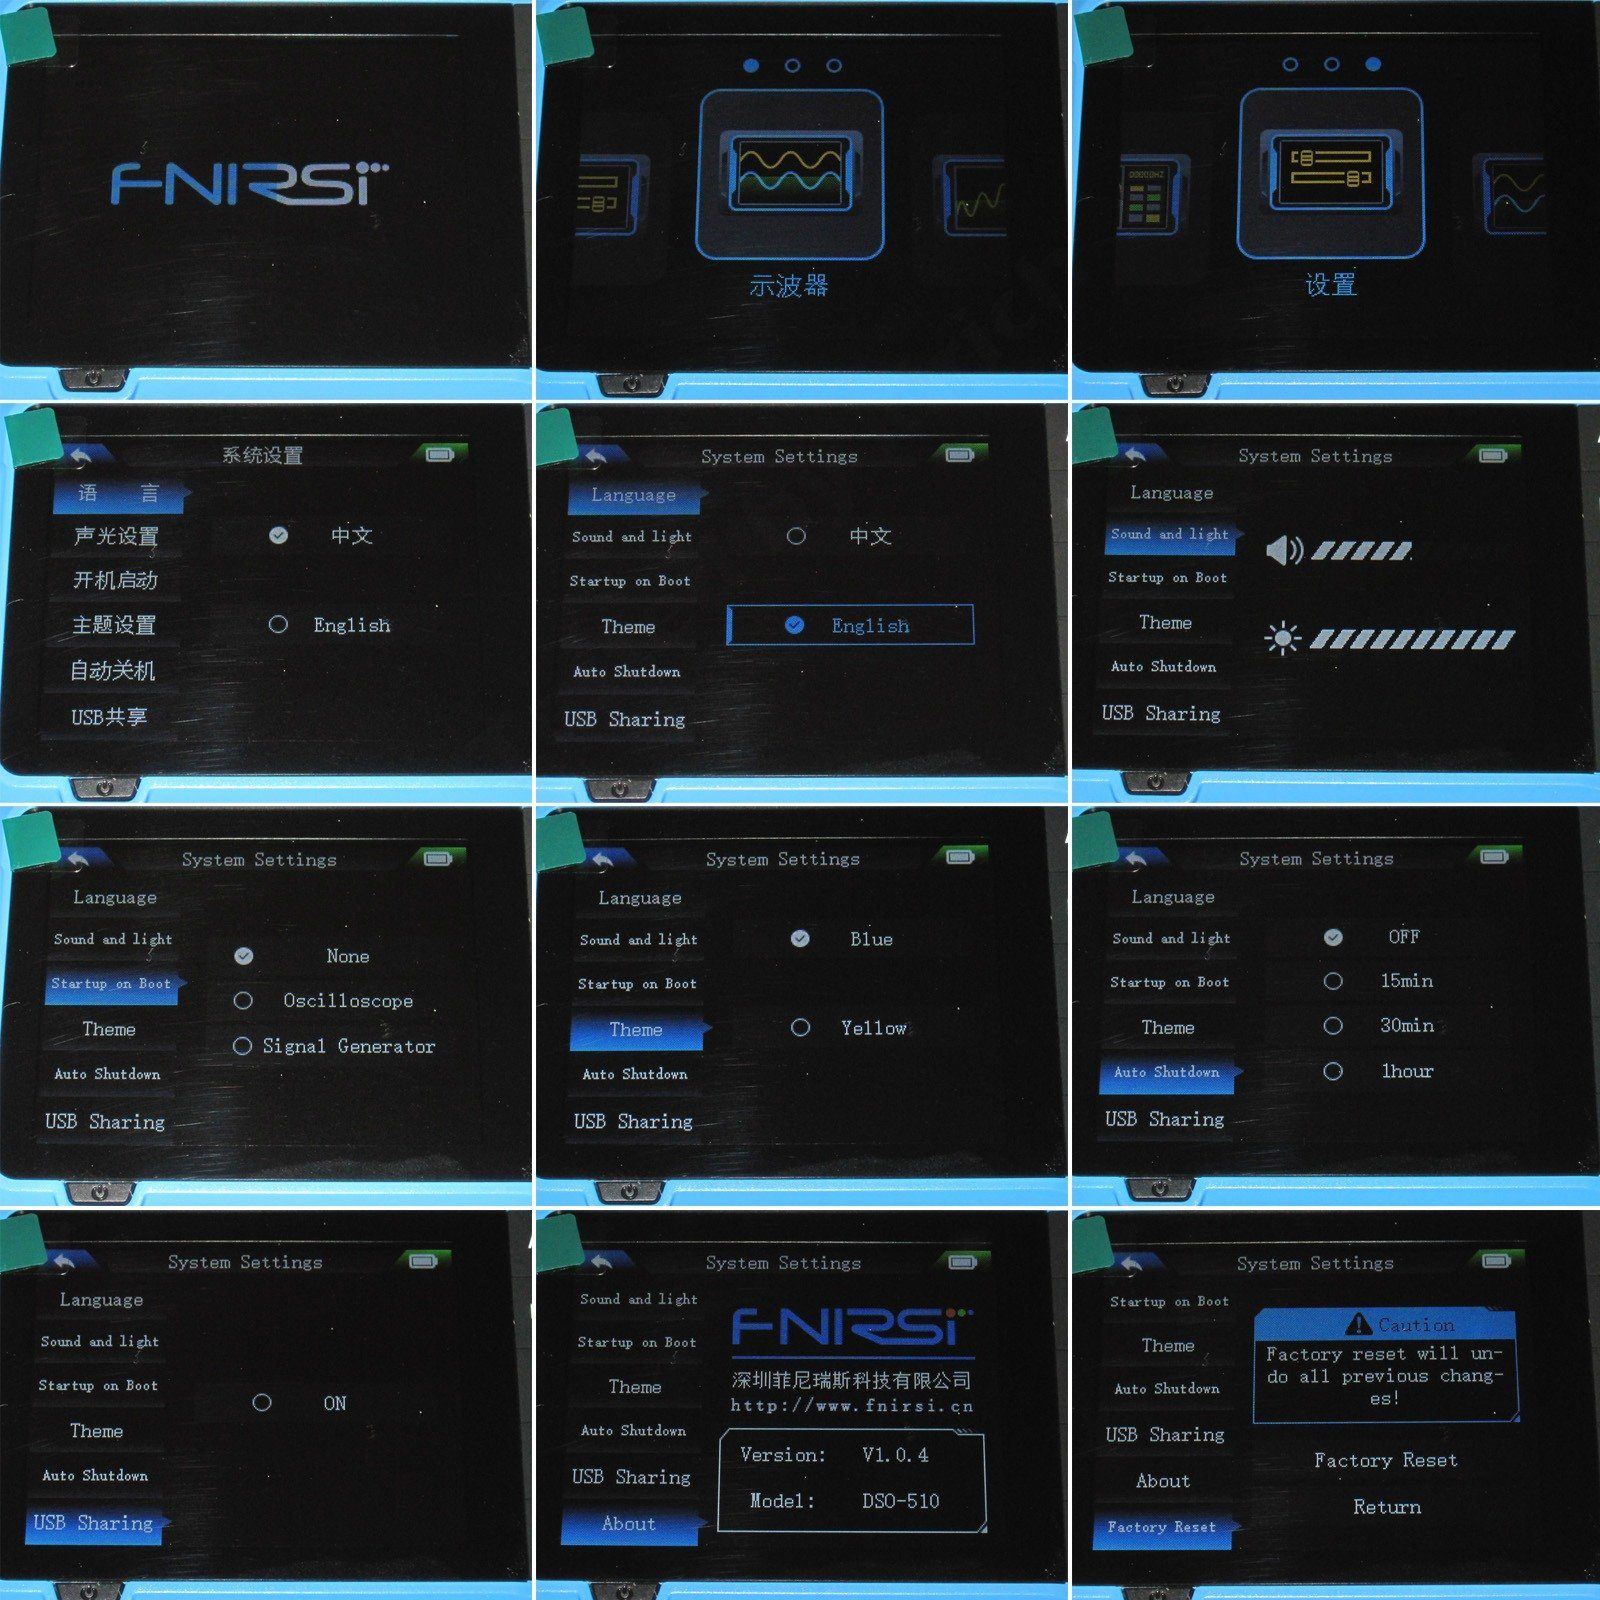
First, we’re greeted by an animated splash screen with the manufacturer’s logo.
Then there was a language selection window, but it only appears on the first boot. So on the second boot, I went straight to the Chinese menu that was set by default.
From there, it’s pretty straightforward: go into Settings (move the joystick left/right) and you land right on the language selection option. Kudos for that, since finding your way through a Chinese menu would be a pain.
Next, select the language (press the joystick button, then use the up/down buttons). Just give it a try and you’ll figure it out :)
Since we’re here, let’s see what’s on offer:
1. Language selection
2. Buzzer volume and display brightness
3. Select what starts by default: nothing, the oscilloscope, or the generator
4. Visual theme. I didn’t even try it; the default one is more than good enough.
5. Auto power-off
6. Transfer screenshots to a computer. If you select this while connected to a PC, you’ll be asked to disconnect and reconnect, and a folder with the screenshots will appear.
7. Manufacturer information and firmware version
8. Factory reset.
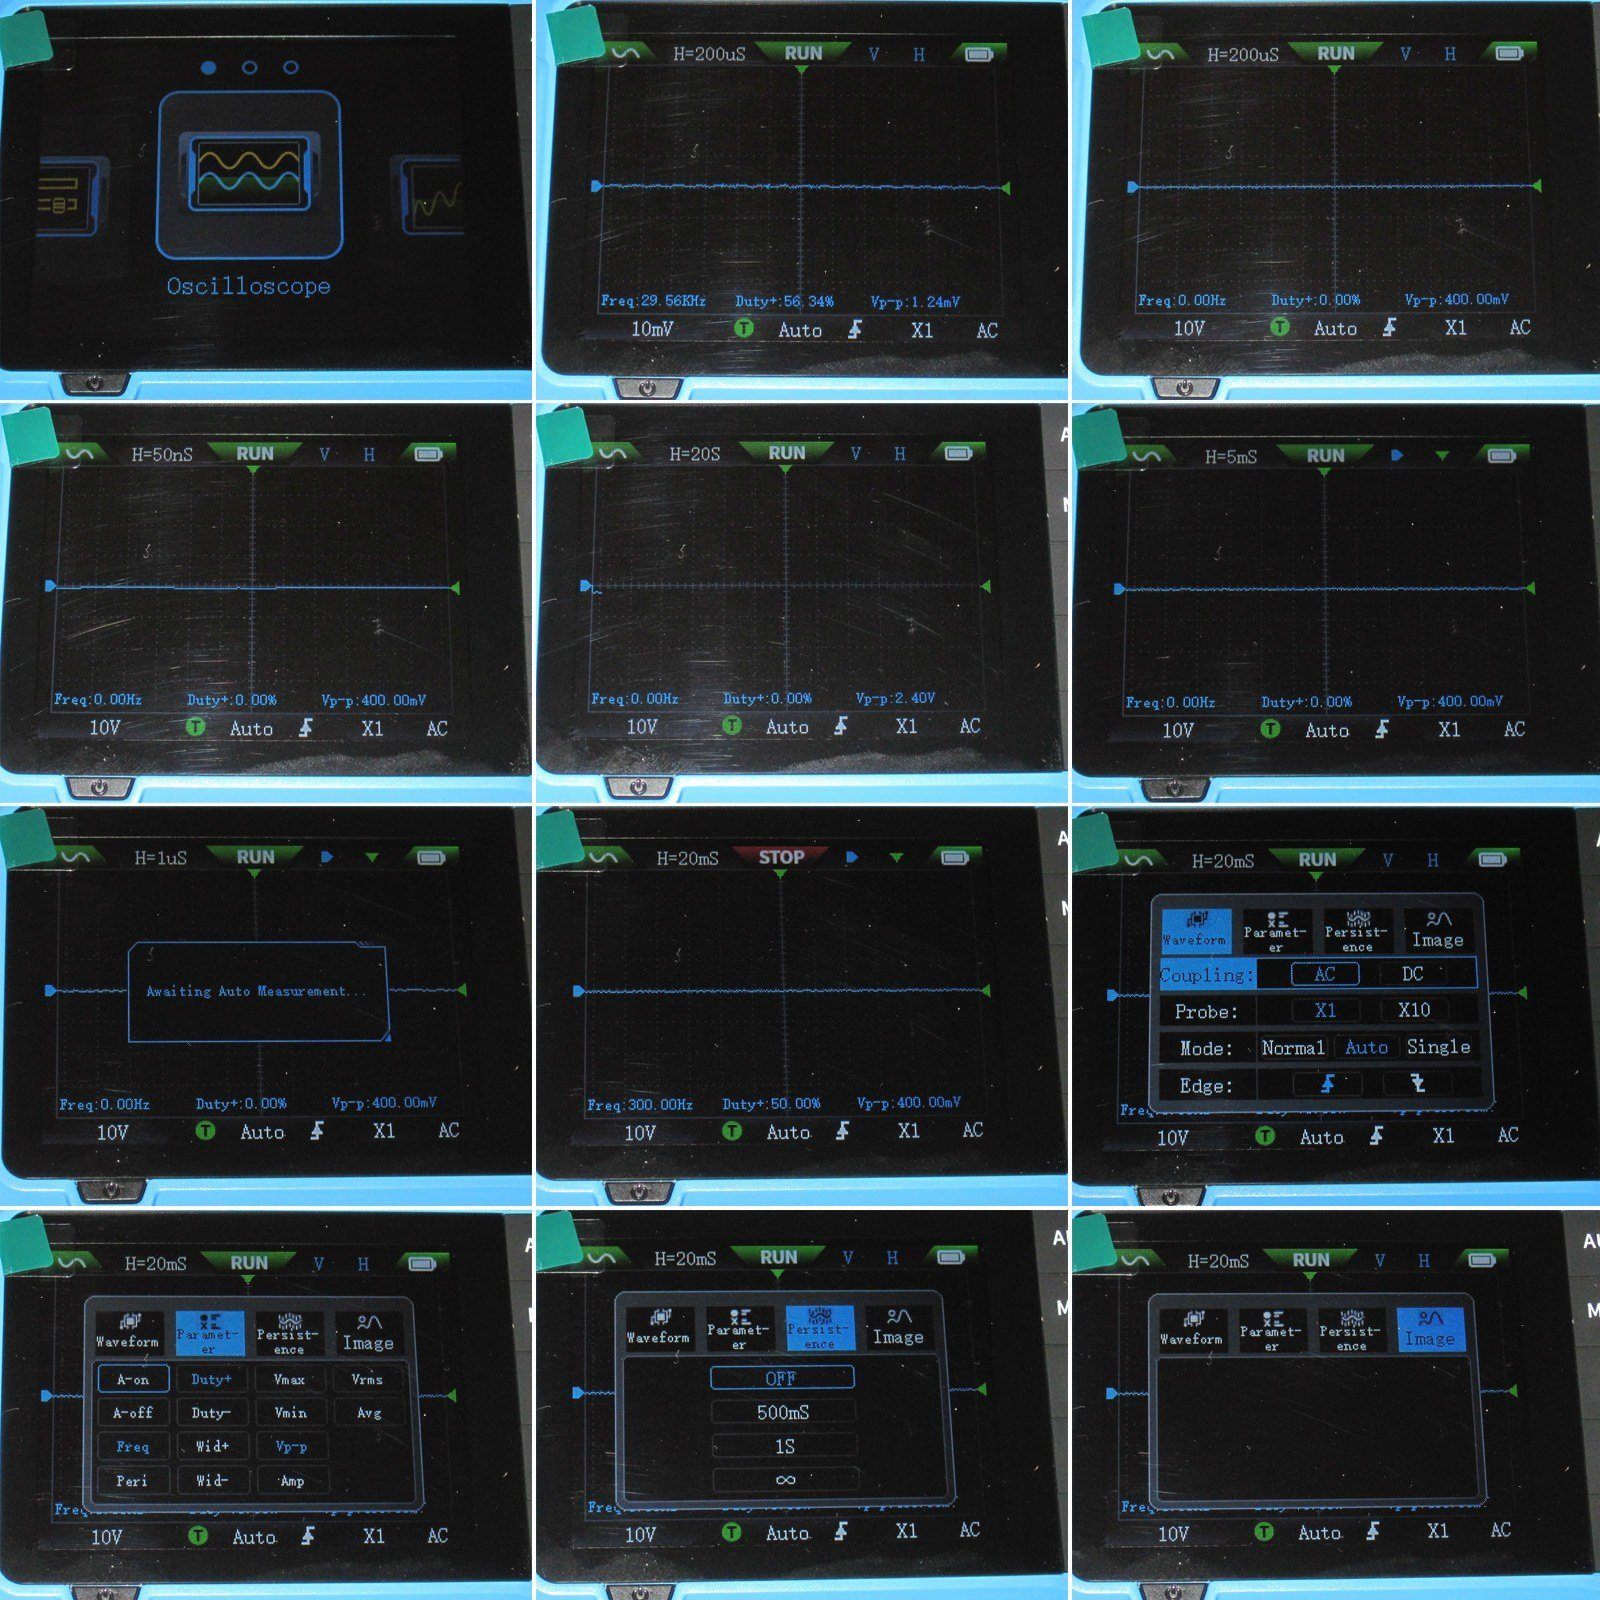
1. Now let’s move on to the oscilloscope.
2, 3. The vertical scale ranges from 10 mV to 10 V per division. That’s pretty good; I remember that many inexpensive models had a minimum of 50 mV, even the DS-203.
4, 5. The time base ranges from 50 ns to 20 s per division, also no complaints there—more than enough, especially for such a basic model.
6. You can also move the waveform left/right and up/down.
7. Pressing the “Auto” button starts automatic measurement. The little device clicks a relay a few times, then settles down. To be fair, I’m more used to trusting my own settings.
8. Pressing the RUN button “freezes” the display. This will be very useful when taking screenshots.
9. The first settings section (long-press the Mode button) contains the basic options: open or closed input, direct or attenuating probe, continuous, auto, or single acquisition, and triggering on a rising or falling edge.
10. Select what to show as additional indicators. This is also very handy.
11. I didn’t expect to see this mode: it emulates the phosphor persistence of an old CRT oscilloscope, with a duration of 0.5 s, 1 s, or infinite—that is, accumulation.
12. The last window shows the screenshot memory
At one point I accidentally held down the Auto button, and the oscilloscope switched to some strange auto-calibration mode. It stayed there for a long time, so I had to power-cycle it.
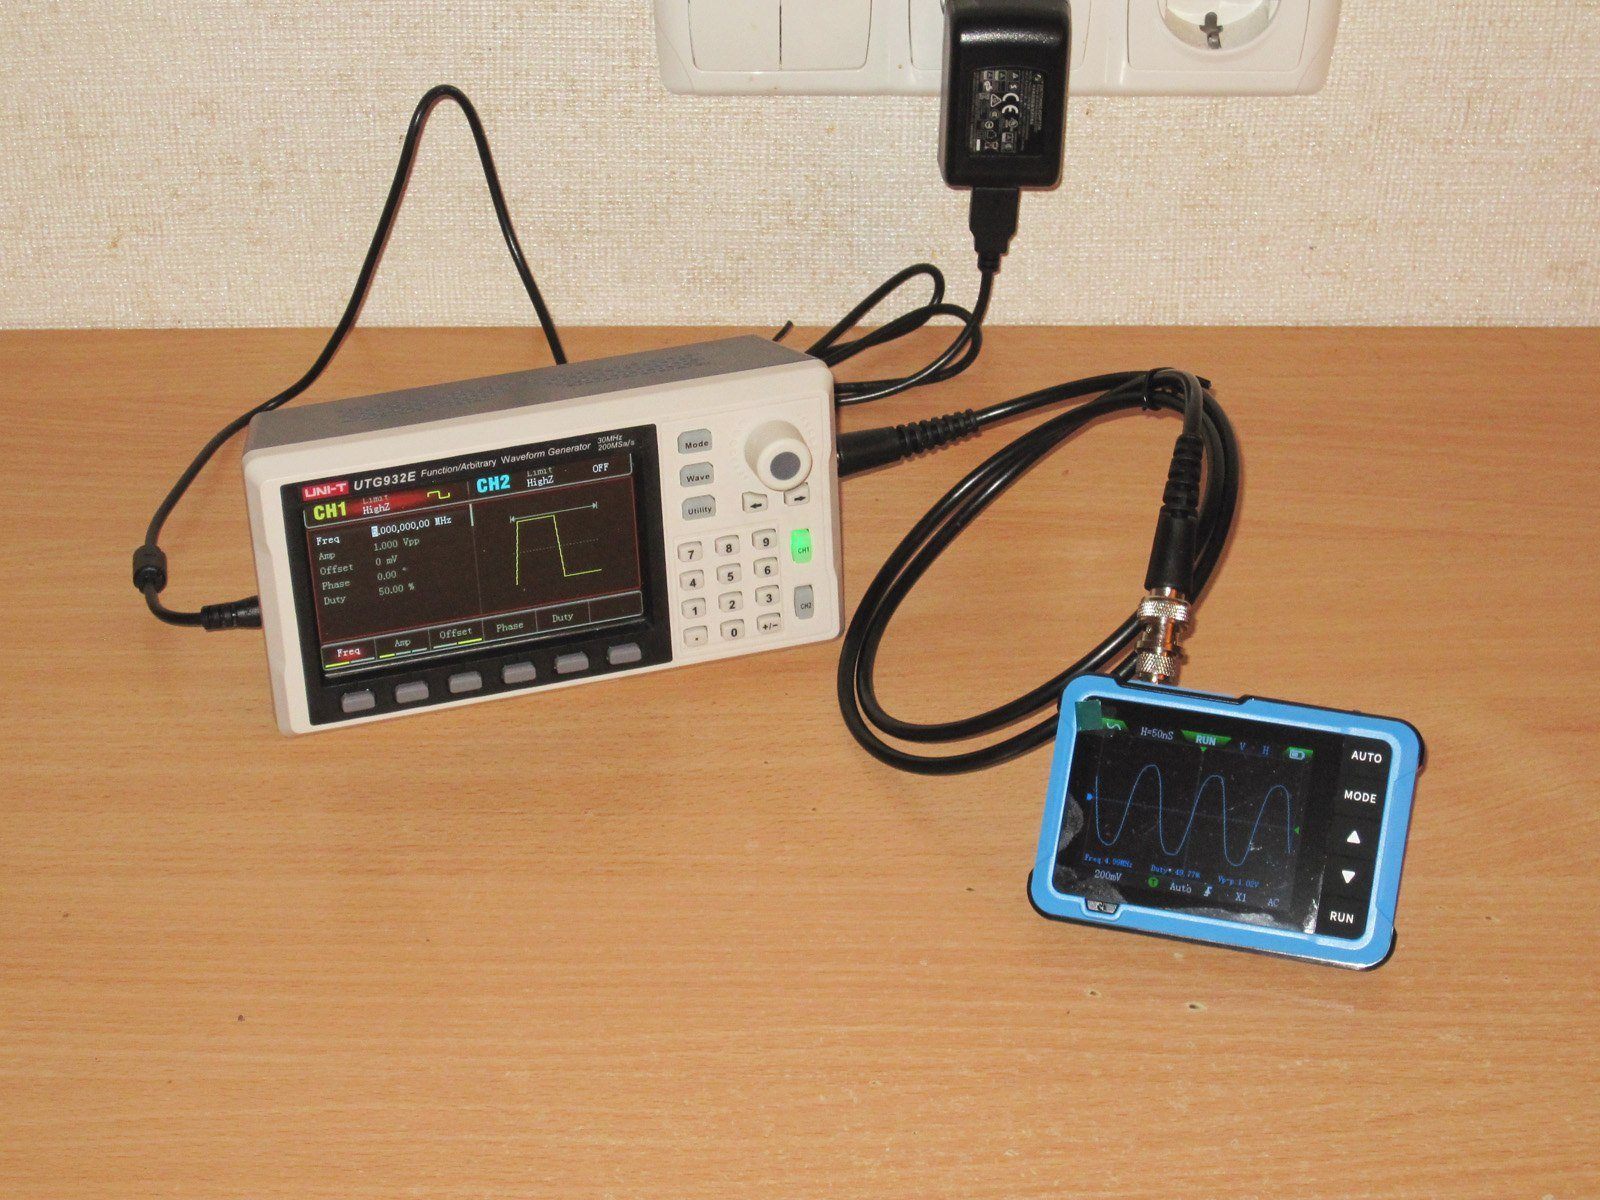
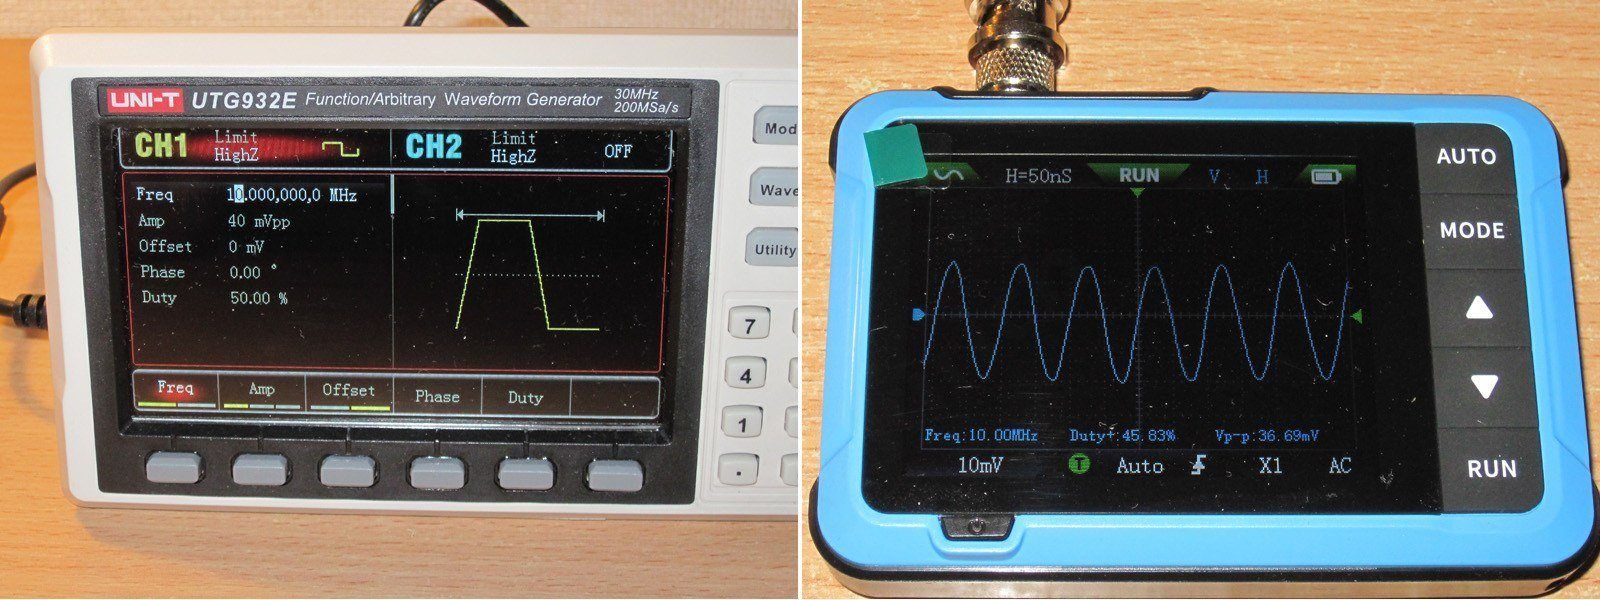
To test the oscilloscope, I used my signal generator. Its maximum output is 20 V at 20 MHz for a square wave, although above 2–3 MHz it stops looking much like a square wave and starts looking more like a trapezoid. You can even see that in the output waveform preview.
But I don't have anything better, and this is a basic oscilloscope anyway. I connected it with the BNC-to-BNC cable included with the generator. I could have used the supplied probe, but I don't see the point: apparently I wouldn't have seen any difference, and it would have been less convenient to use.
At first I took photos, and only later remembered that the oscilloscope can take screenshots. The grid is hard to see in the photos, and that's important.
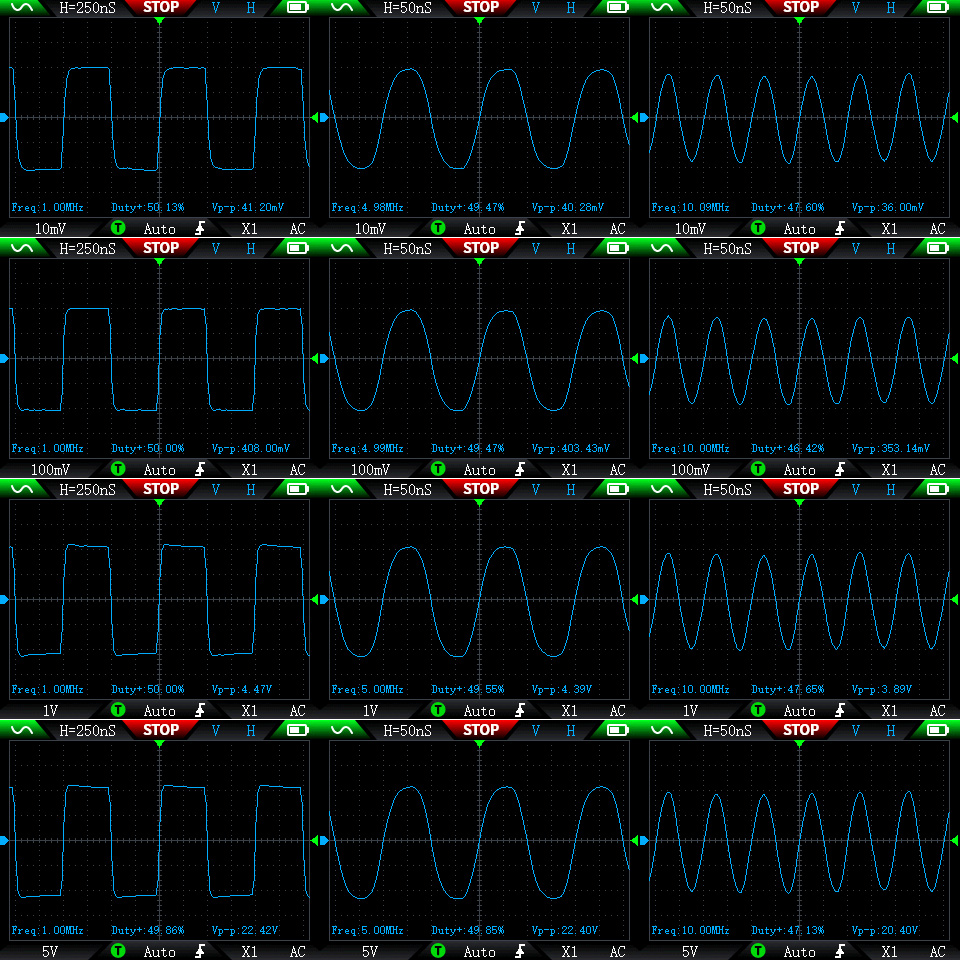
Tests:
1–3. 1, 5 and 10 MHz with a 40 mV signal
4–6. 1, 5 and 10 MHz with a 400 mV signal
7–9. 1, 5 and 10 MHz with a 4 V signal
10–12. 1, 5 and 10 MHz with a 20 V signal
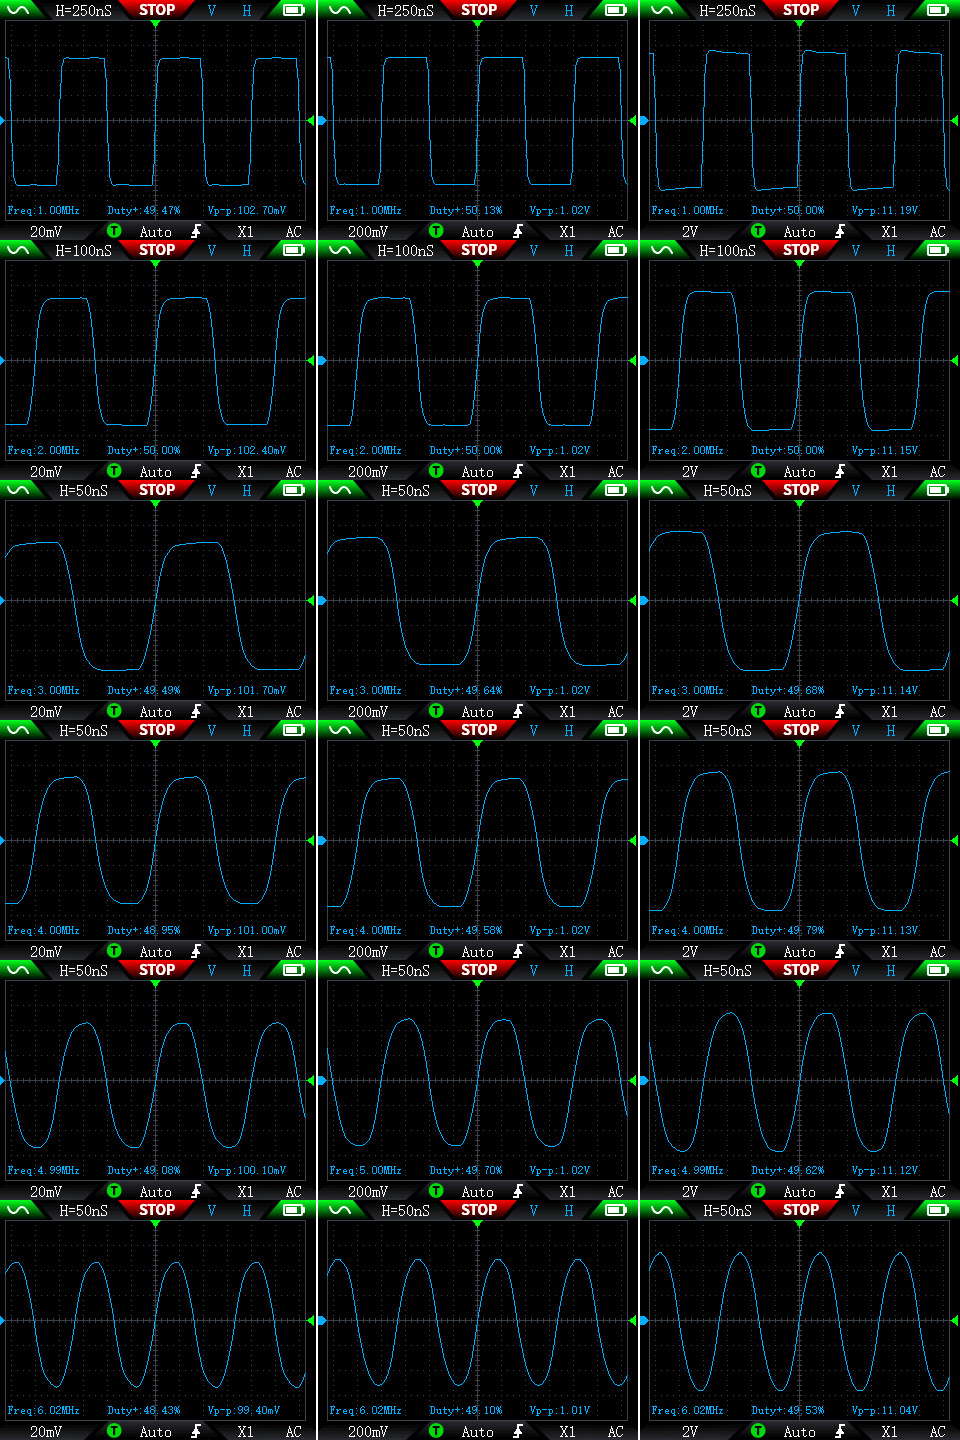
This test is a little different: the horizontal rows show signal voltages of 0.1, 1 and 10 V, while the vertical rows show frequencies of 1, 2, 3, 4, 5 and 6 MHz.
You can see that the signal looks roughly square up to about 3 MHz; beyond that, it looks more like a sine wave.
The oscilloscope can actually “see” signals up to 20 MHz, but both the amplitude and the signal itself deteriorate significantly. It still measures the signal frequency reasonably accurately, though.
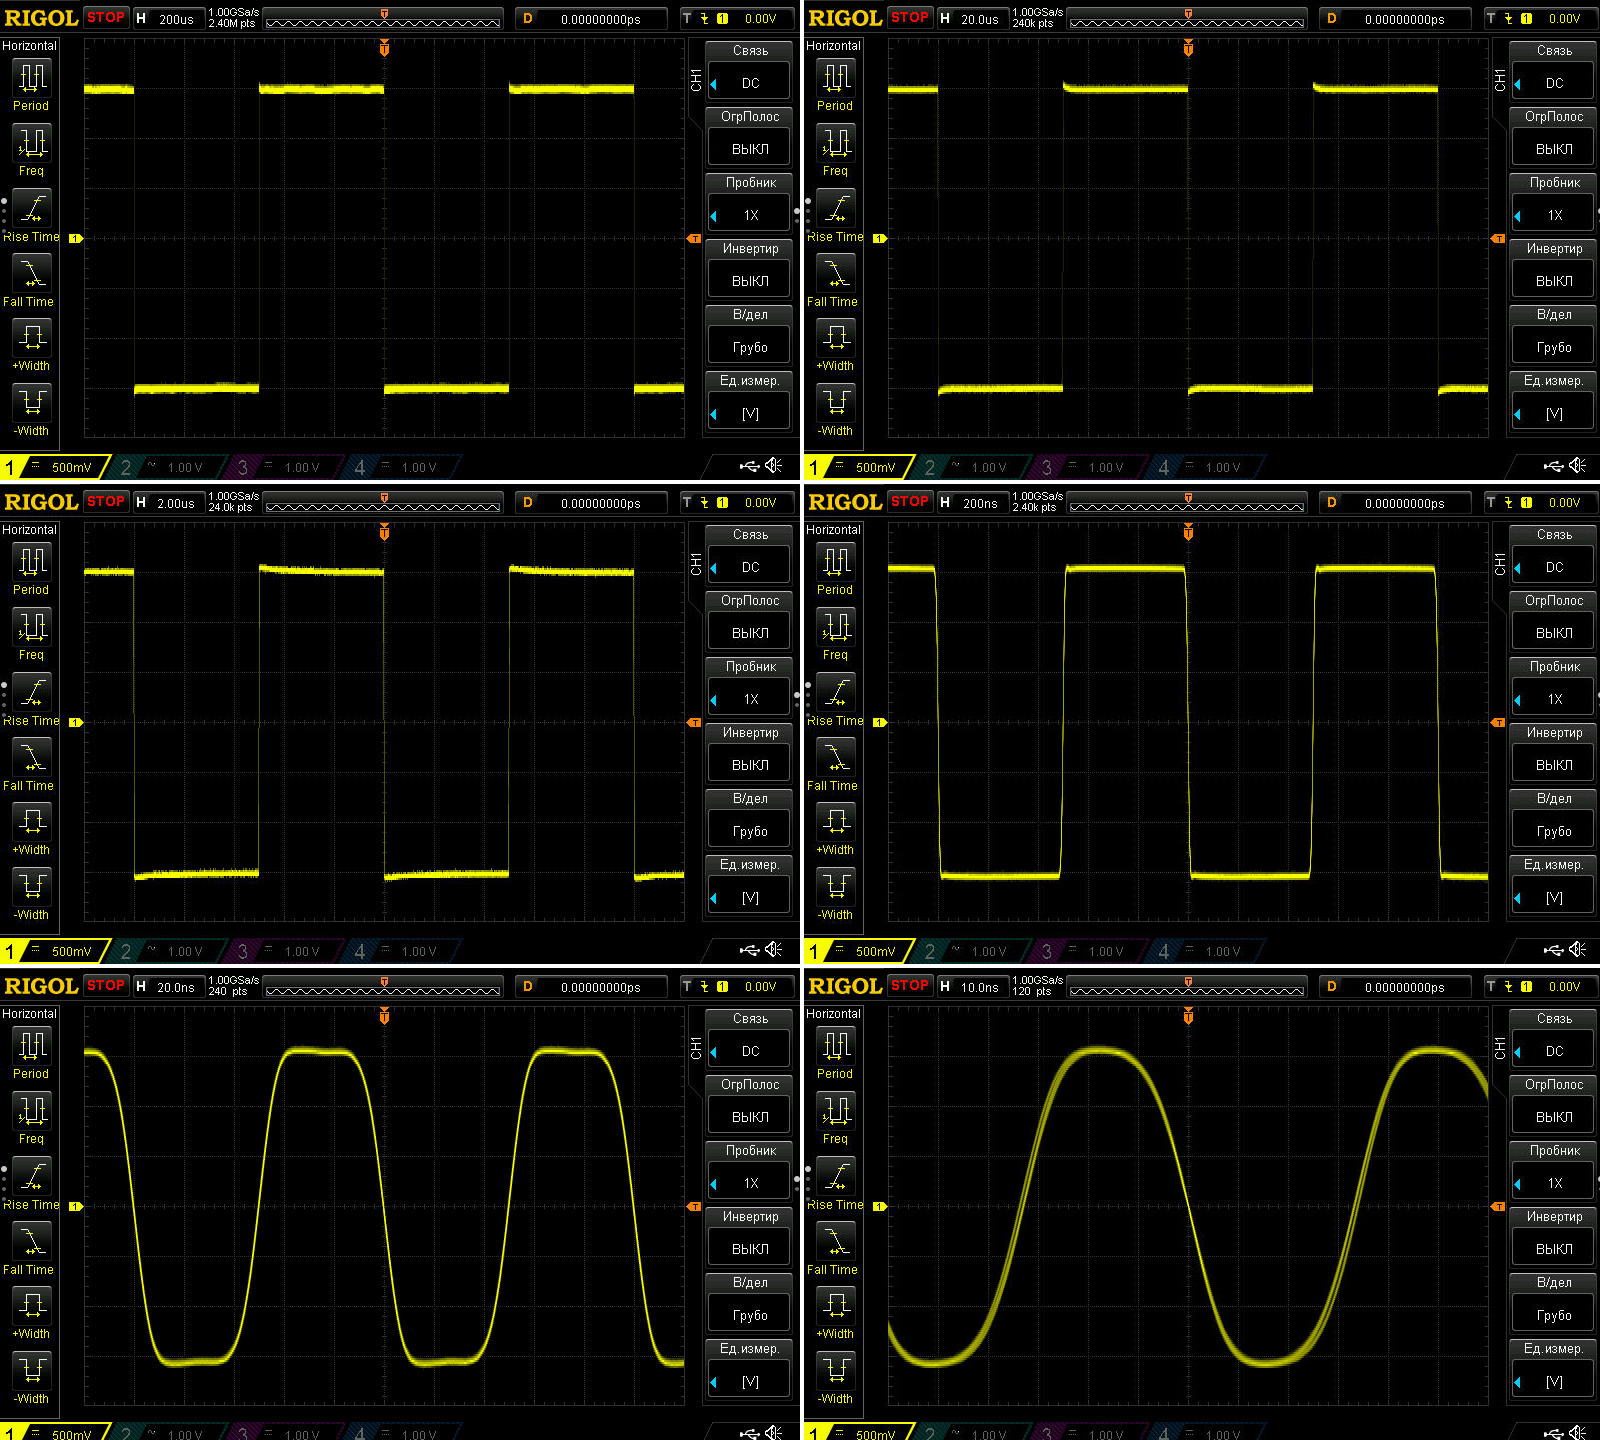
Just to show what was actually at the input, here are screenshots from my signal generator review: square waves at 1, 10 and 100 kHz, and 1, 10 and 15 MHz
Phosphor simulation. The first two are in 0.5 and 1 second modes; to me, they look no different from having it turned off.
The third is in infinite mode. Here it's somewhat noticeable and, in my opinion, looks pretty good. But the third screenshot shows that if something happens to the signal in infinite mode, the whole screen fills up.
I think it would be best to add options for, say, 5, 10 and 20 seconds.

The oscilloscope seems to have inadequate shielding, because if you hold it in your hands while taking a screenshot, the image gets corrupted. This happens more often at higher signal frequencies, which is why I recommend pausing the signal before taking a screenshot.

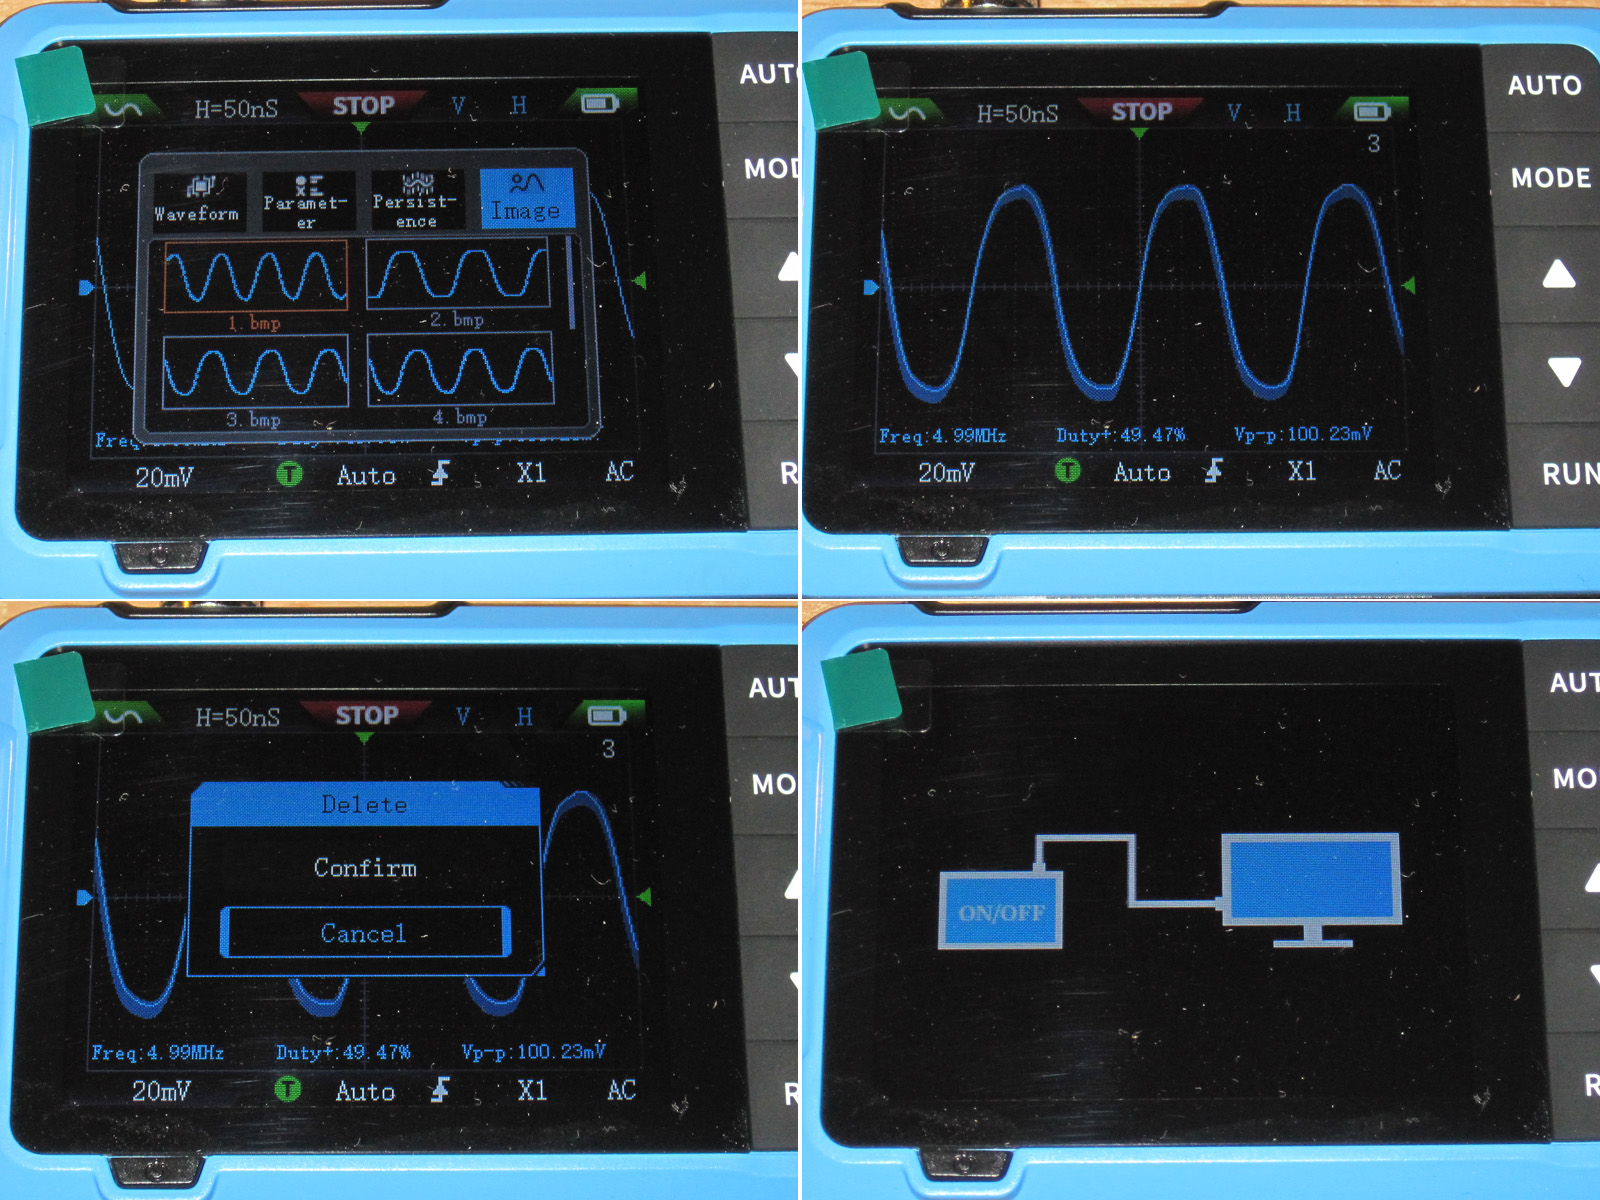
The screenshot menu lets you view screenshots, expand them to full screen, and delete unwanted ones. The file number is shown in the upper-right corner.
You can save up to 32 screenshots in memory, in BMP format. That's not a lot, of course, but it's enough in practice.
To copy them to a computer, you have to go to PC connection mode from the settings menu. You can't just plug in a cable and download them.
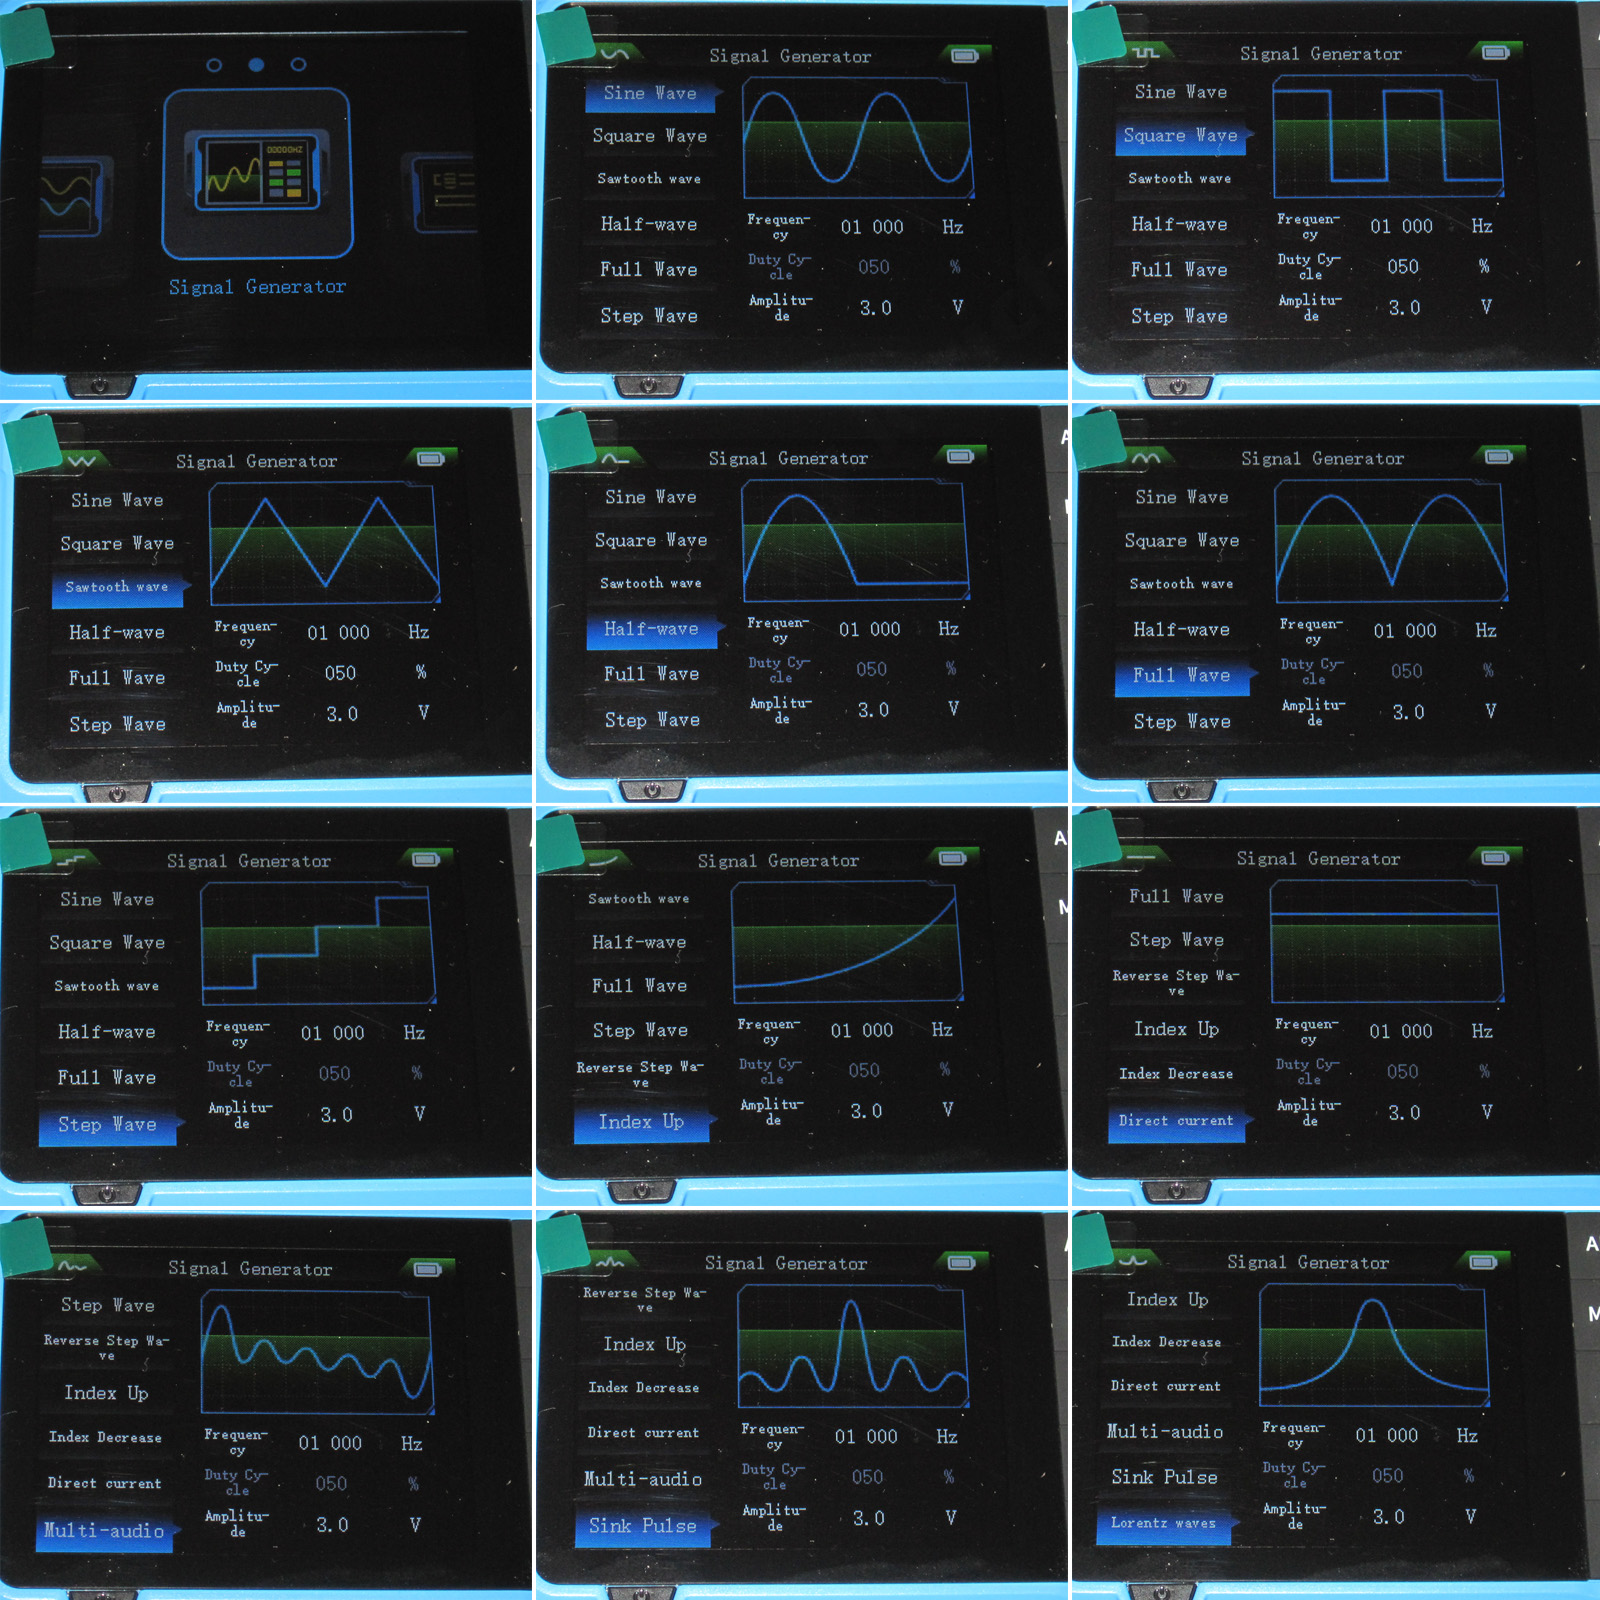
Signal generator: there are lots of different waveforms here, including a couple that are available in both normal and inverted forms, such as a staircase ramping up or down. The maximum frequency is 50 kHz, which seems a bit low to me. The maximum voltage is 3 V. There's also a DC signal, for which you can inexplicably select a frequency too.
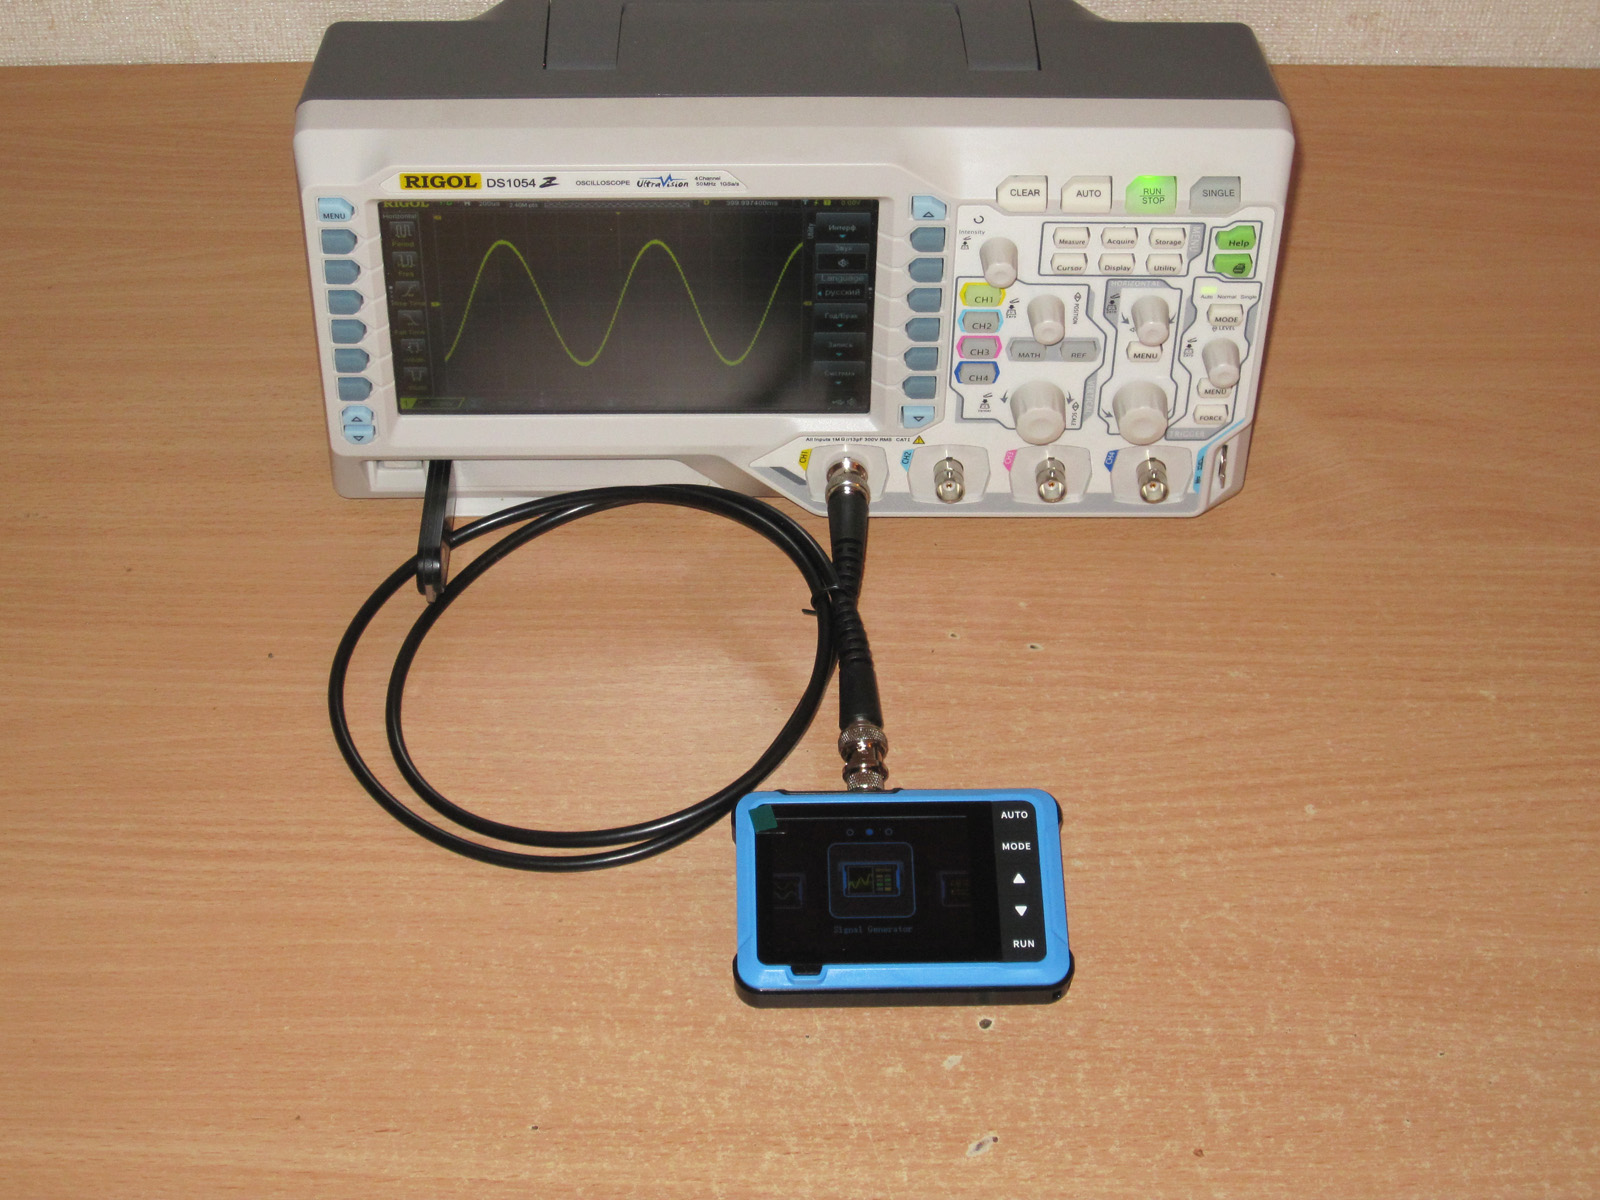
For testing, I used my main oscilloscope. When I connected it, I noticed that the generator output is always on. By the way, in theory, lowering the frequency in the generator menu might reduce power consumption, since the generator is always running.
At 50 kHz, the signal looks fine; the only thing is that it falls a little short of the set 3 V. I did run the tests with a discharged battery, so that may have affected it. But in a properly designed instrument, the specified parameters should be maintained across the entire supply voltage range.
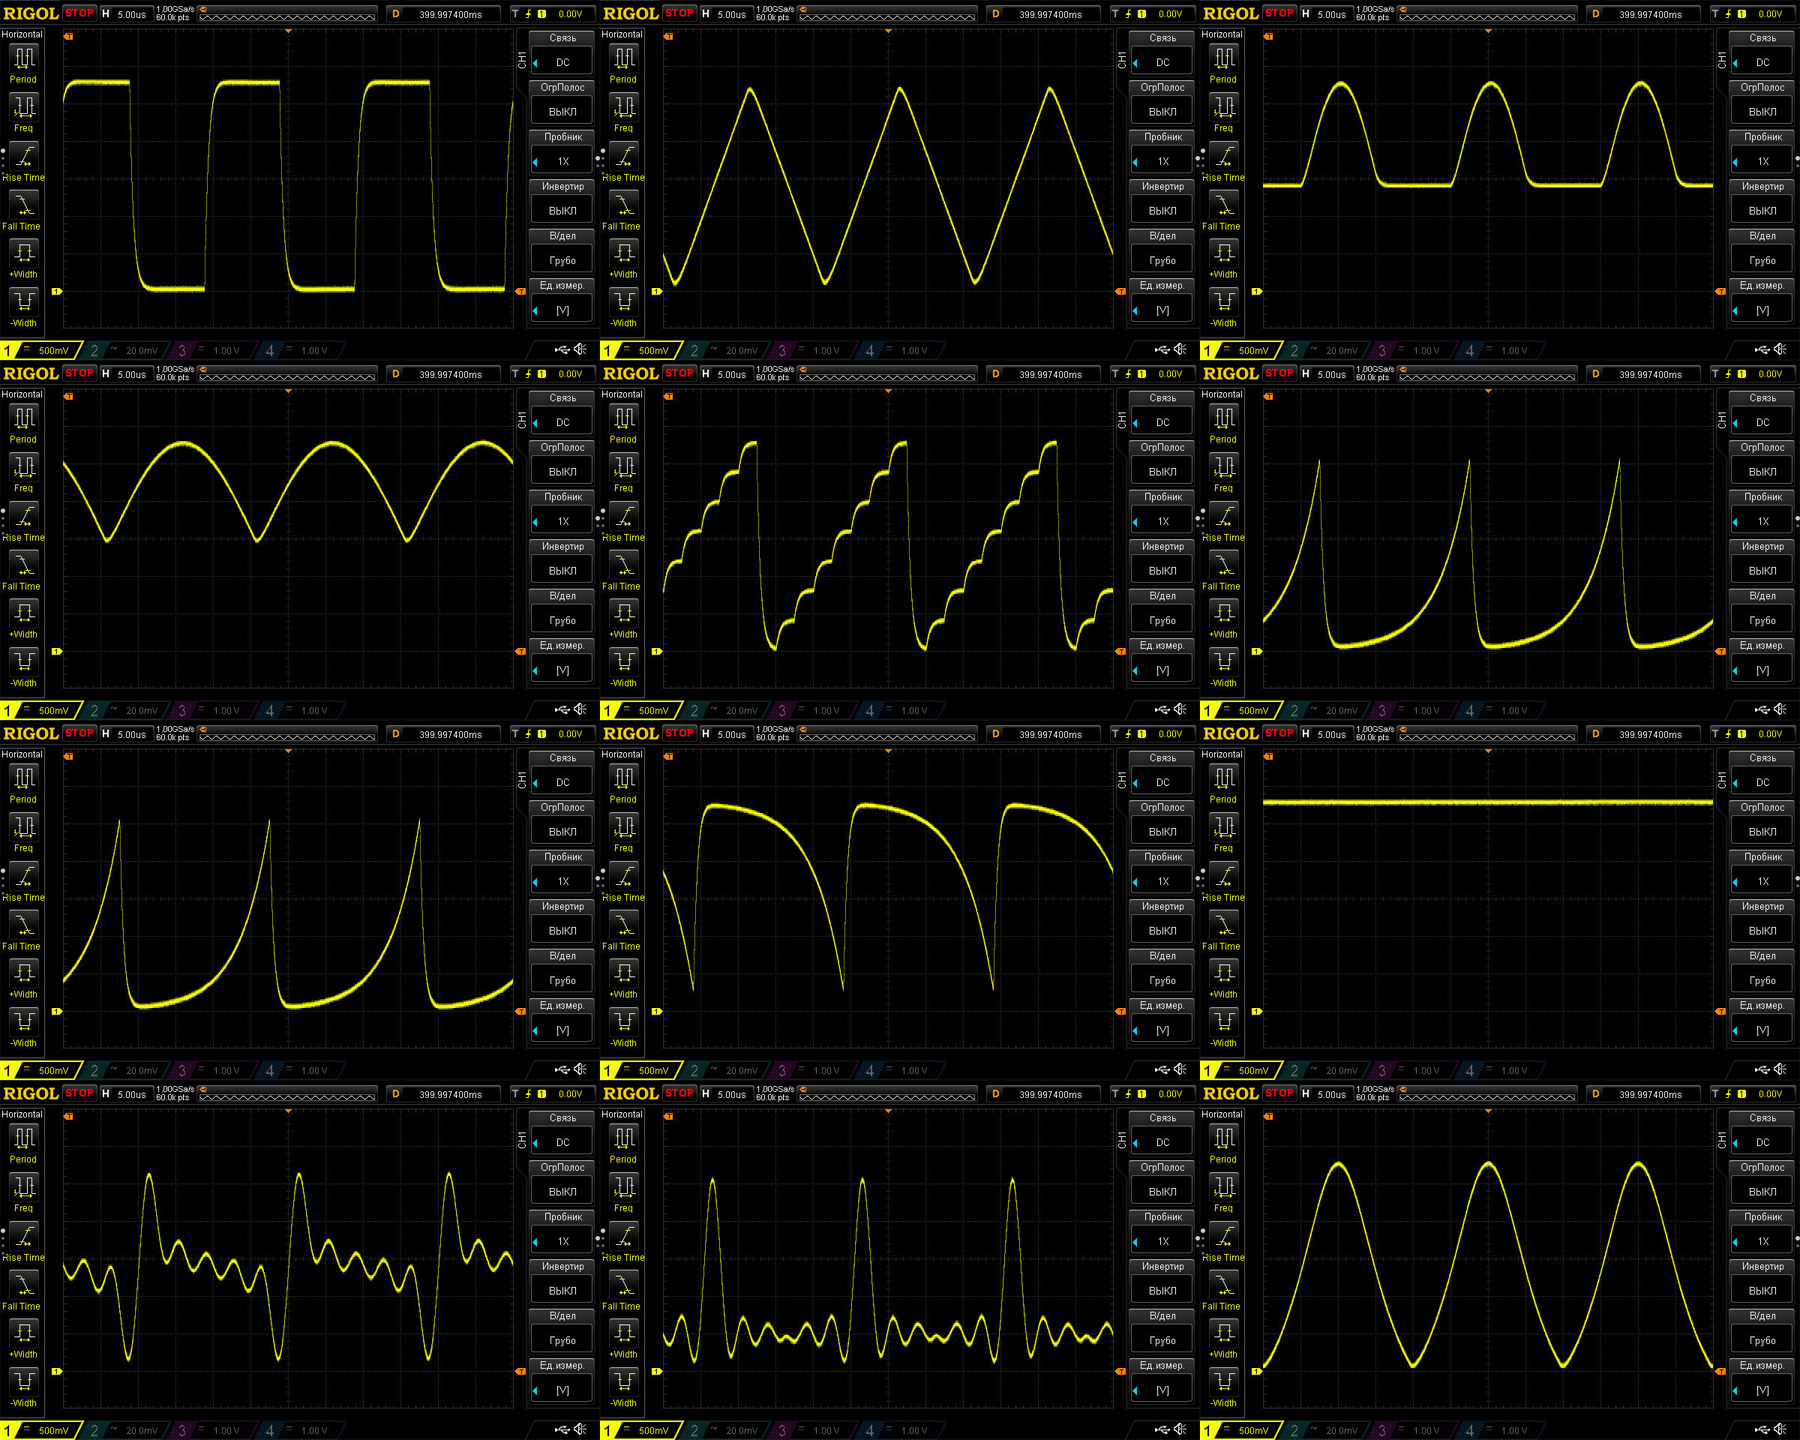
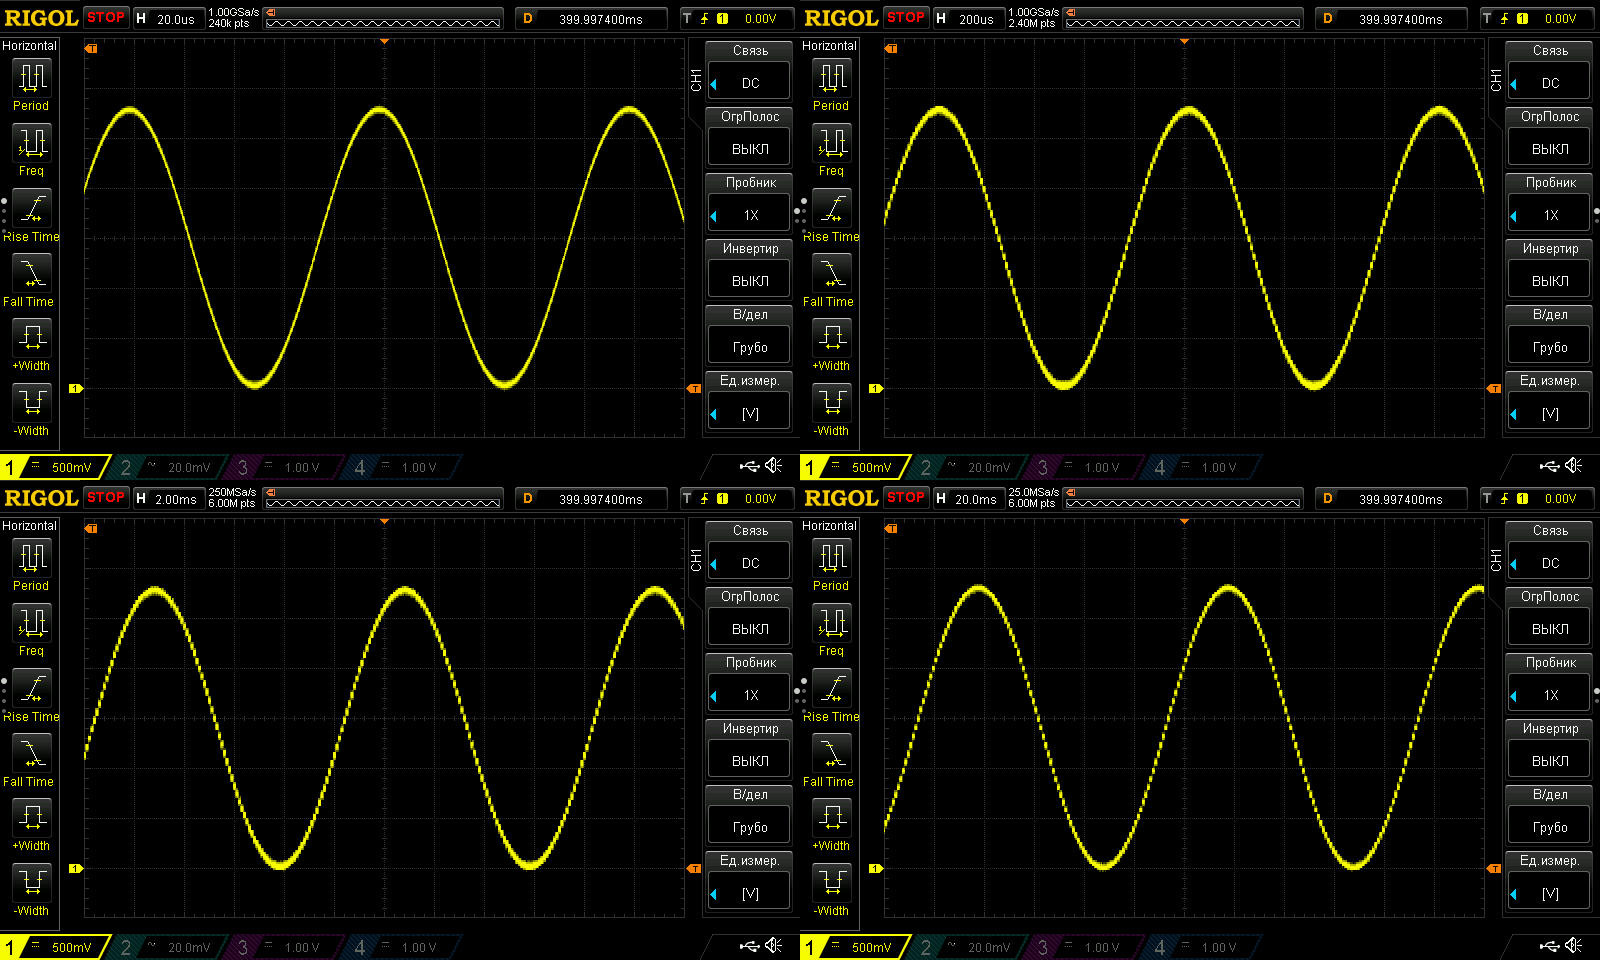
Just out of curiosity, I checked whether the output voltage might depend on frequency, as that can happen. So I ran a sine wave at 10 kHz, 1 kHz, 100 Hz and 10 Hz. The signal amplitude didn't change, but the waveform did: at 1 kHz, the steps became clearly visible.
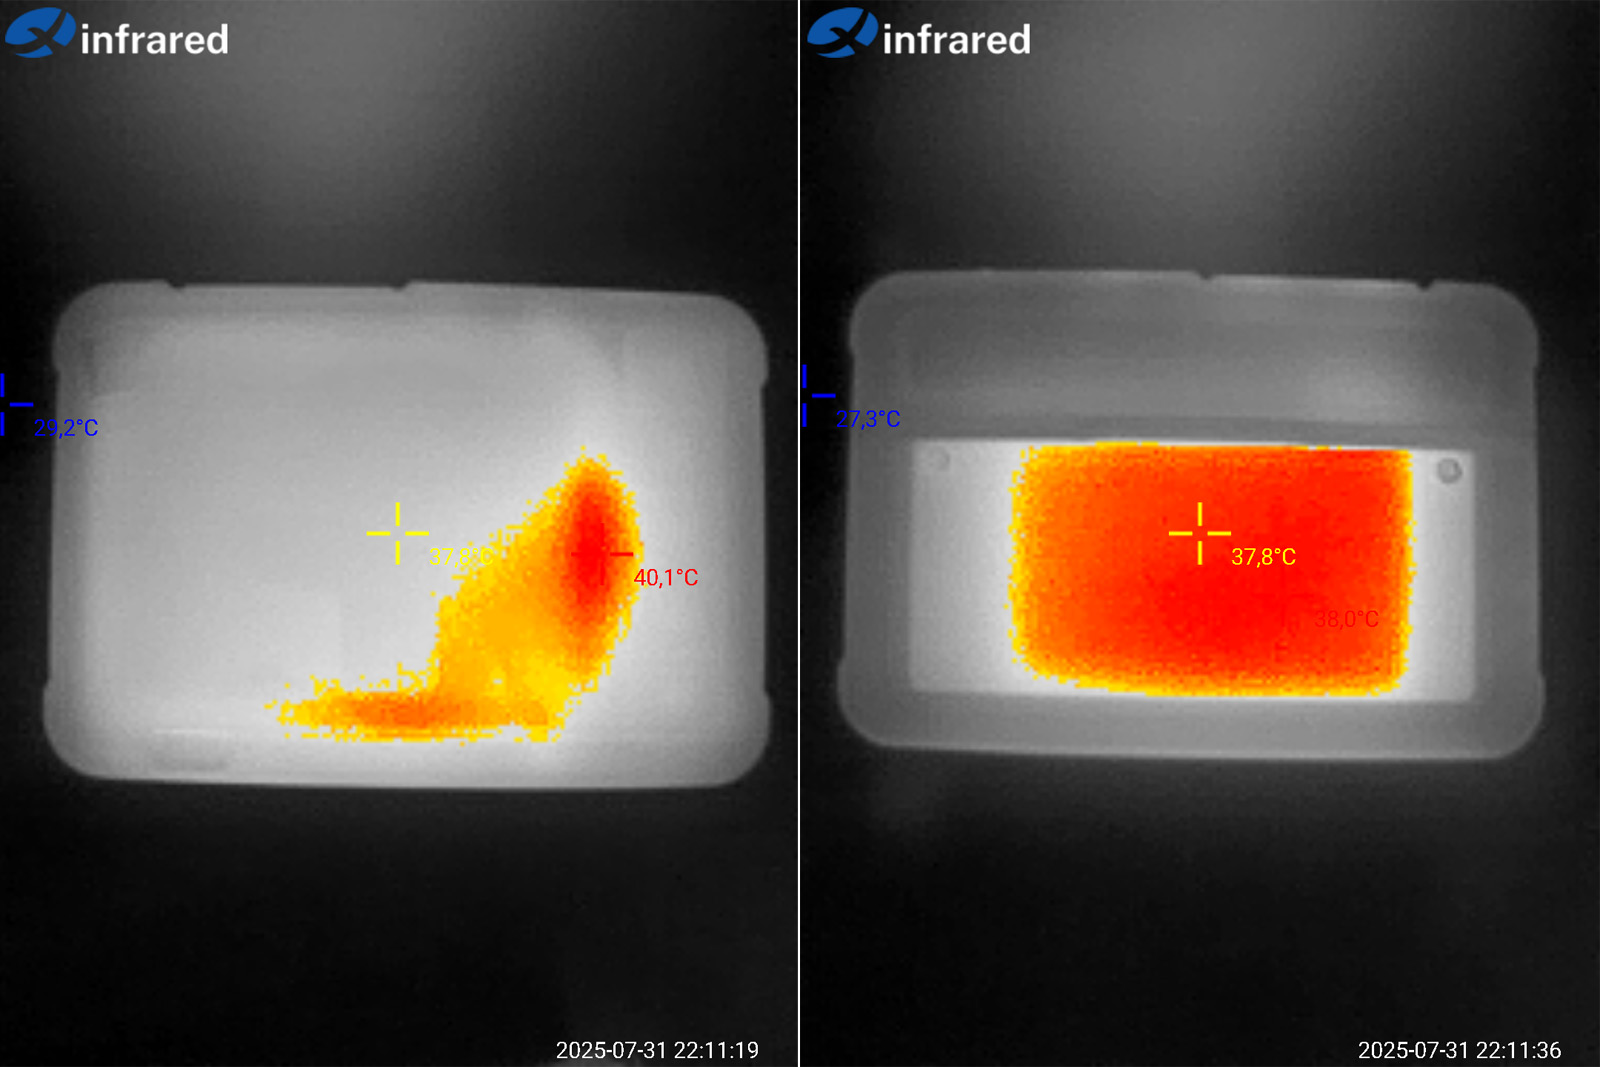
While I was running tests and doing other things, the oscilloscope sat powered on on the table. When I picked it up, I noticed the case was a little warm. Out of curiosity, I pointed a thermal camera at it—and yes, it does heat up. And when you switch oscilloscope modes, you can hear a relay click inside :)
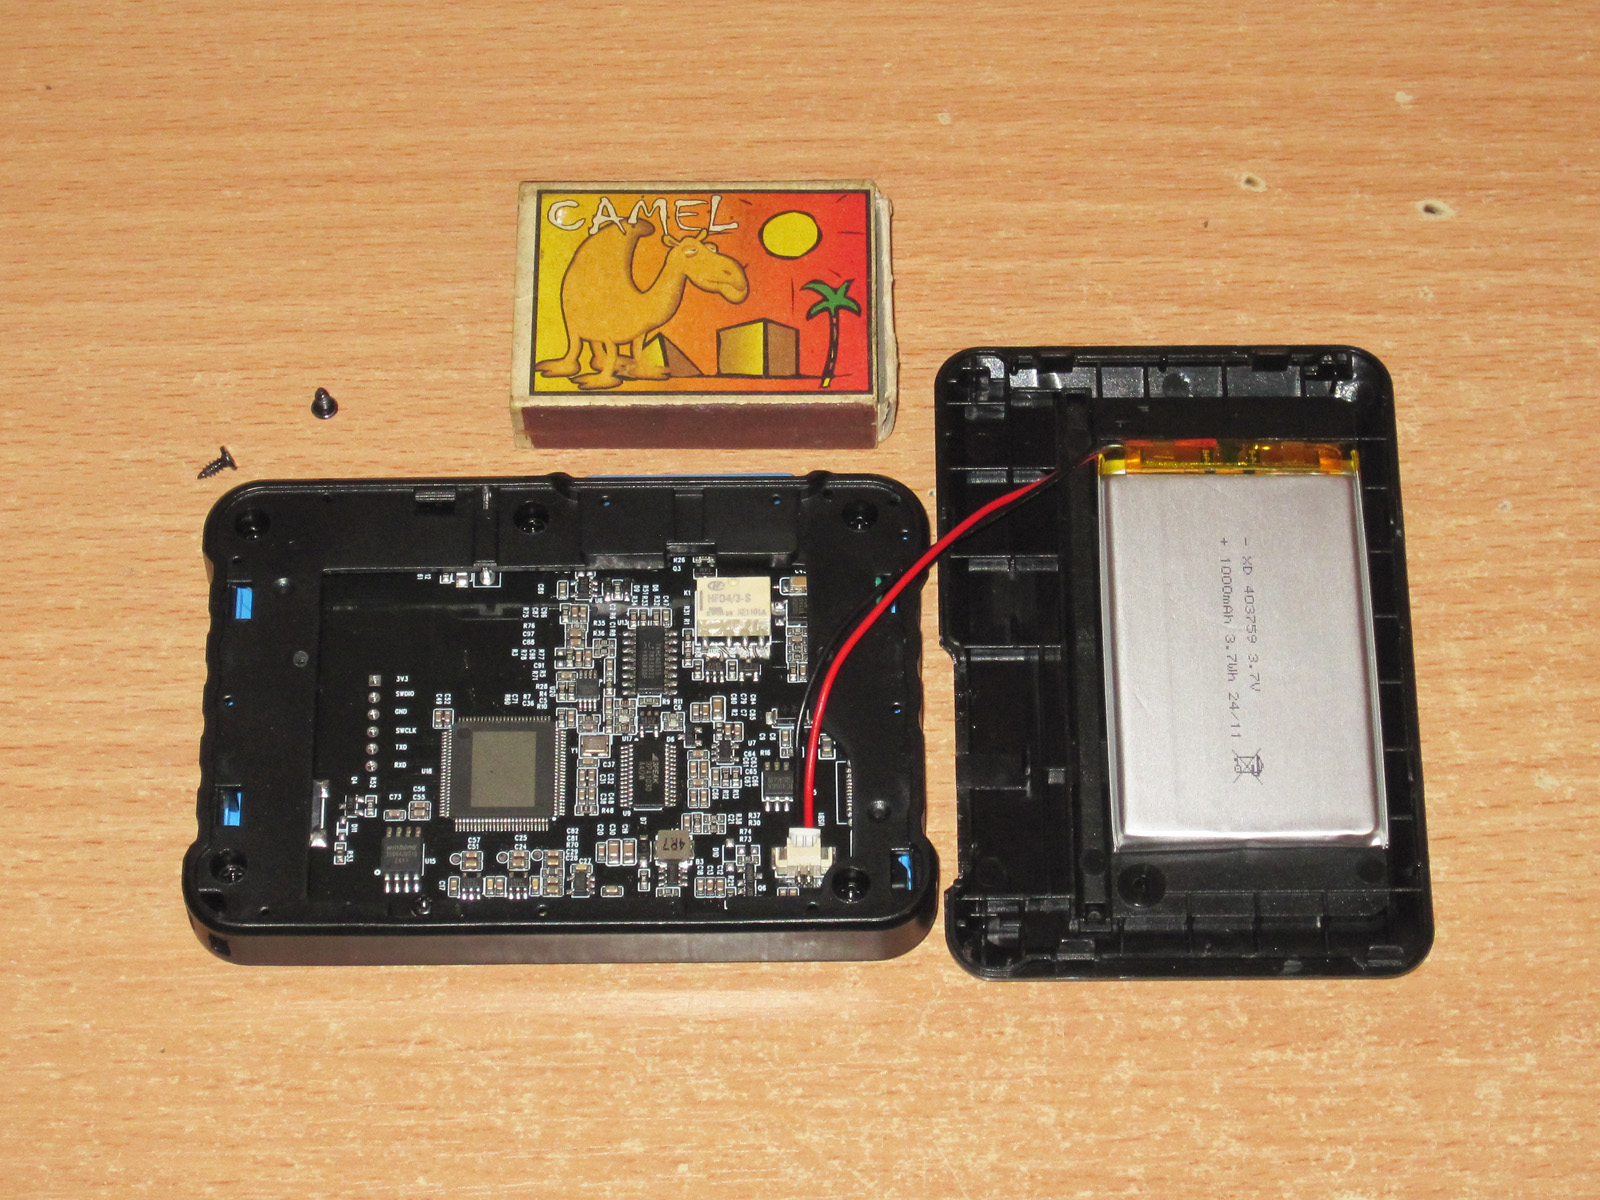
And of course, I had to take it apart. The procedure is dead simple: remove a couple of screws, pry off the back cover, and lift it off. There are clips, but they’re soft.
Inside is a 1000 mAh battery, which, according to reports, lasts for several hours. I didn’t time it, but the little device definitely ran for a total of about an hour and a half.
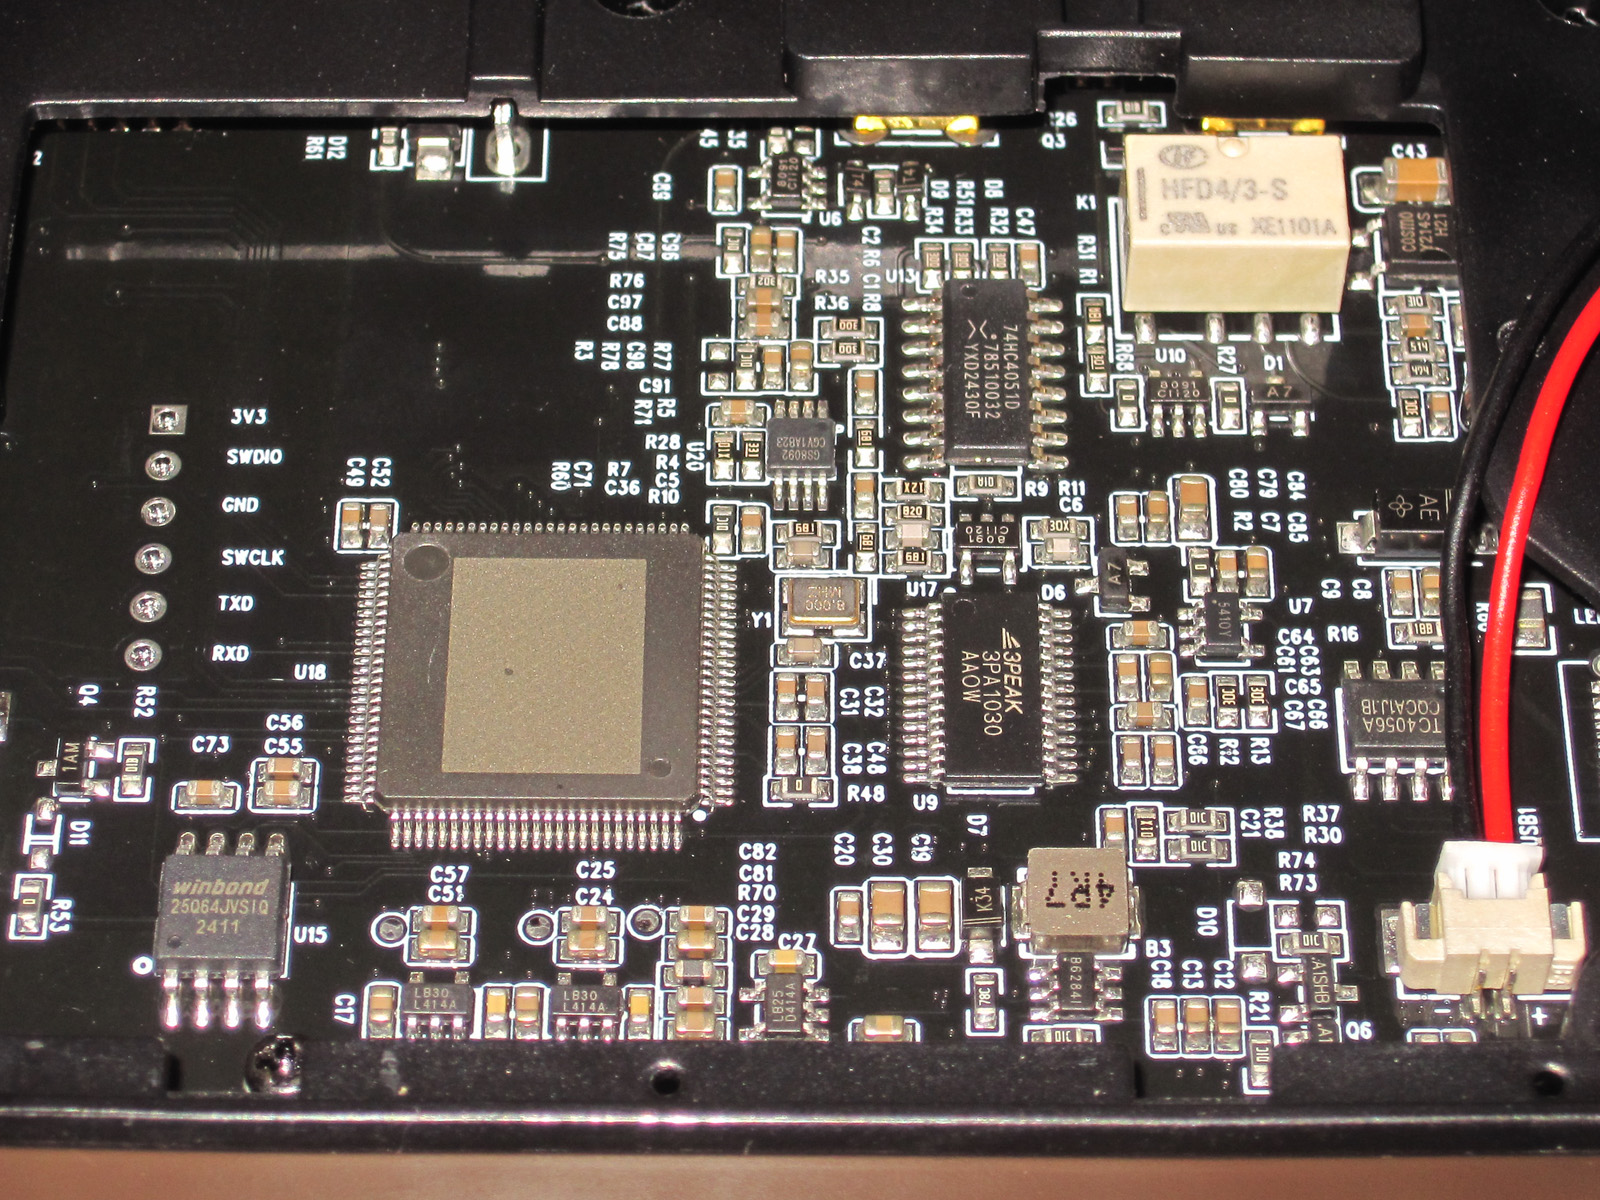
Inside is a small circuit board packed with components. I didn’t see anything particularly interesting, but maybe it’ll be useful to someone.
Conclusions.
The device is pretty basic, especially as a signal generator. There are plenty of brands out there, but the frequency only goes up to 50 kHz, and at low frequencies you get a step in the waveform.
As an oscilloscope, though, it was a pleasant surprise. It’s simple, but works very reliably. Up to 3 MHz, even a square wave looks like a square wave, which is quite nice.
Given that it’s battery-powered and can save screenshots, it’s a pretty good fit for simple tasks, as well as working with switching power supplies.
It gets 5 out of 5 for looks. Ease of use is a little harder to rate: you just have to get your head around the developers’ logic, and then everything will be fine :))))
All in all, I think it’s well worth the money. It’ll be enough for most hobbyist projects, especially for those just starting out on this never-ending journey. Maybe a little later, when I test power supplies, I’ll see how well it picks up ripple.
There’s a discount at the store right now: $5 off a $30 purchase, so you can get this model for $30
That’s all for today. I hope you found it useful.
$34.91
This page was found when searching for:
dso-510 калибровочный контакт, https://www.kirich.blog/obzory/izmeritelnoe/1281-malenkiy-sociilografgenerator-dso510-ot-fnirsi, dso510 при какой мерять миандру, руководство по эксплуатации по использования осциллограф dco-510, fnirsi dso 510 как пользоваться
dso-510 калибровочный контакт, https://www.kirich.blog/obzory/izmeritelnoe/1281-malenkiy-sociilografgenerator-dso510-ot-fnirsi, dso510 при какой мерять миандру, руководство по эксплуатации по использования осциллограф dco-510, fnirsi dso 510 как пользоваться
This model is included in the summary table: Comparison of measuring instruments reviewed on the blog
The figures from this review are in the measurement database: Measuring instruments
Calculate manuallyAll calculators
Discounted products
You may be interested in



Discounted products
Support the project
All the content on the site and the advice are free, but we’d be grateful for your support of the project and the channel!
Discuss on the forumHave a question or some experience to share? Discuss the article with the author and readers: the forum is a convenient place to share schematics and photos.
Go to the forumOnly registered readers can comment. It takes a minute to sign up, and you can log in with the same account you use on the forum.
Log inRegister