
ORICO 9558RU3 or five hard drives in one box
$137.70
A quick note about the price of this device. It cost me $102. There was some kind of promotion, which prompted me to buy it, although I’d had my eye on it for a while. On top of that, I had to pay another $36 for shipping :(.
The shipping cost was partly offset by the fact that delivery was fairly quick (though it took a long time to ship), and it was courier delivery, meaning the package was brought right to my home.
By the way, the package turned out to be quite large. I somehow expected a box about half this size, especially since the only packaging was a layer of plastic wrap.
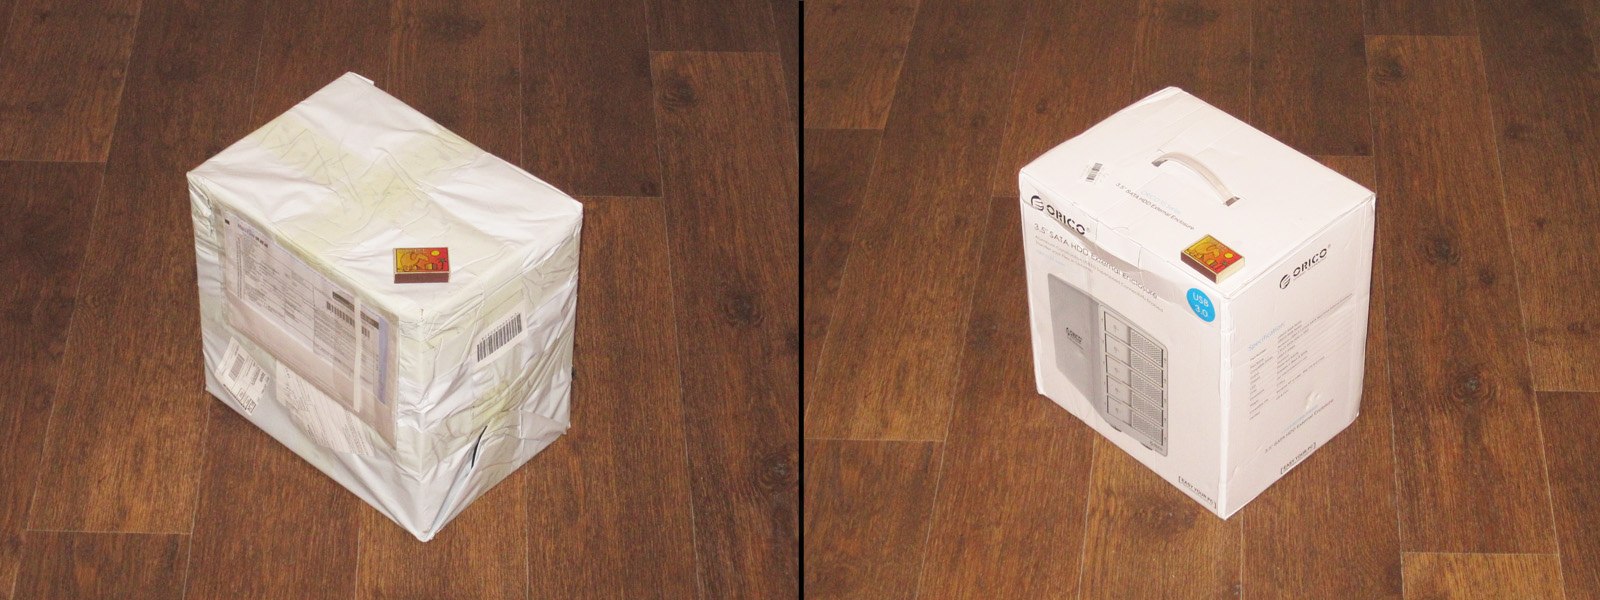
When I opened the package, I was a little disappointed: there was no color listed on the packaging, and the box in the picture was silver. I had originally ordered the black one; I consider black the classic color for electronics.
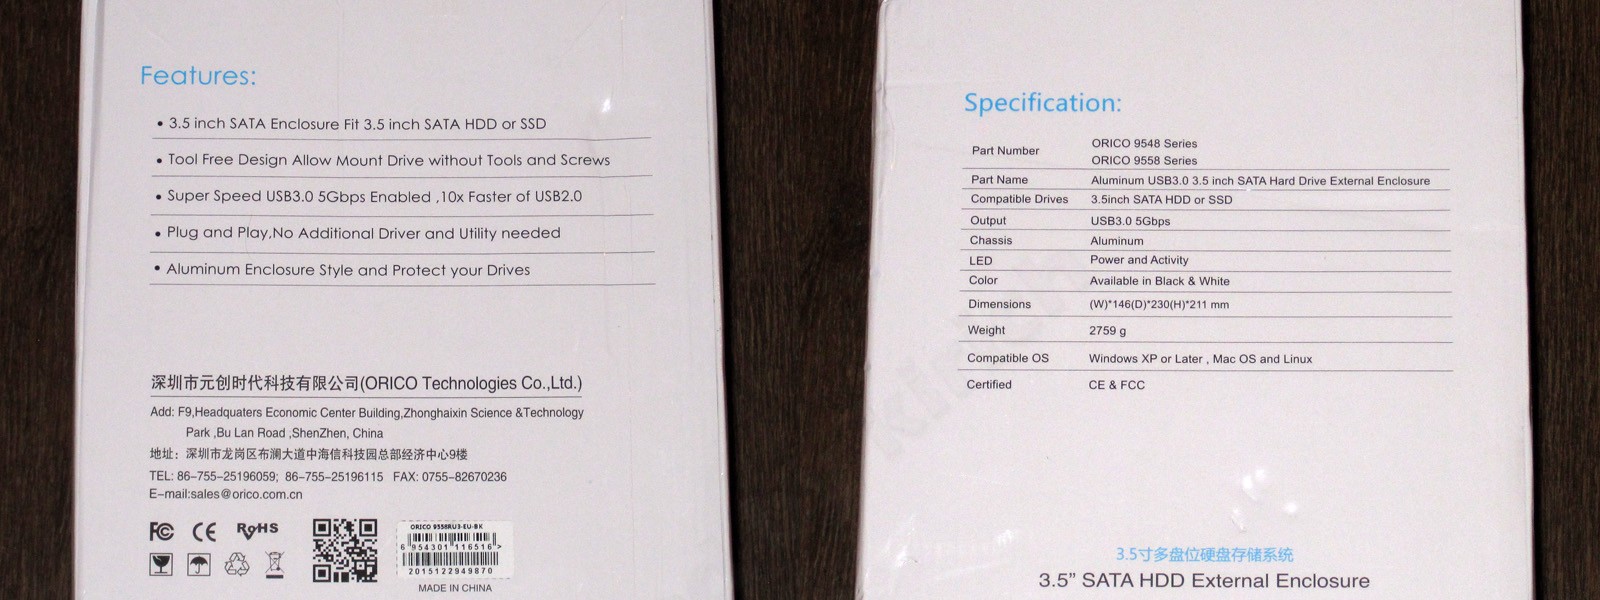
The box also has some information on it, including the dimensions, weight, and main specifications.
All the pictures (or at least most of them) are clickable.
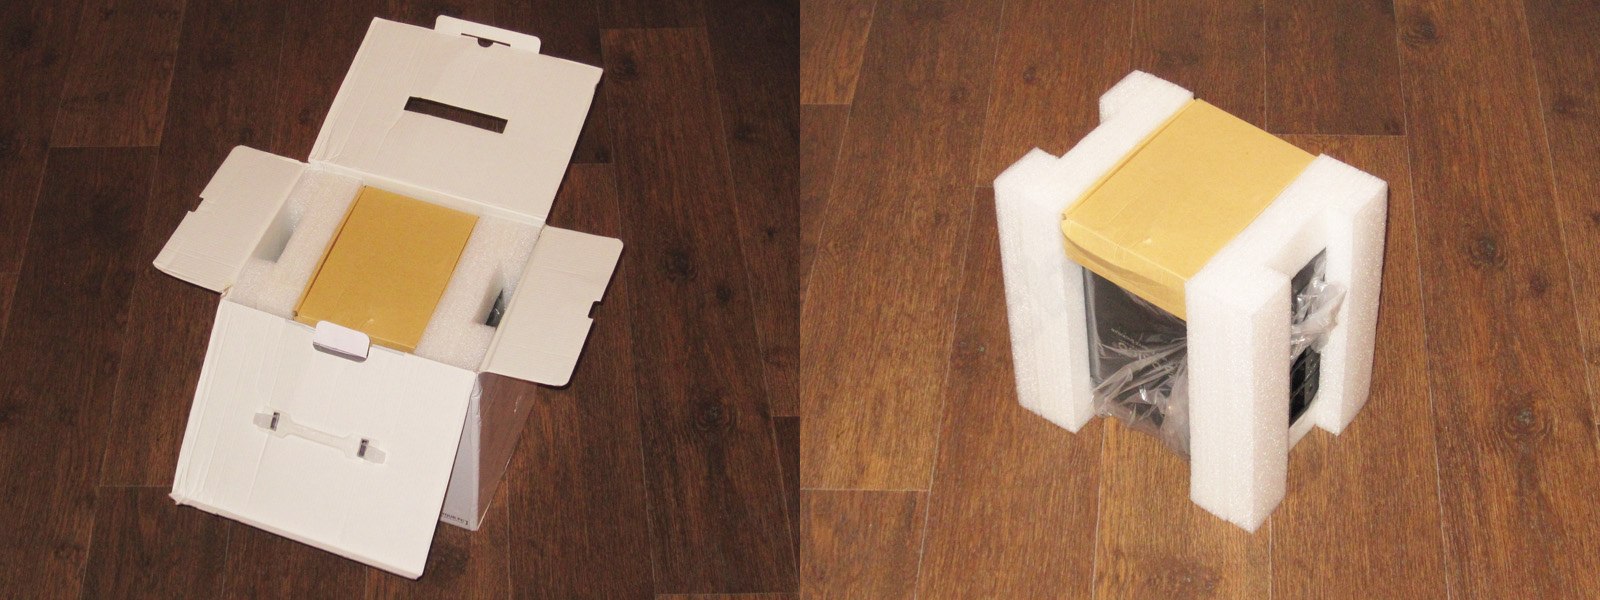
As soon as I took everything out, I thanked the manufacturer for packing the contents so well.
The enclosure is held firmly between two inserts made of expanded polyethylene, which is why the packaging is about twice the size of the device itself.
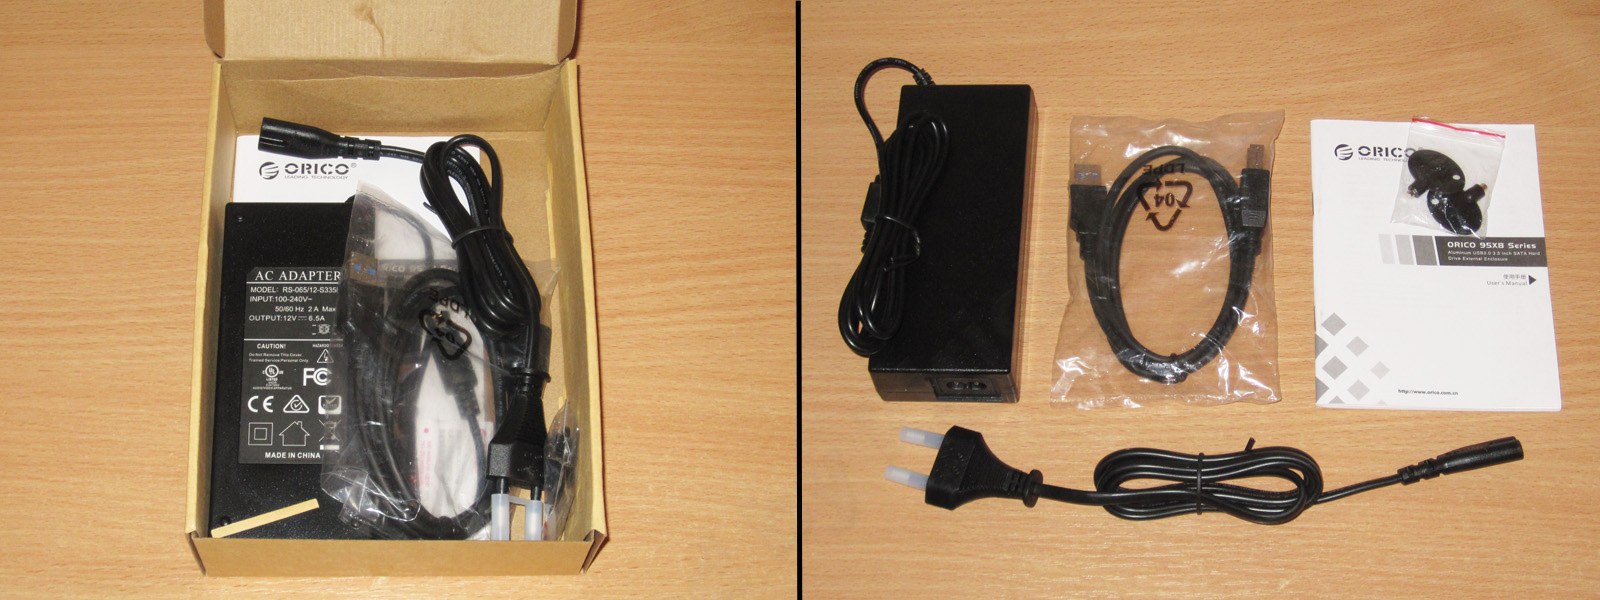
On top was a small cardboard box containing the following accessories:
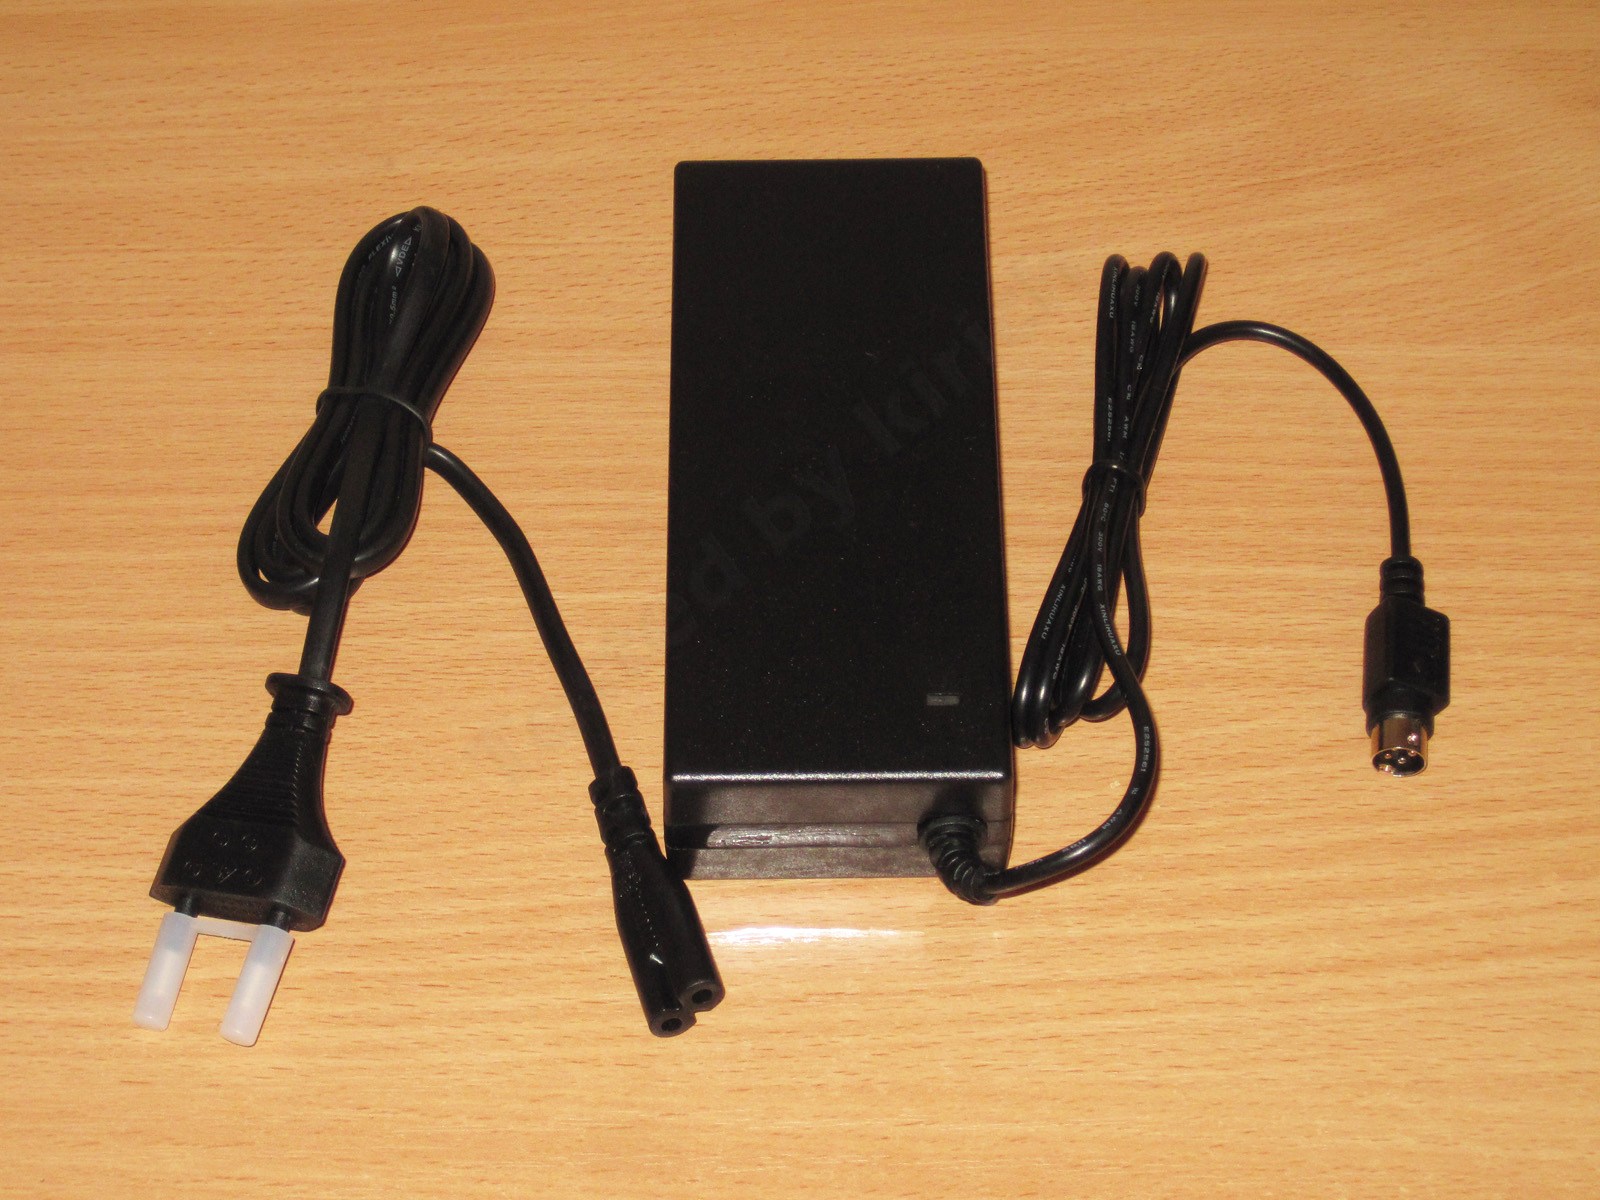
1. Power supply
2. Power cable
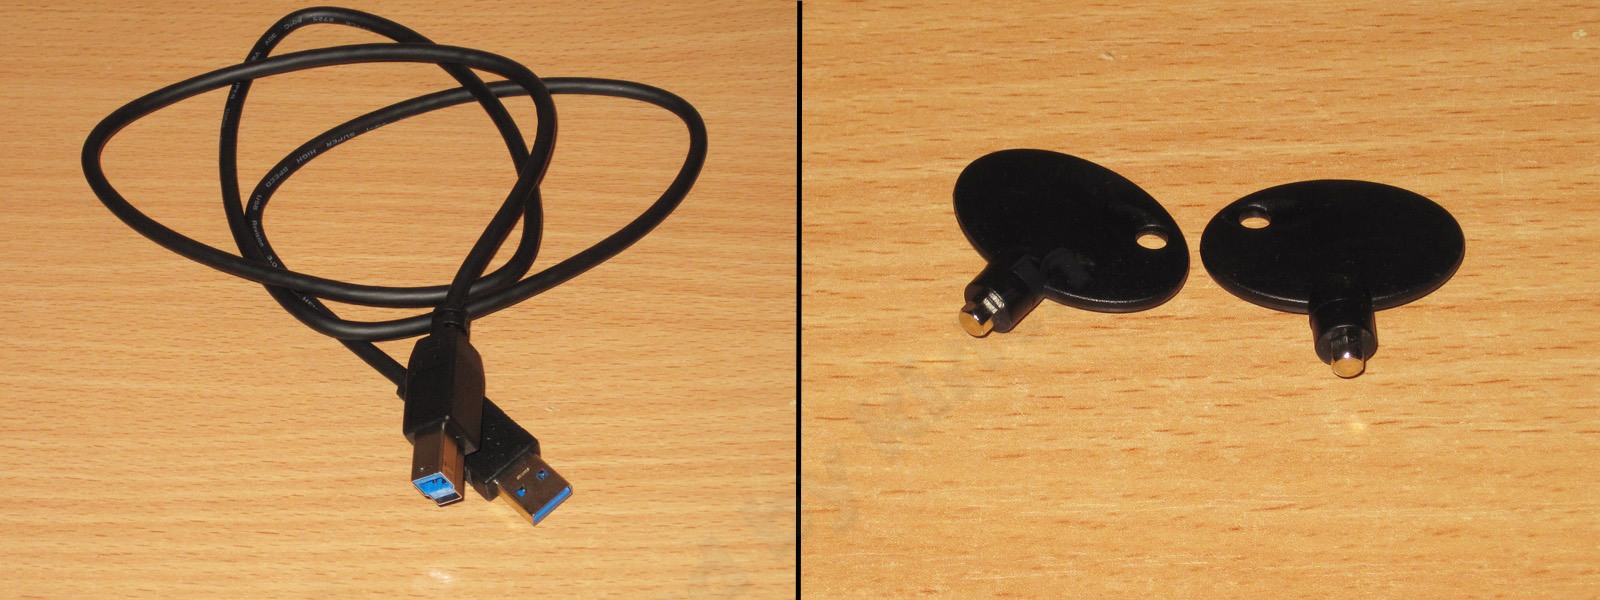
3. USB cable
4. A pair of keys
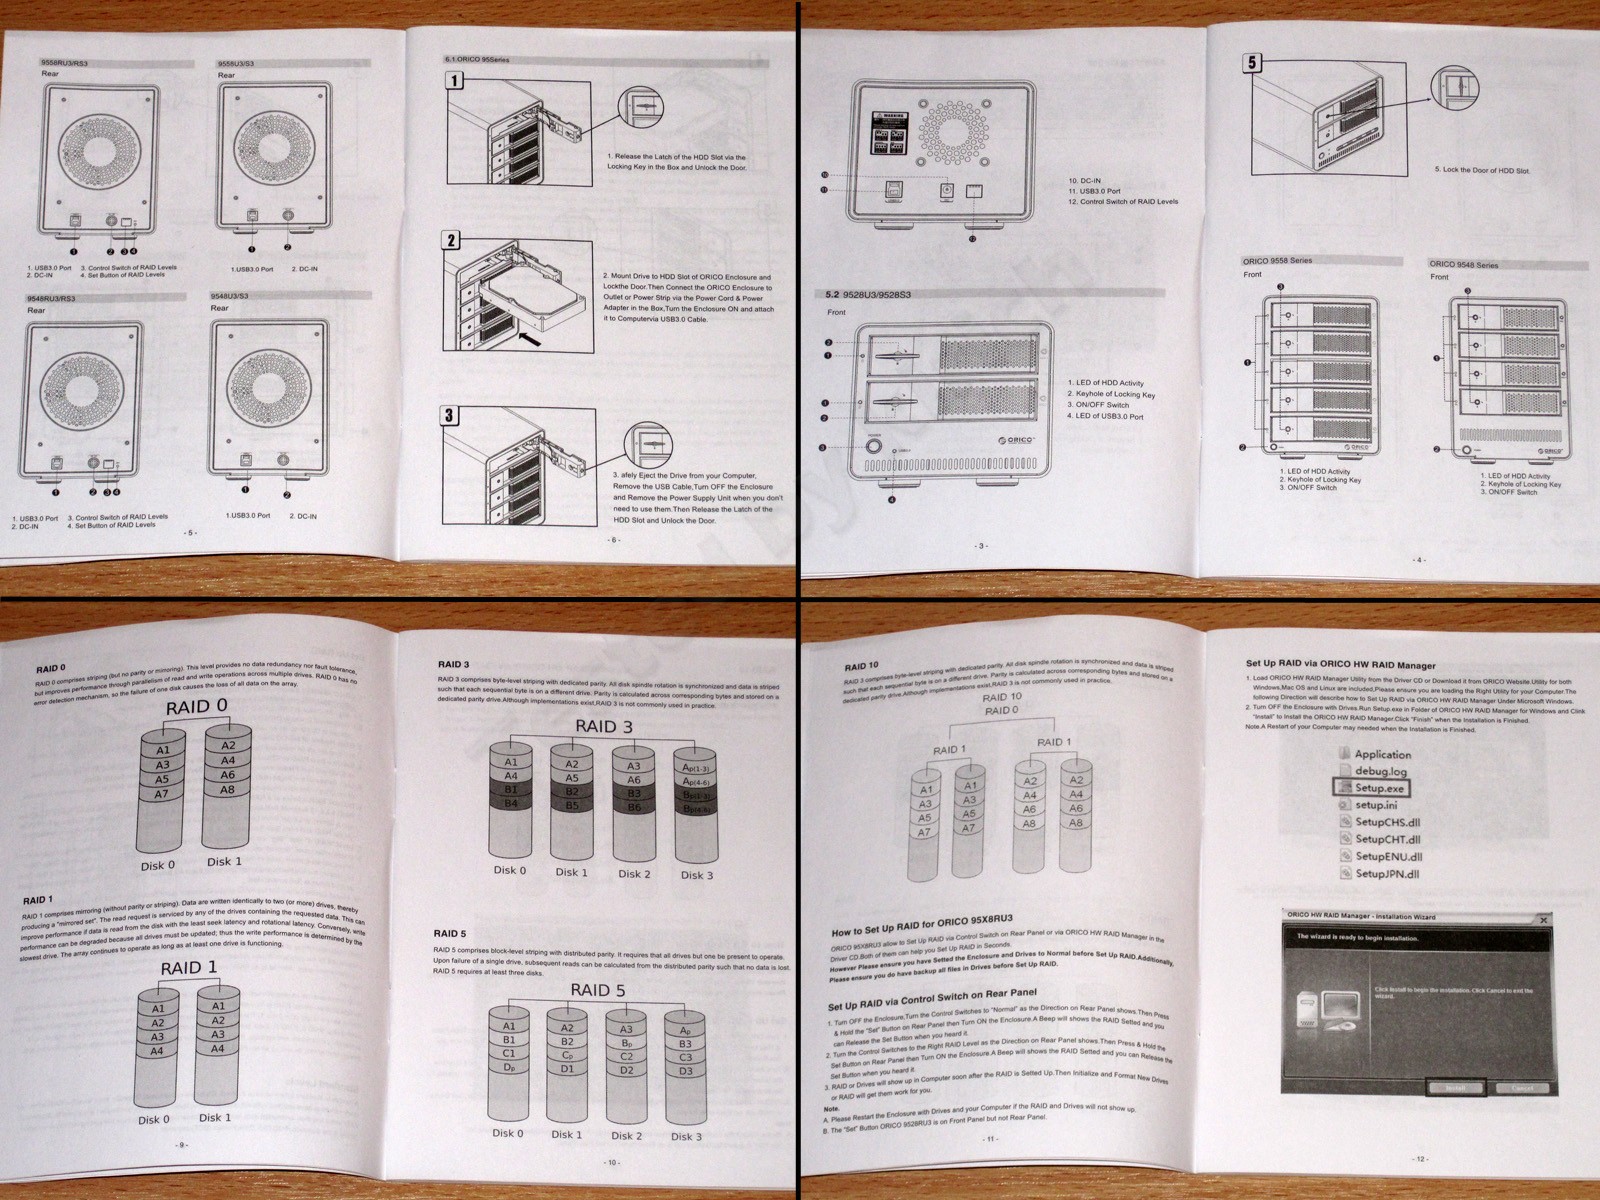
5. Manual
Unfortunately, the manual is in English, and I have to admit that even all those pictures won’t help someone who doesn’t know the language.
The thing is, the manual is intended for someone with an above-average level of technical knowledge. You don’t need to know much to turn it on and use it, but you will need that knowledge to use the device’s more specialized features.
They also included a puzzling little slip of paper with a pair of smiley faces, one happy and one sad. I assume it’s for sending feedback about the product.

The included cable is decent, although it has no interference filters. I’m glad the manufacturer used the proper USB Type-B connector to connect to the device.
That connector is much more reliable than the common MicroUSB type.
They also included a pair of little keys, though technically they’re small hex keys with handles. The locks aren’t meant to keep other people from accessing your drives; they’re there to prevent the bay from being opened accidentally and the drive from being disconnected by the user.
The power supply is fairly large and has a detachable cable. The only downside is that the cable isn’t the standard grounded computer power cable, but a simpler one with a figure-eight connector. That makes it a little harder to find a replacement cable, but at least it can be replaced. It could also come in handy if you order the device with a cable that doesn’t fit your local outlets.
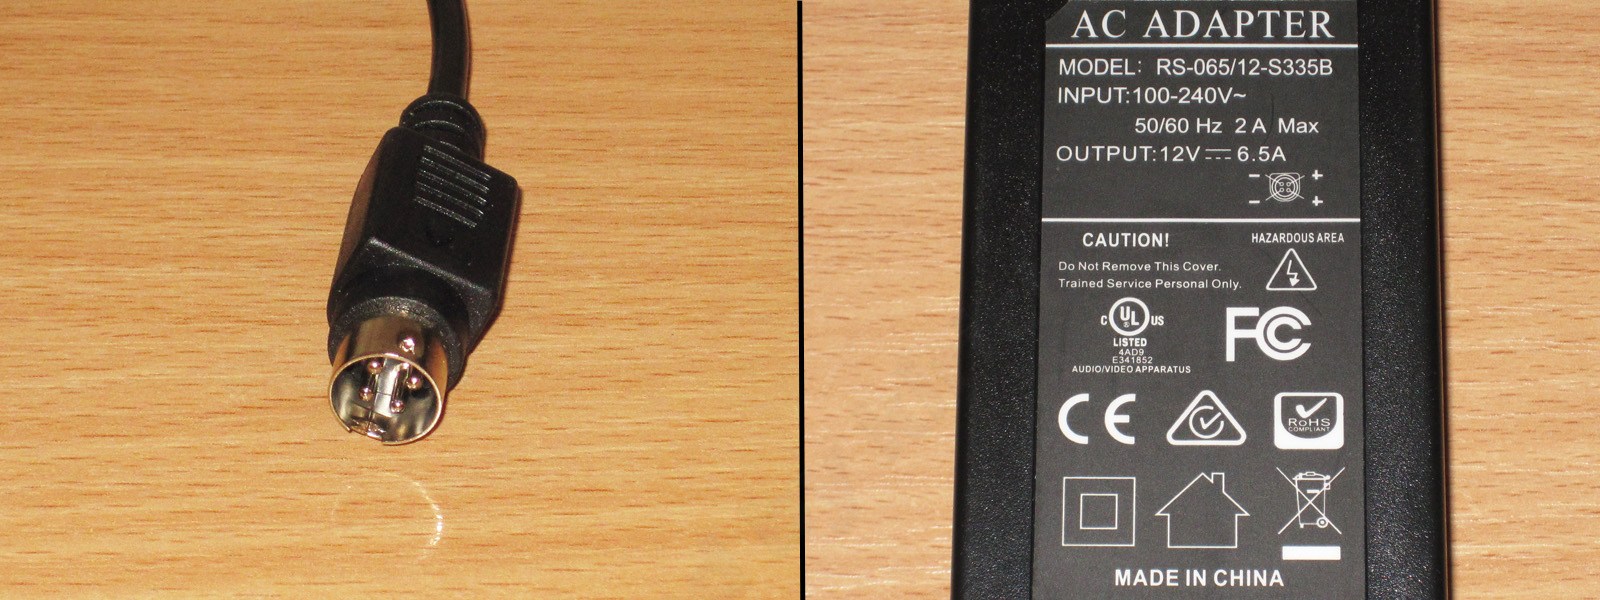
The power supply connects to the device via a four-pin connector, the kind I've seen on DVRs.
Unlike DVRs, where the power supply sometimes provided two voltages, this one is designed for 12 V only, and the connector pins are paired up.
The power supply is rated for an output current of up to 6.5 A.
I've heard good things about Orico products more than once, and I also have a USB 3.0 card from this manufacturer in my computer, so I was curious to see how the power supply was put together.
People usually assume that when a power supply fails, the load is what suffers. That's only partly true, since it depends on the type of failure. The power supply has a greater impact on the overall device's service life and reliability.
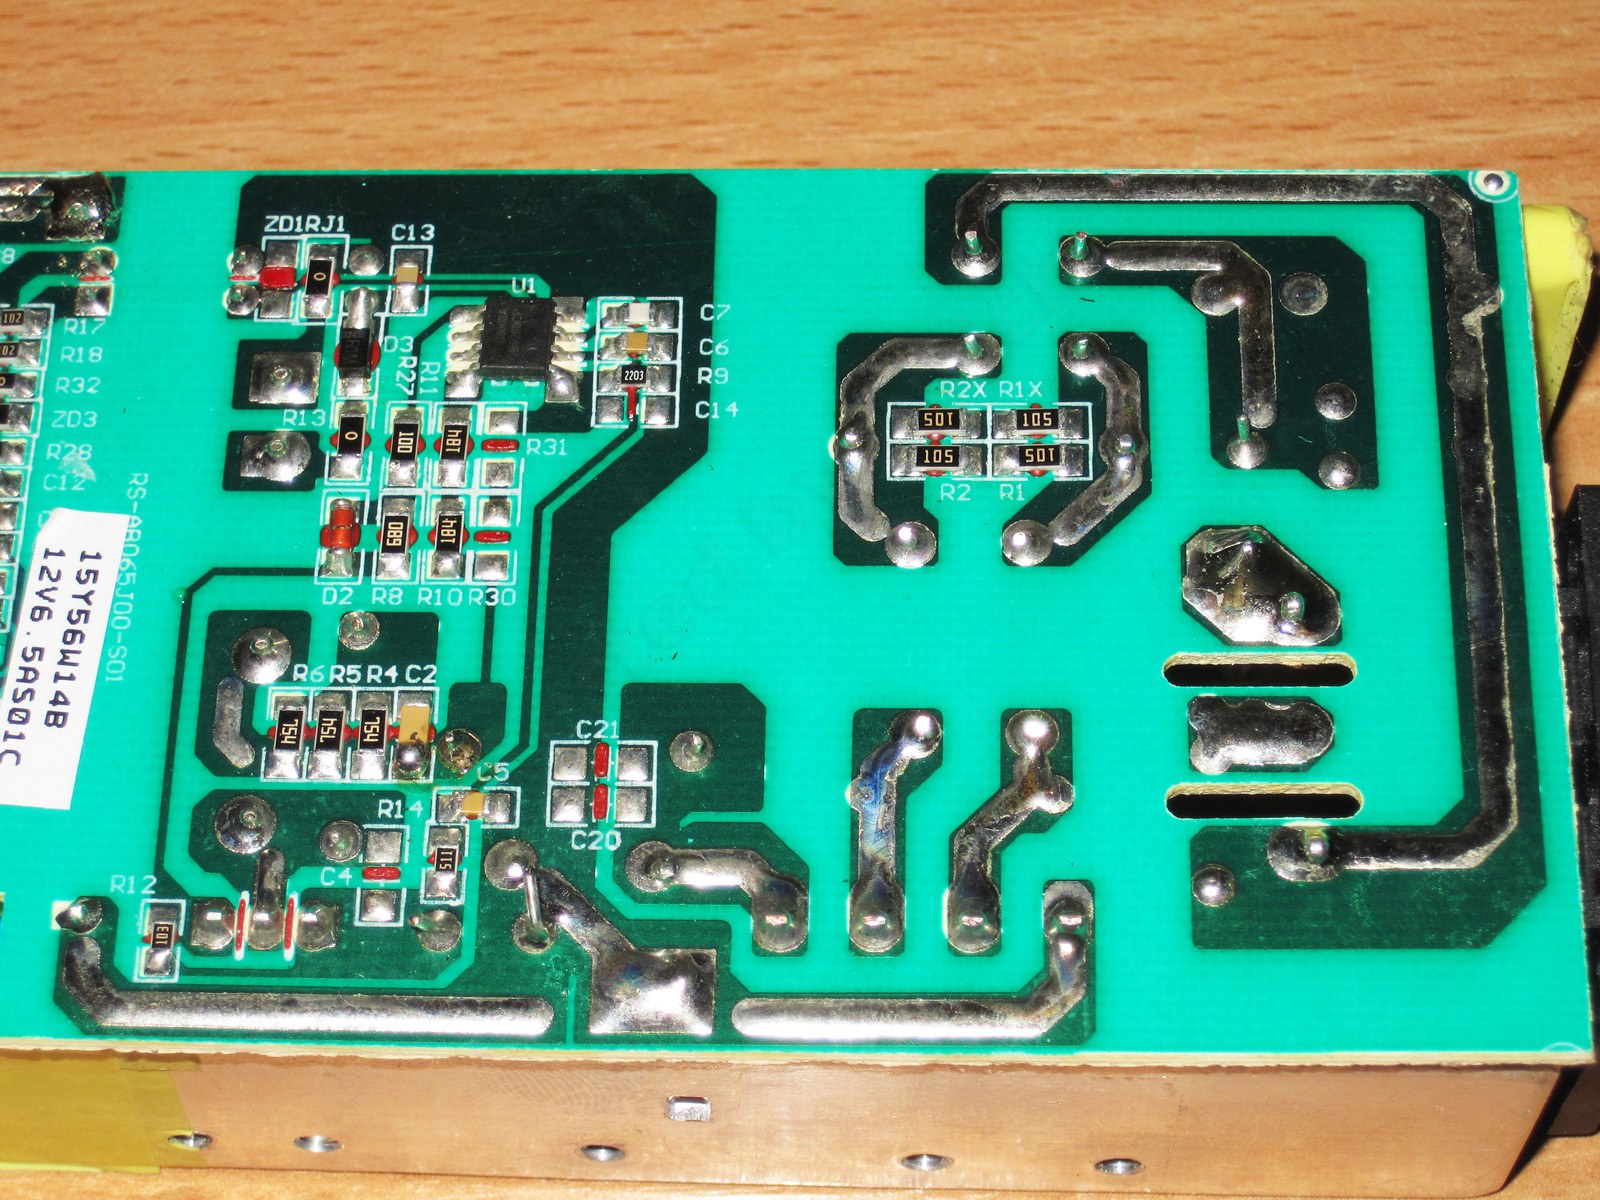
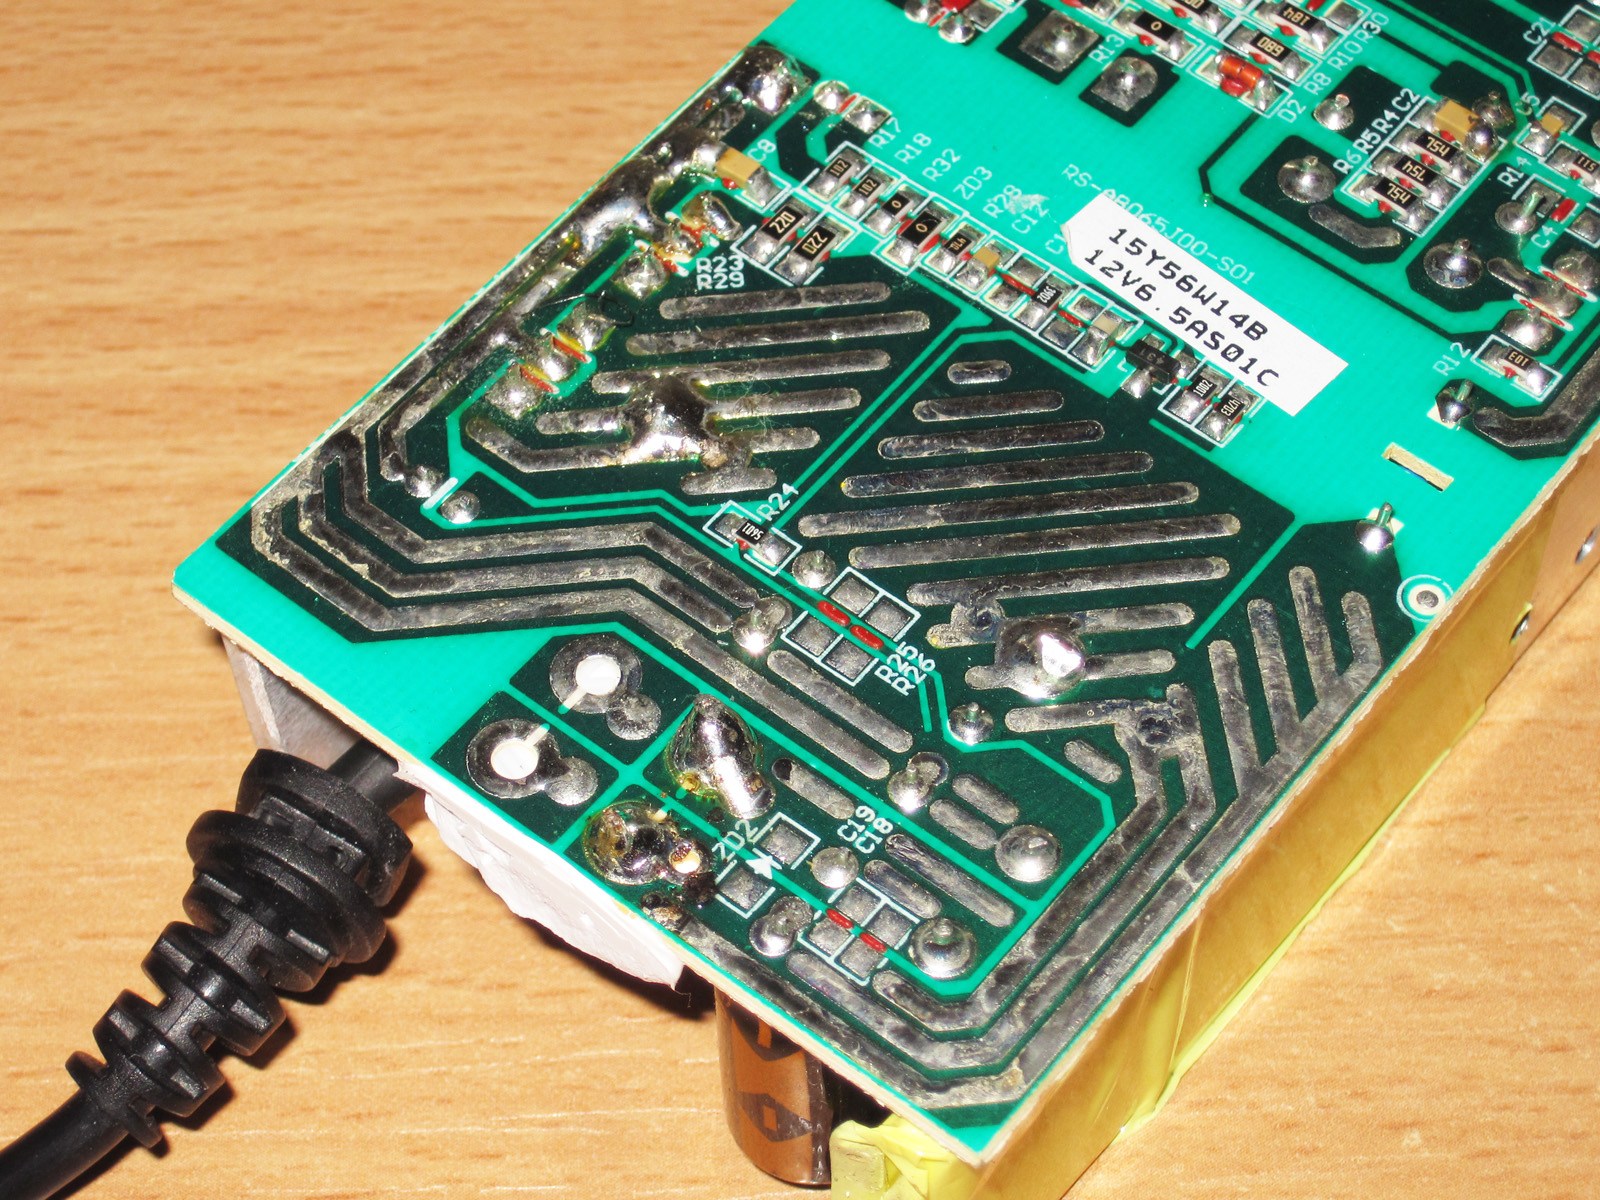
So, the power supply was mercilessly opened up and inspected.
The design is very similar to the familiar “laptop” power supplies.
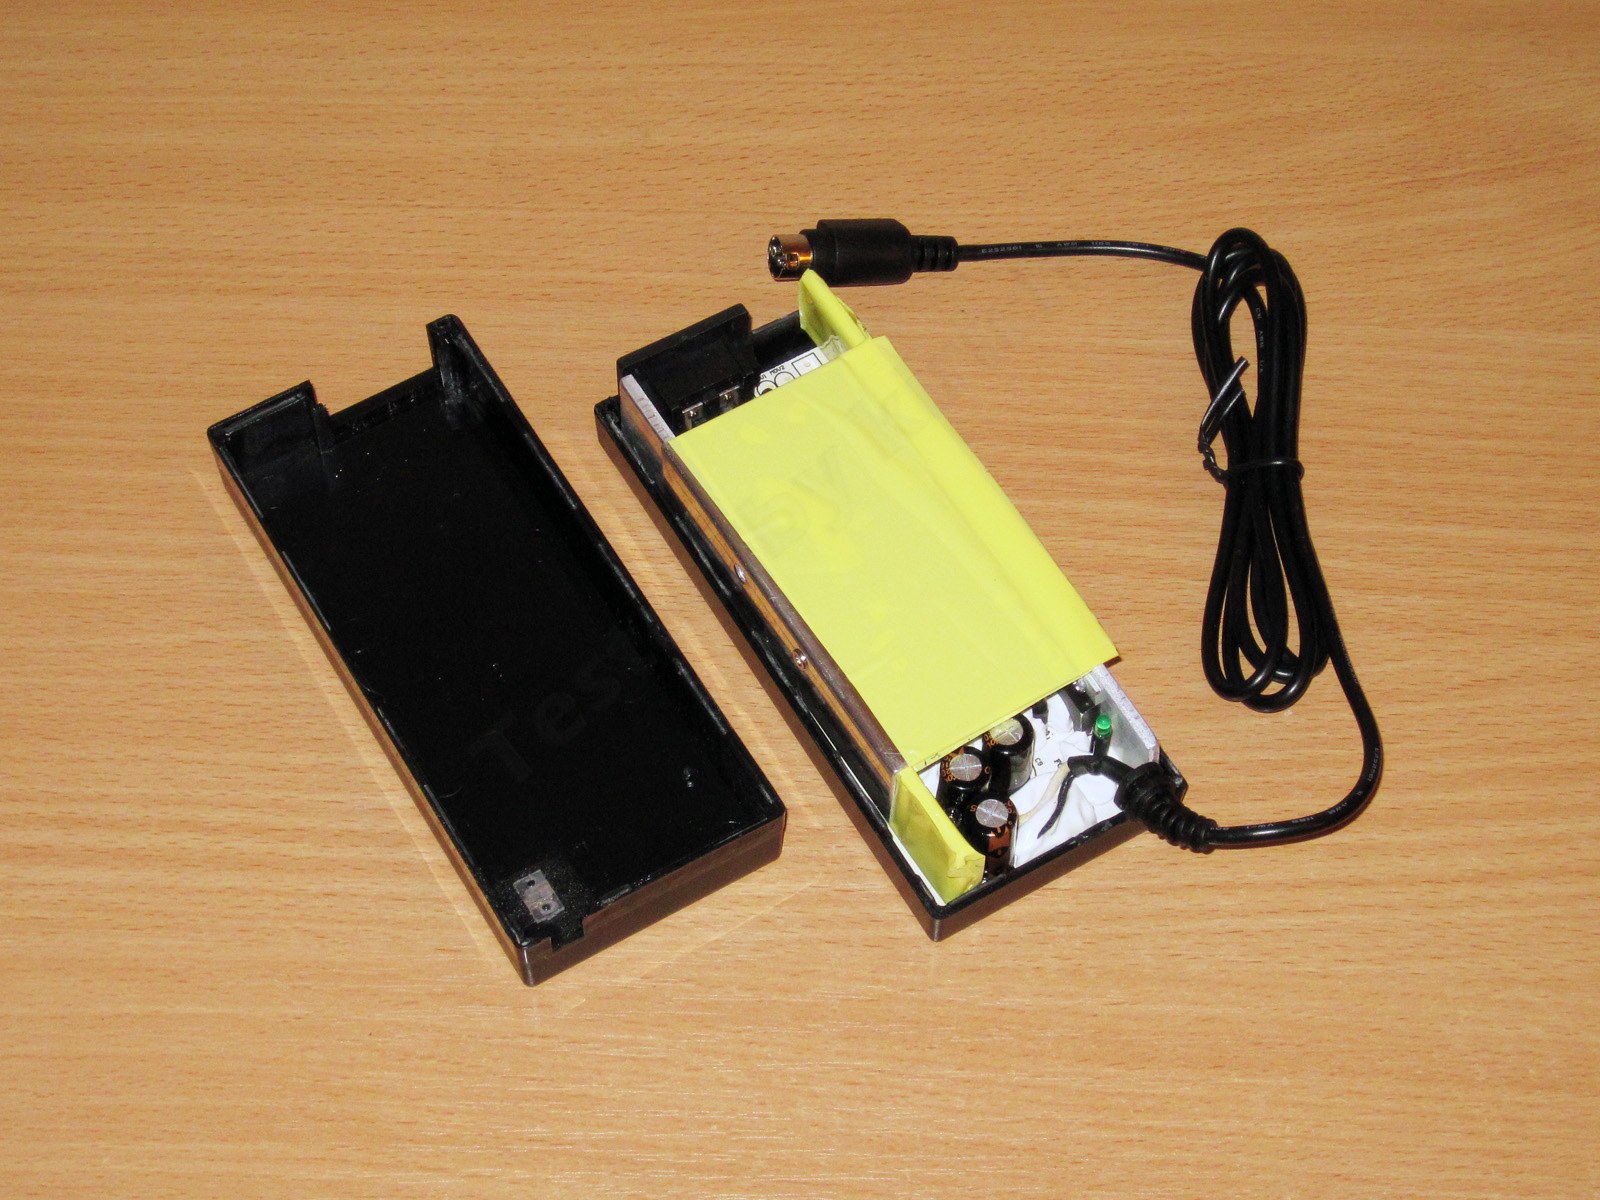
The rest of the teardown is hidden under the spoiler.

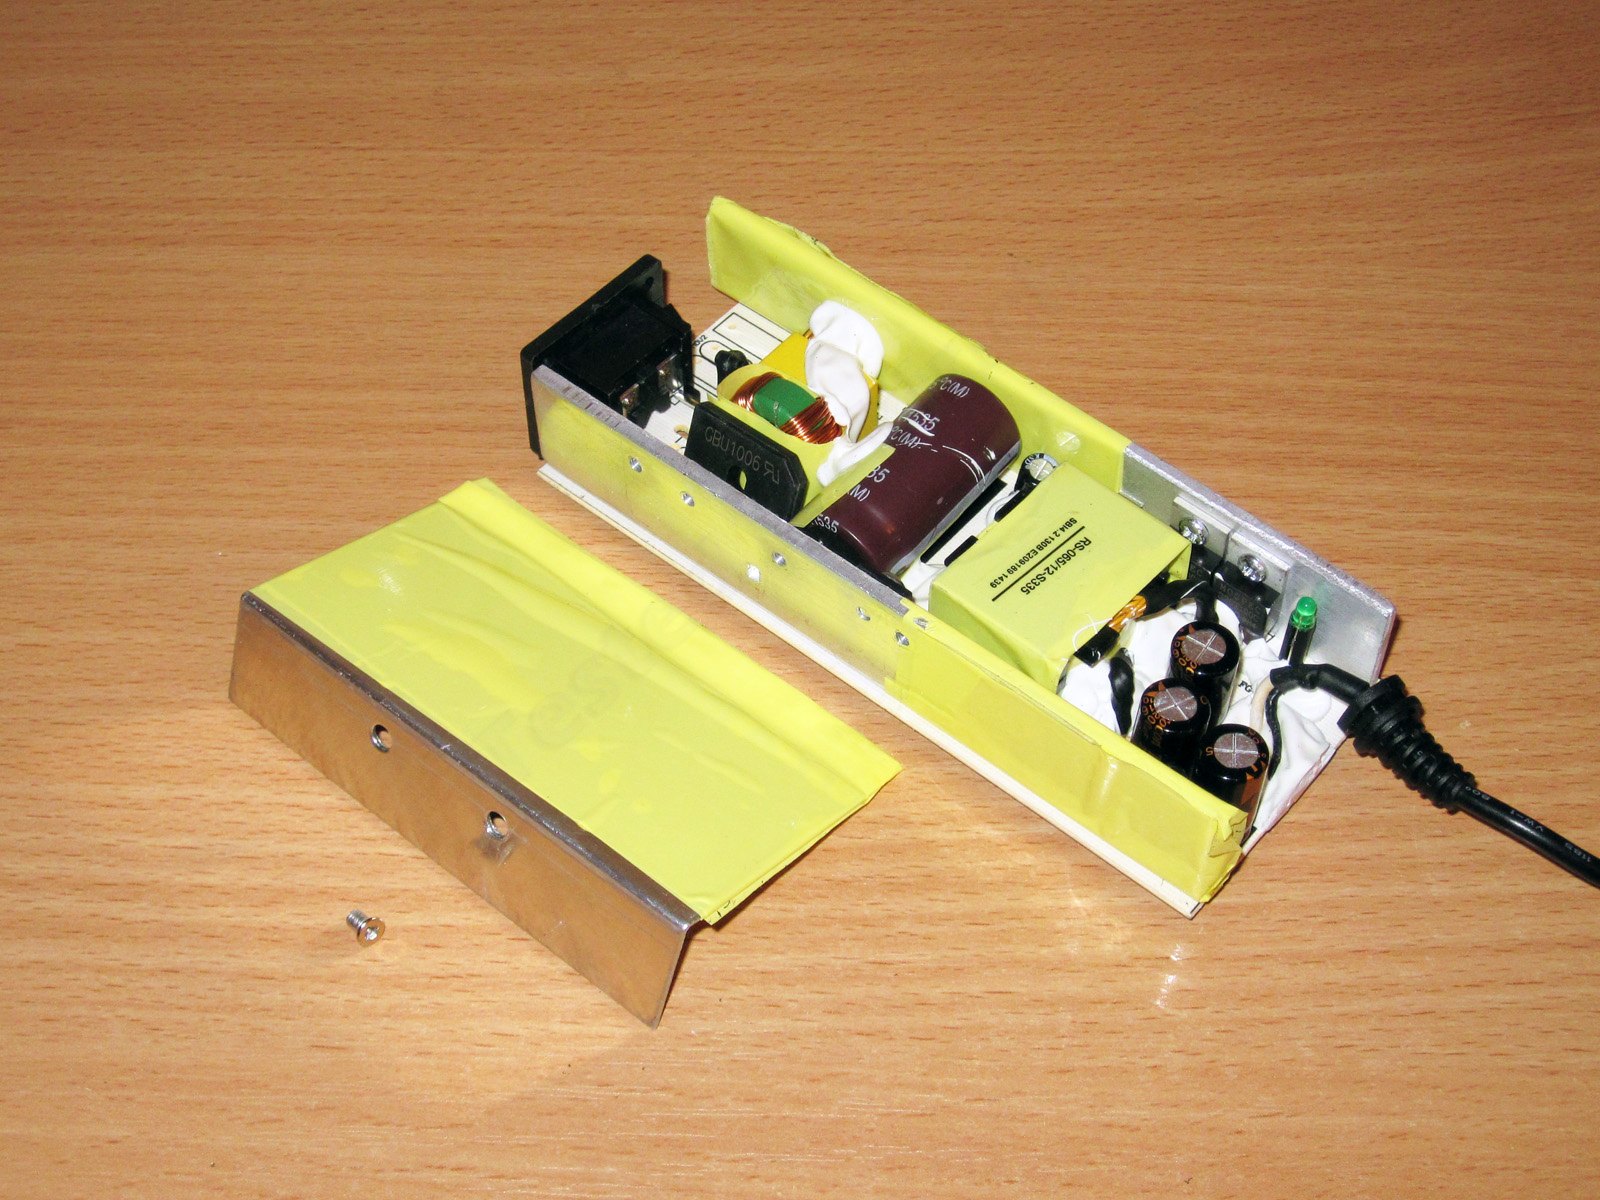

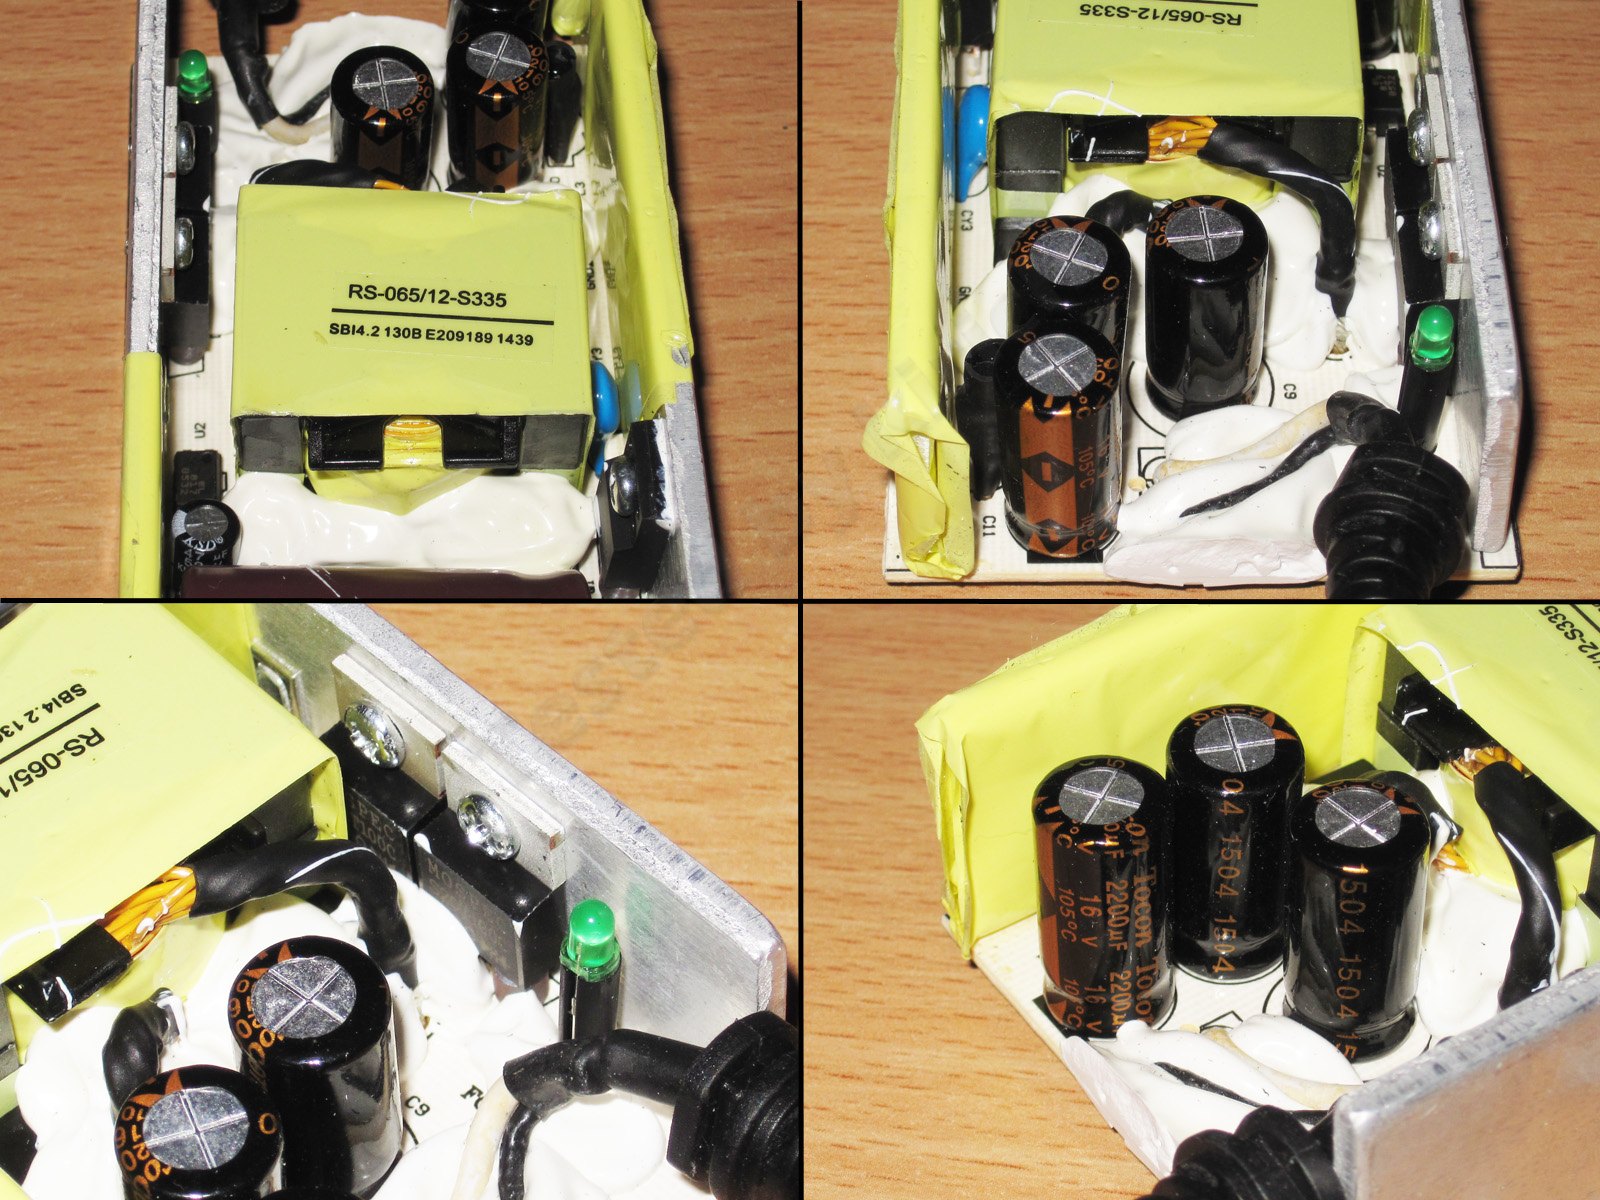
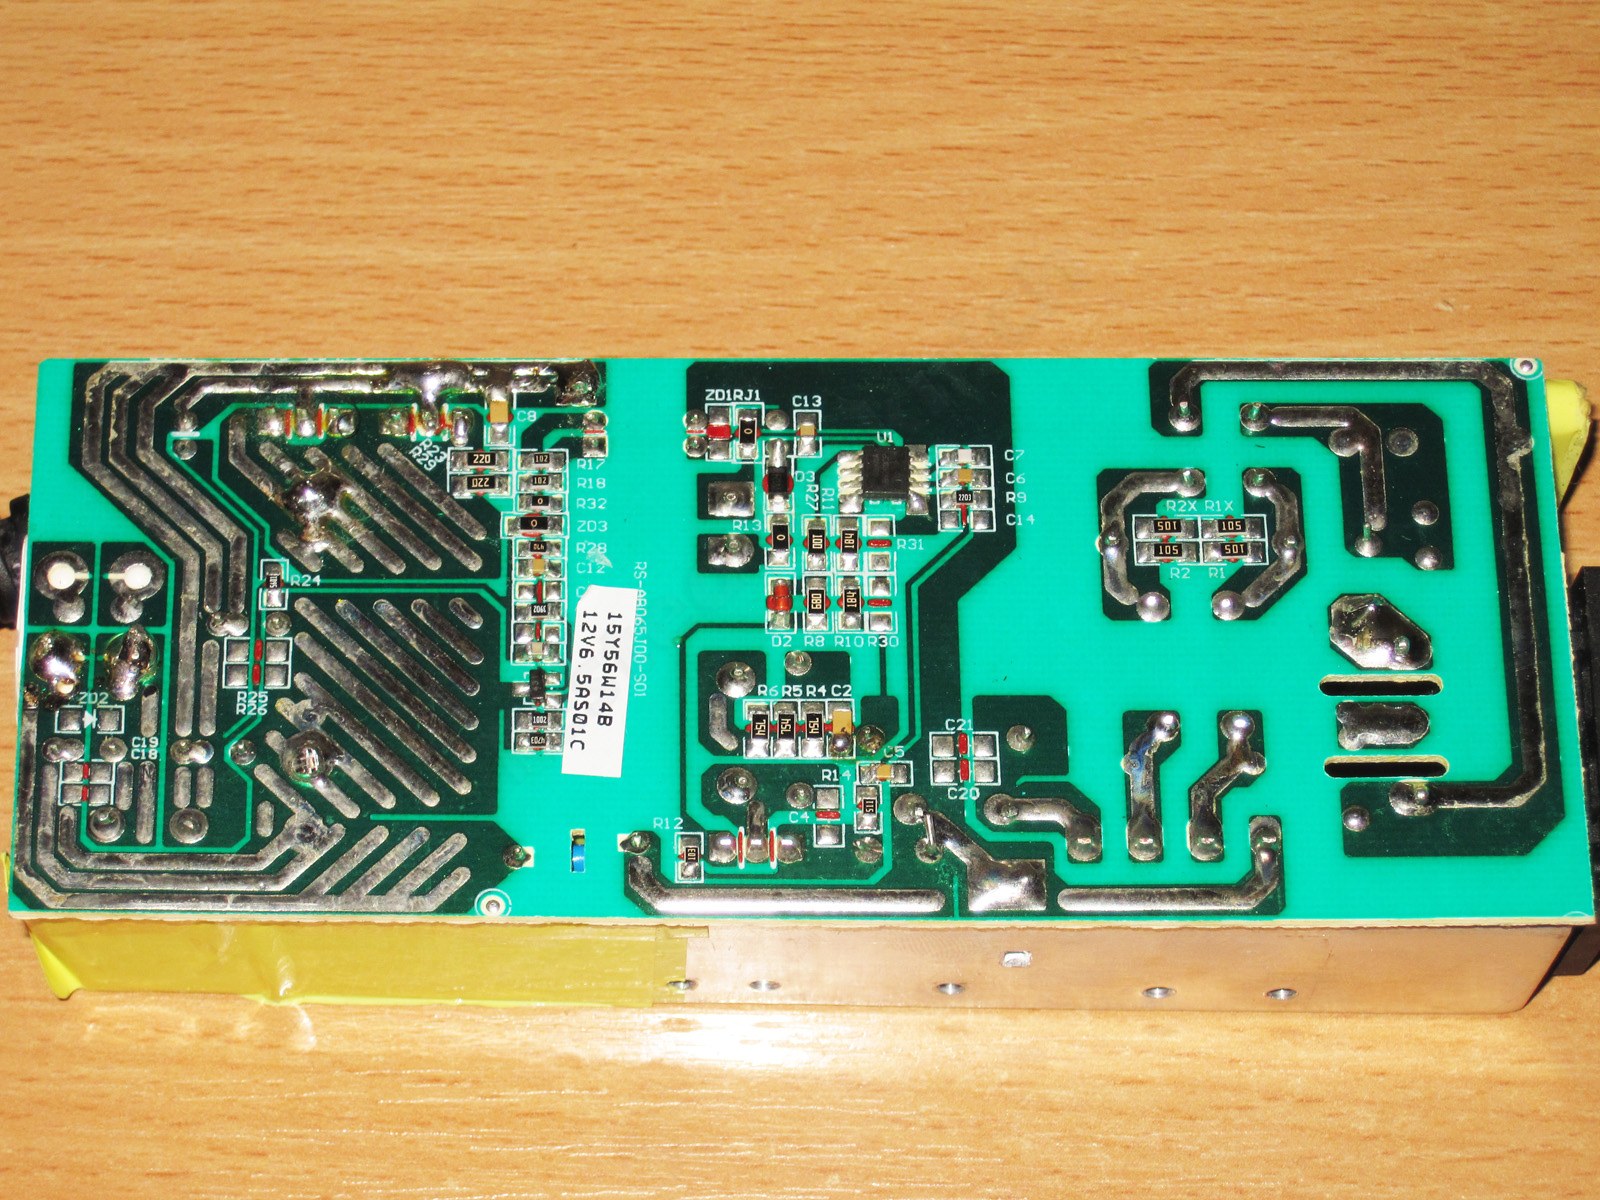
I needn't have worried about the color: they sent the right one, a black enclosure.
It looks great; at least, I have absolutely no complaints about its appearance.
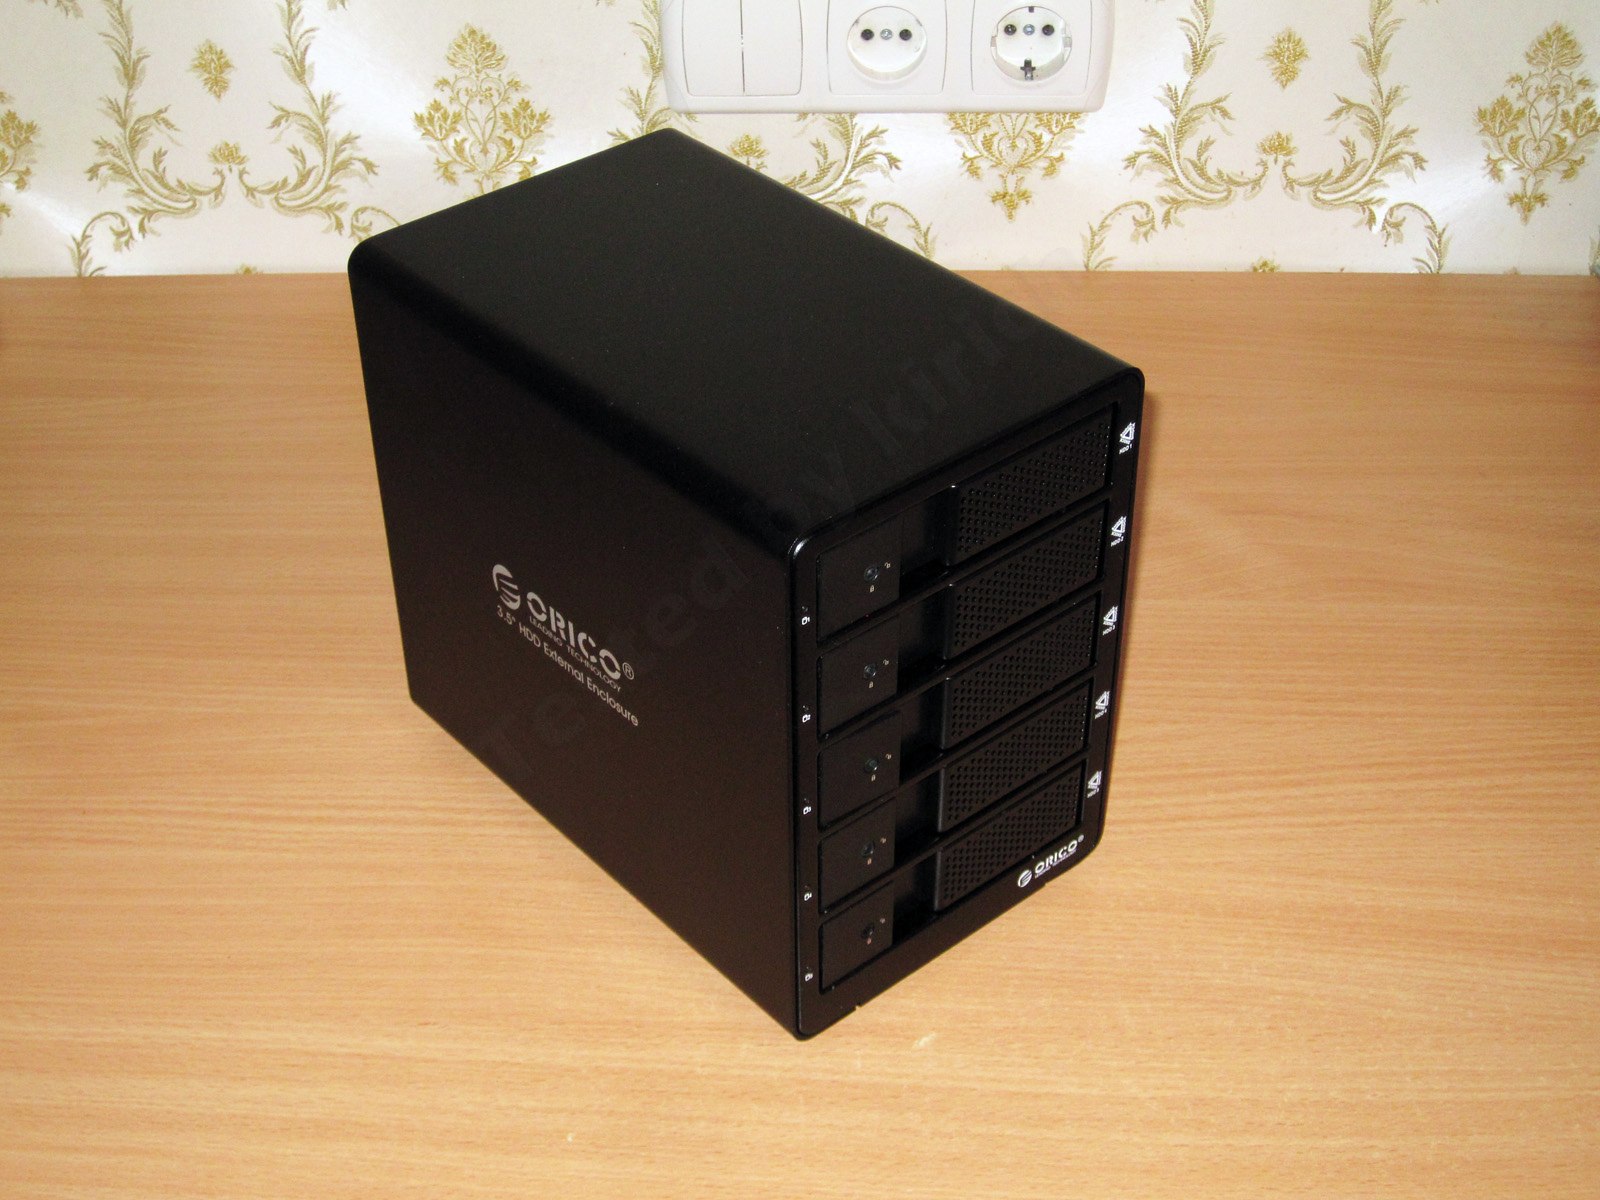
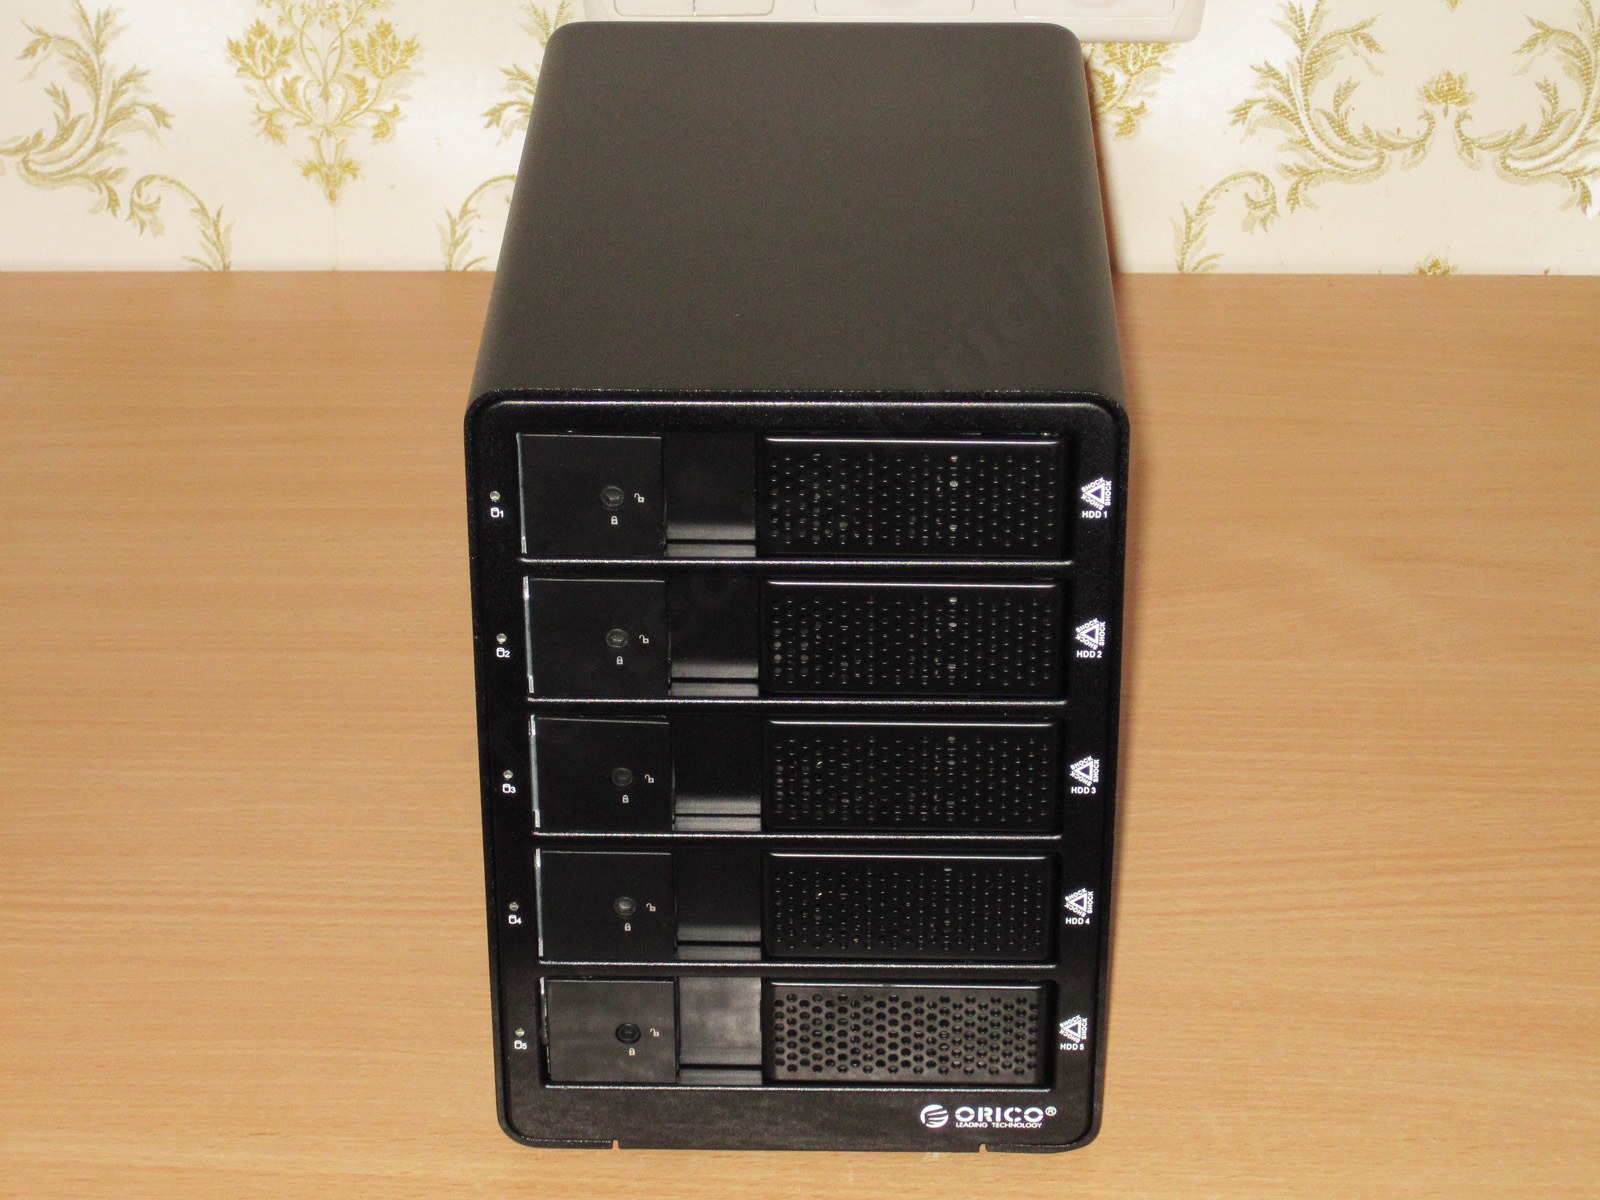
The front panel has five hard drive bays, and each bay door has ventilation holes.
By the way, there are several versions of this enclosure, and their designs differ noticeably. For example, the four-drive version has ventilation holes only at the very bottom, where the lowest door would be, but isn't.
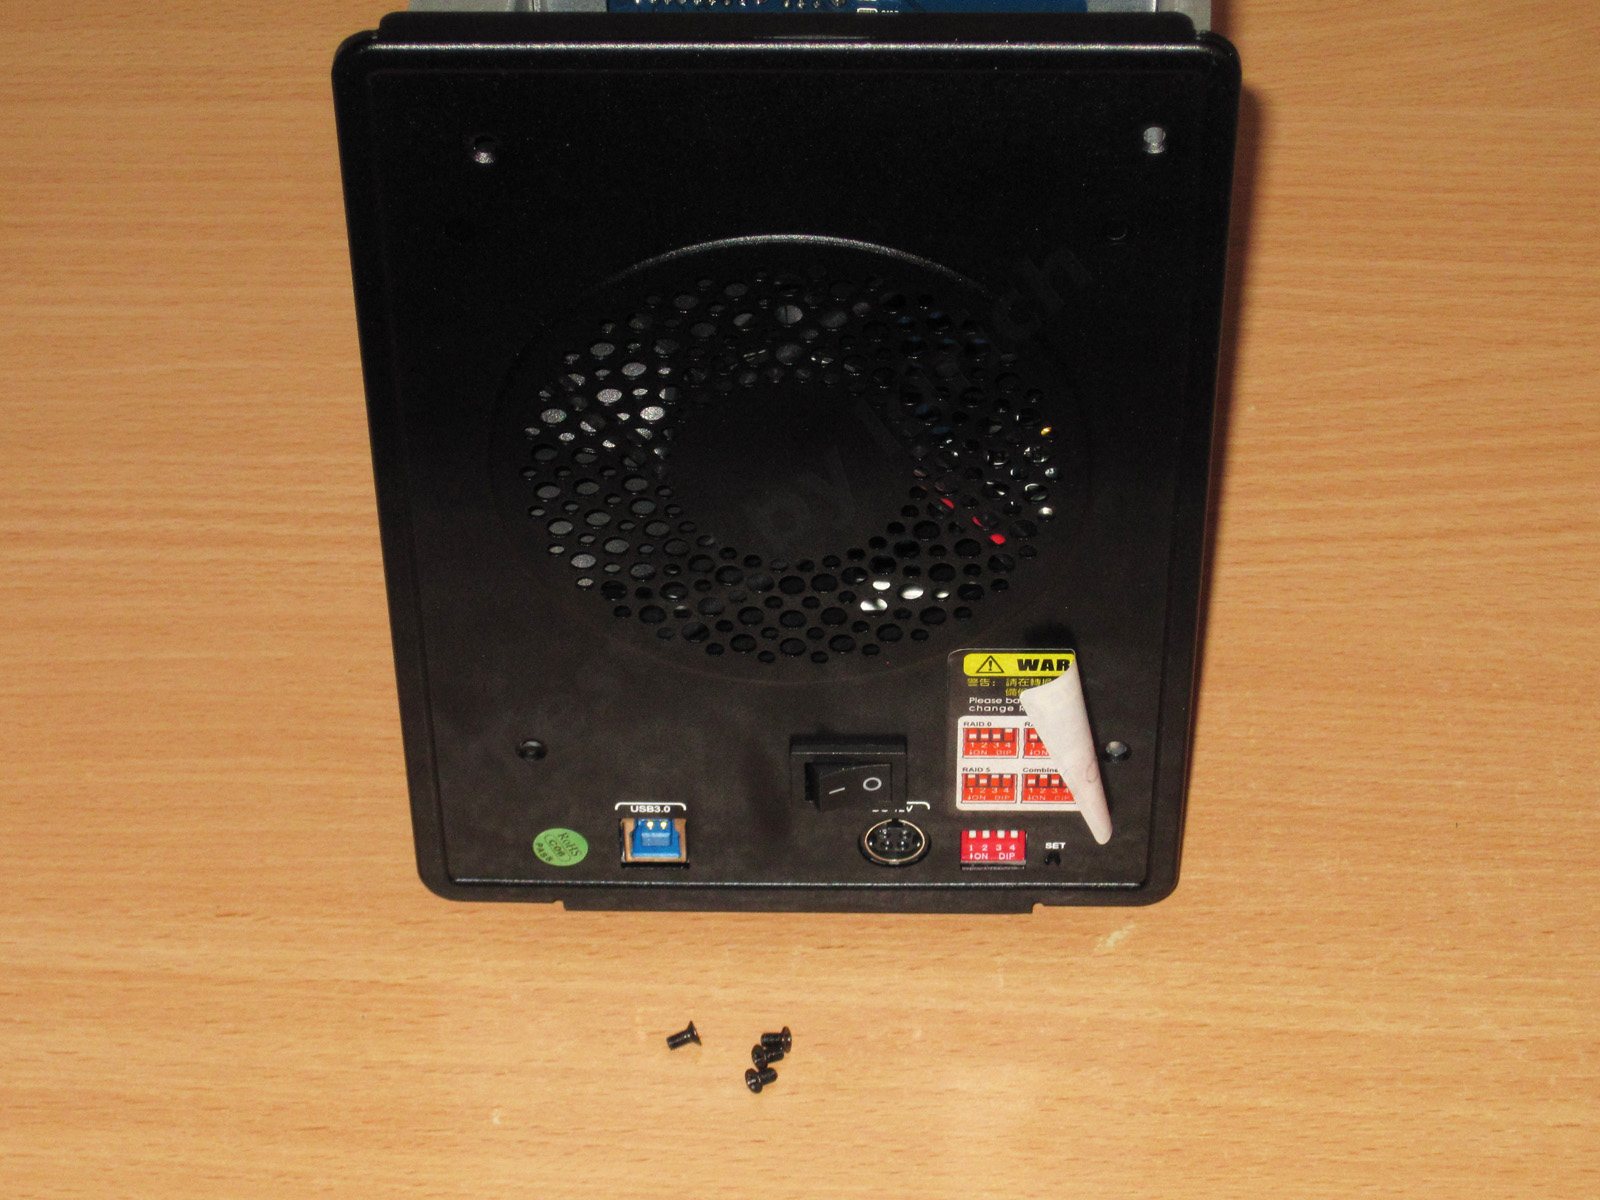
The back has a large fan, a power connector, and various switches.
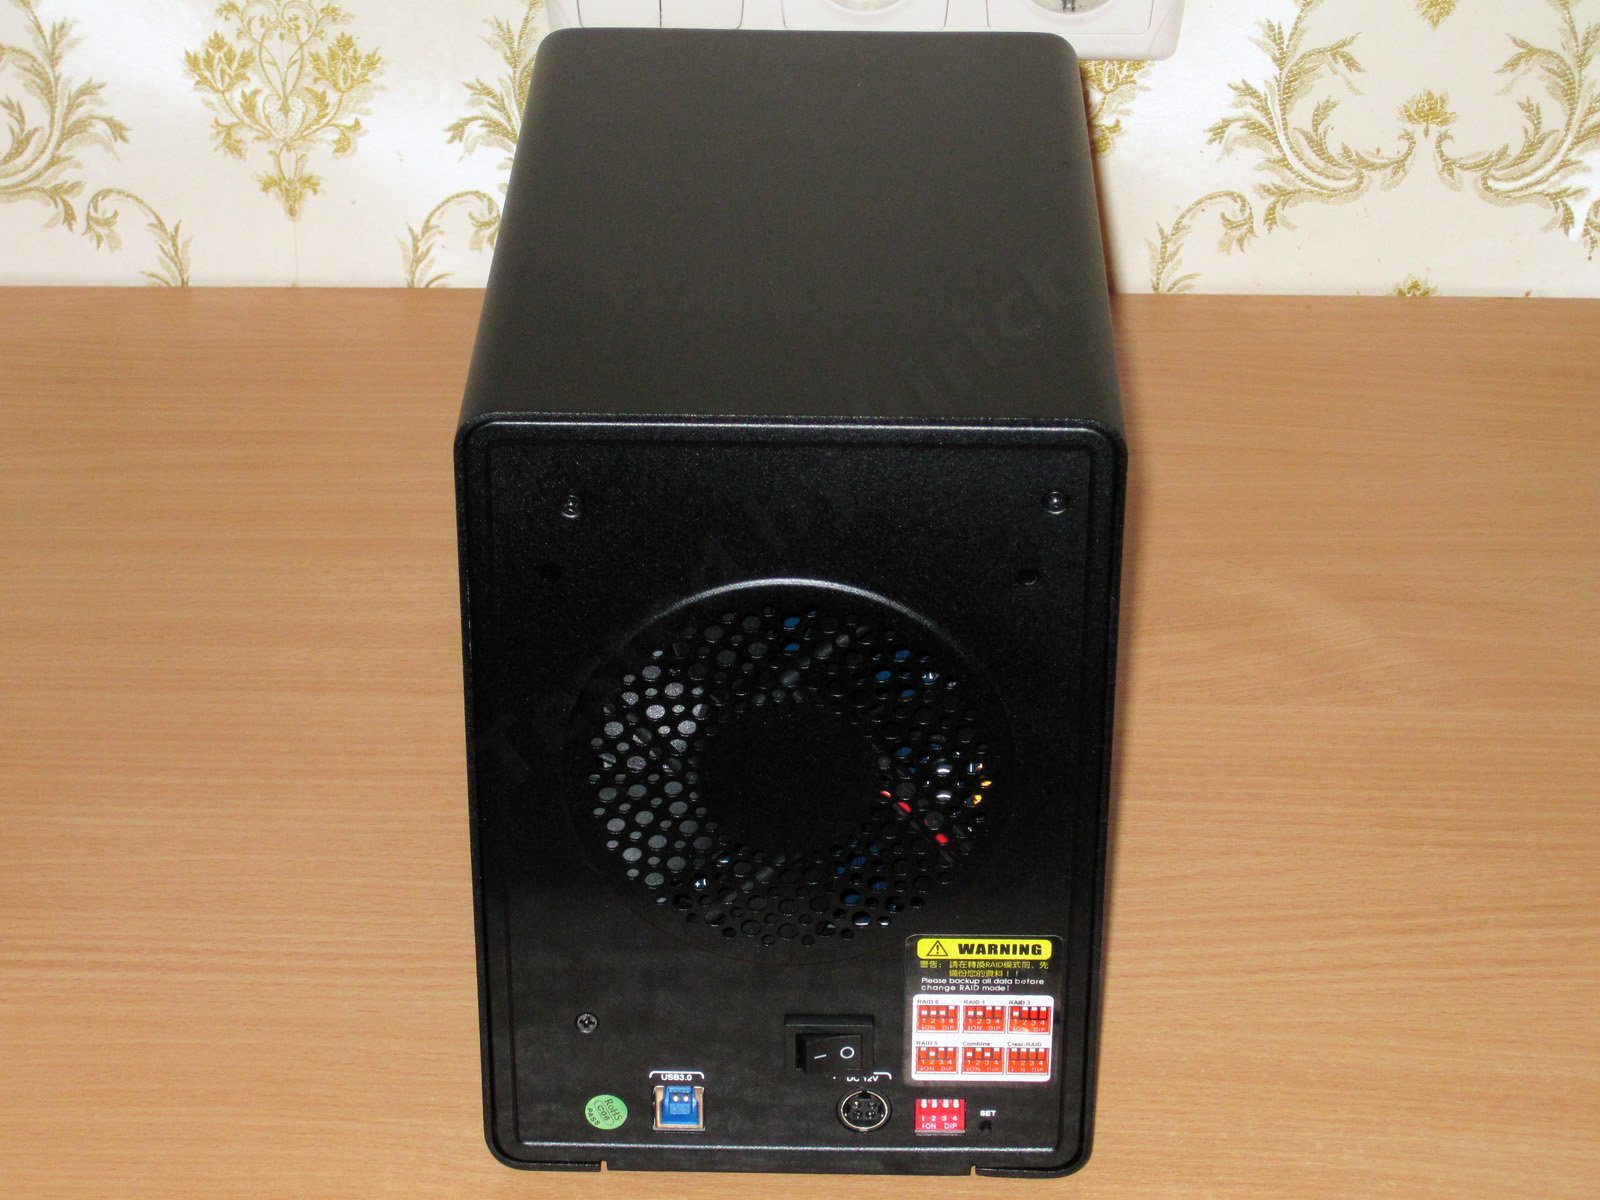
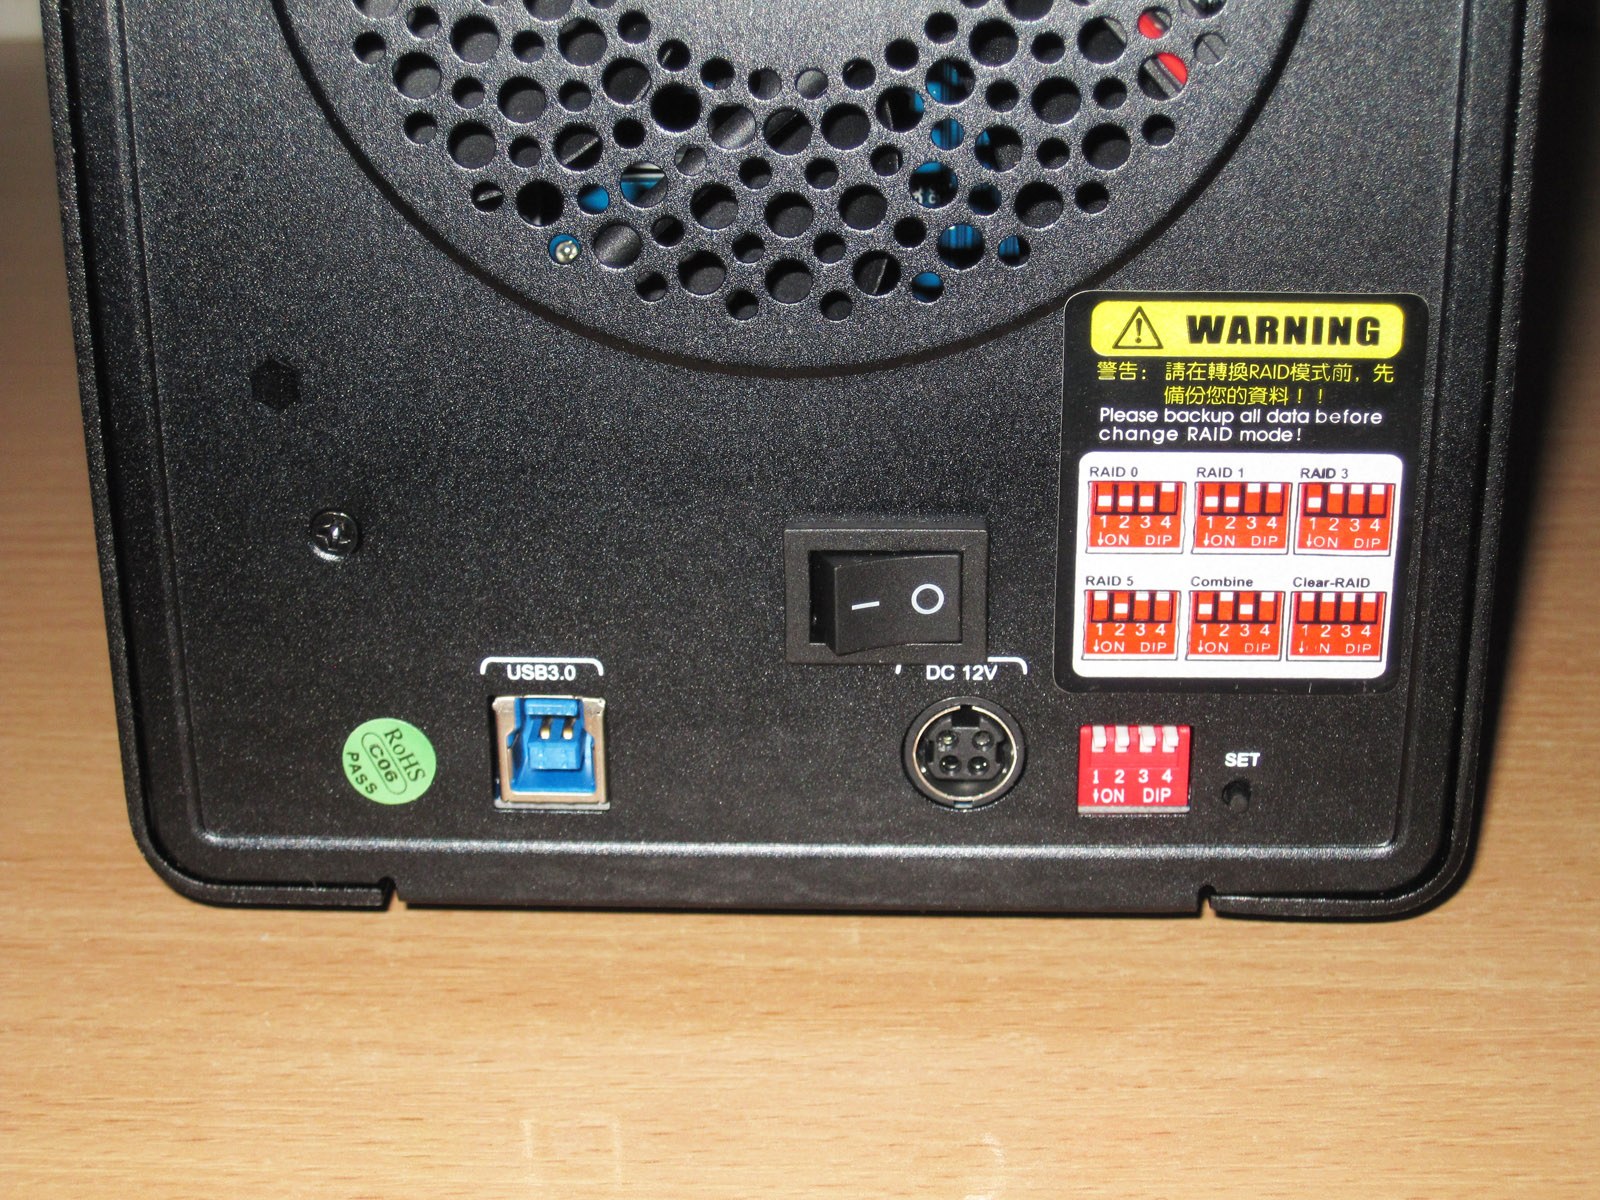
The rear panel has:
1. USB port
2. Power switch
3. Power connector.
4. Switch for selecting the built-in RAID controller's operating mode
5. Button to activate the selected mode.
Let me explain that last button separately.
Use the switches to select the controller's operating mode, then press the SET button. This prevents the mode from being changed accidentally while the unit is running.
By default, the controller operates without RAID, meaning each drive appears as an independent device. That's why I said at the beginning that anyone can simply plug it in and use it, but you'll need to read the manual to use the additional modes.
Here's what the device looks like with the cover open. For some reason, I initially thought the drives went in using special caddies, but it's much simpler: you slide a drive straight into the enclosure and close the door, which holds it in place.
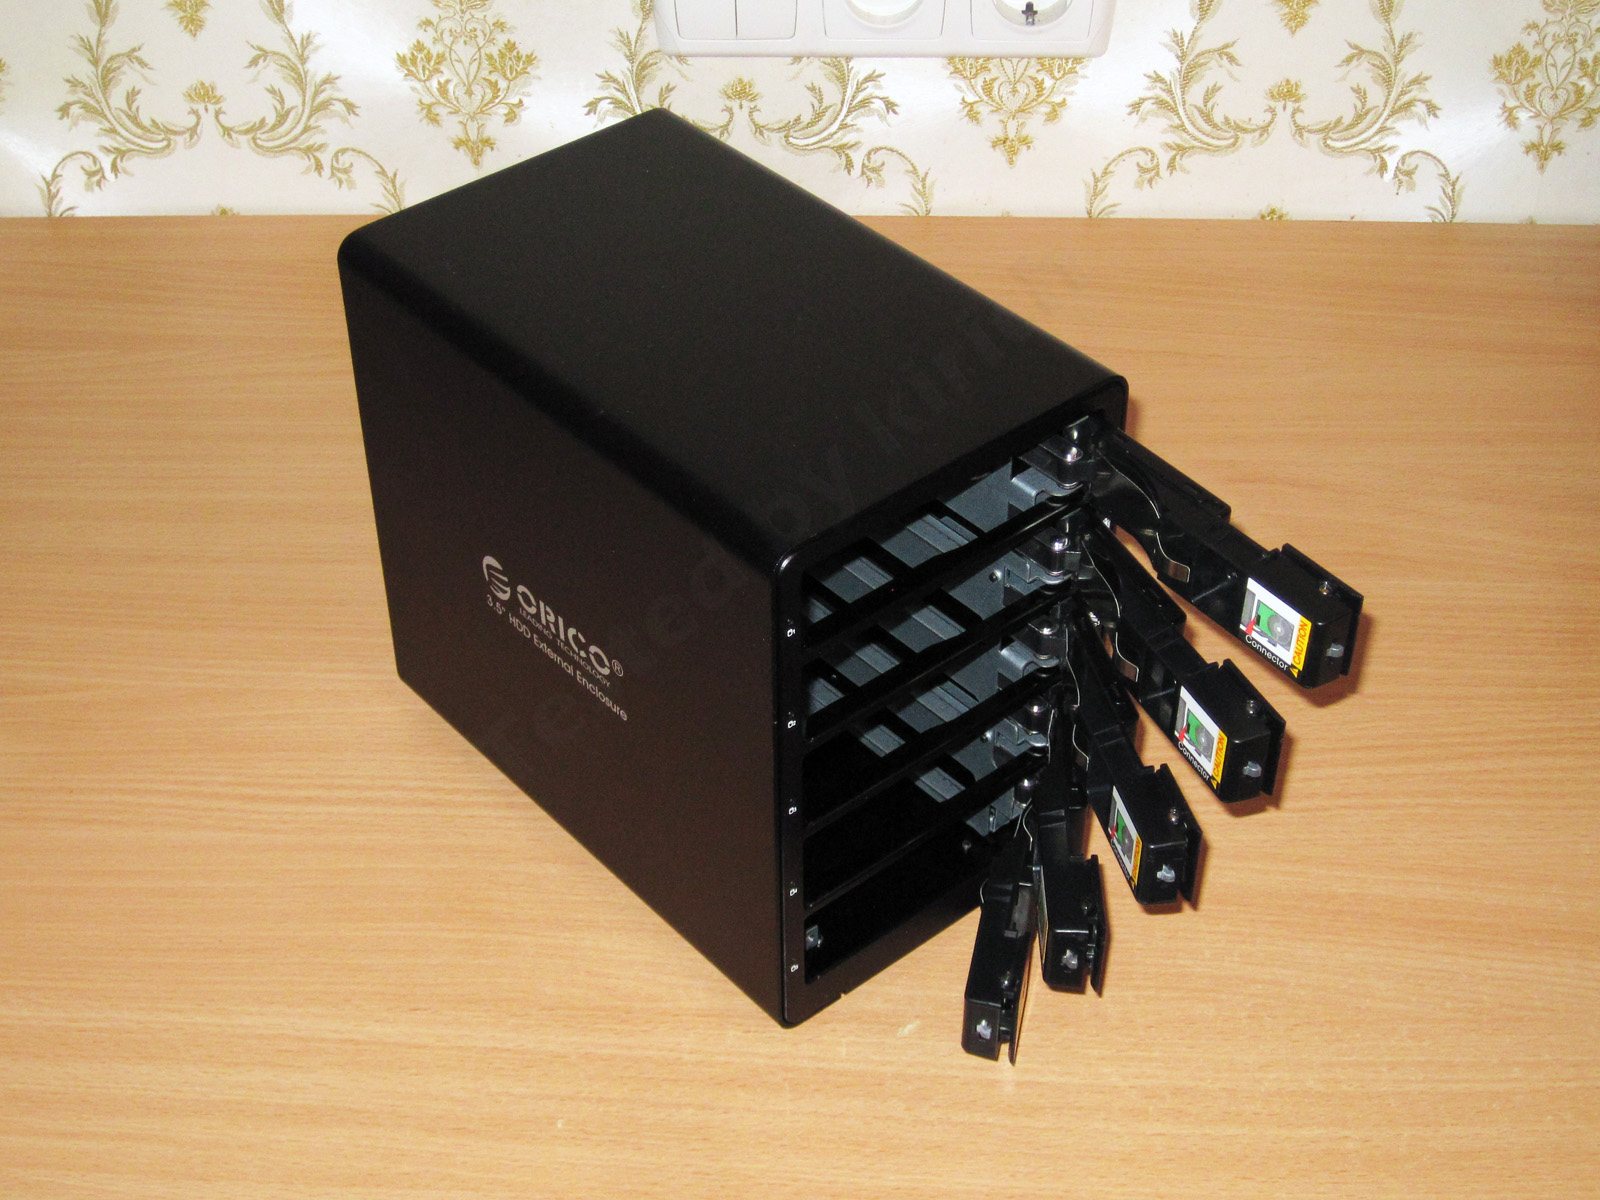
A spring strip on the door holds the drives in place.
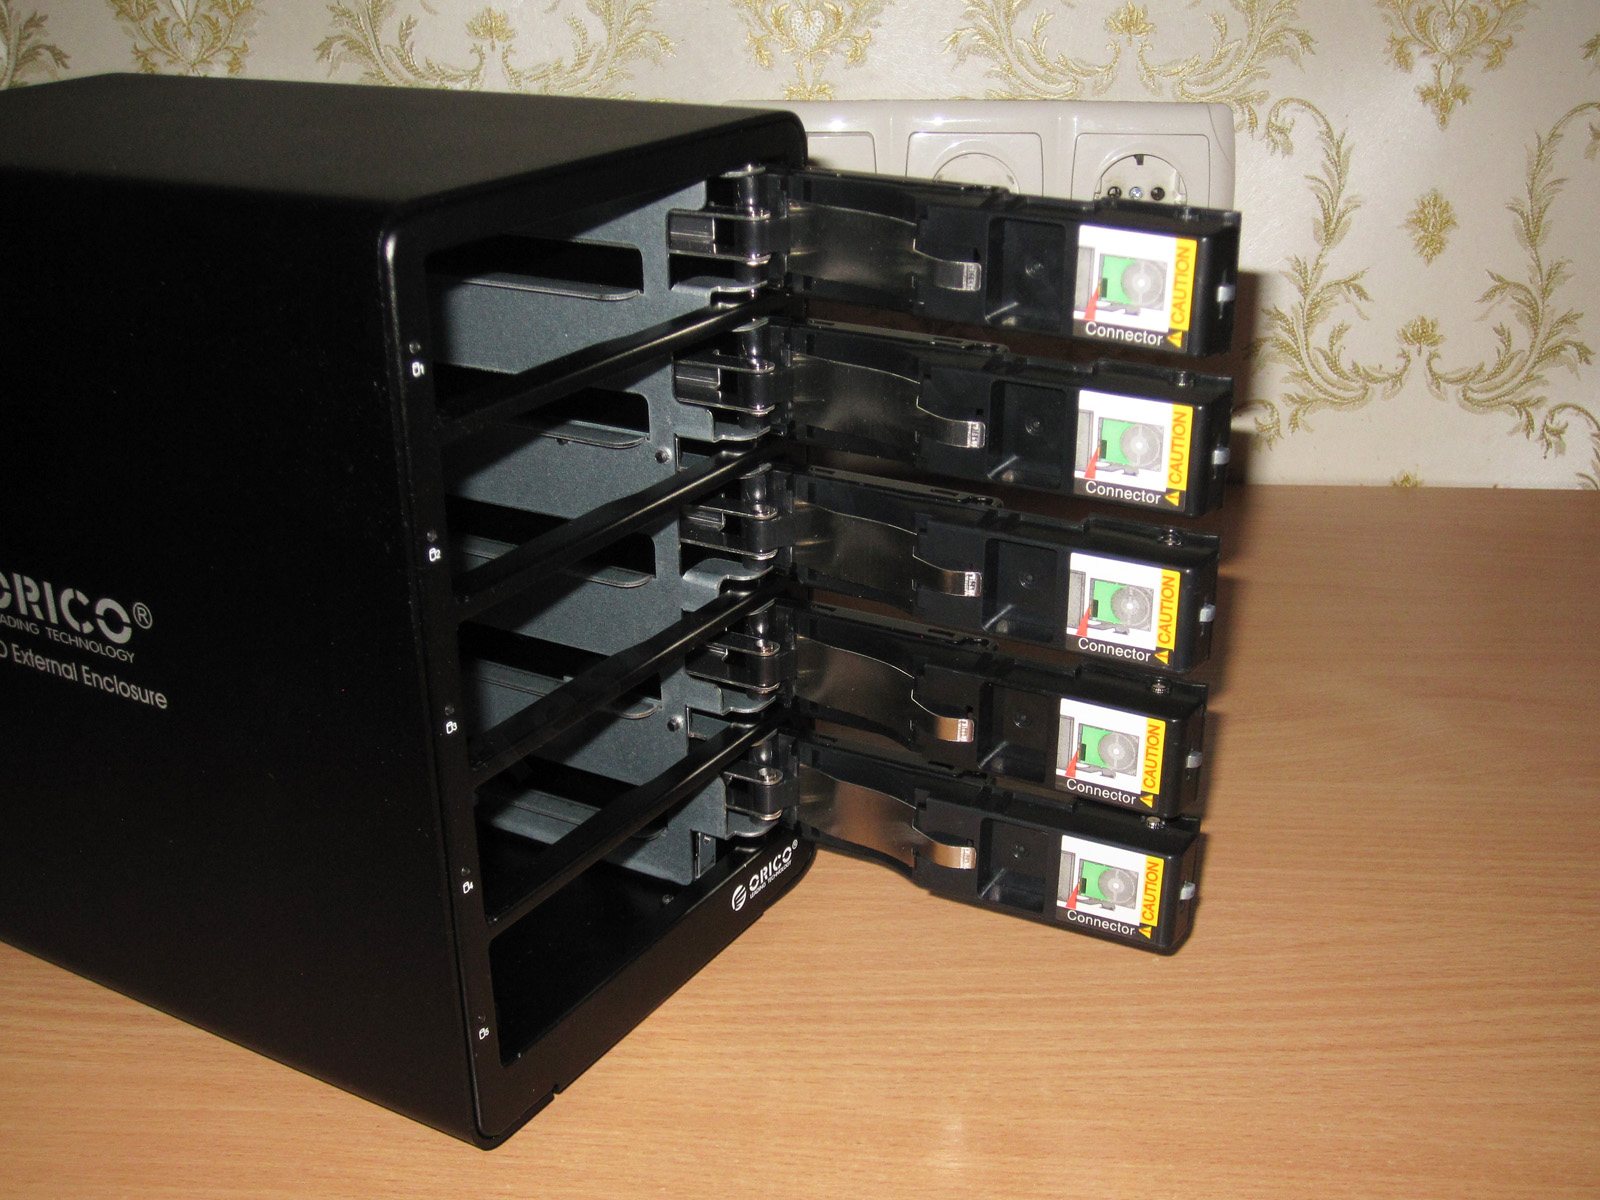
Inside, ejectors push the drive out when you open the door, far enough to pull it out by hand.

There are four feet on the bottom of the enclosure. The rubber is moderately soft and barely slips on the desk. Special thanks to the manufacturer for the feet: they do a great job of damping vibration from the enclosure, and the material is just right.
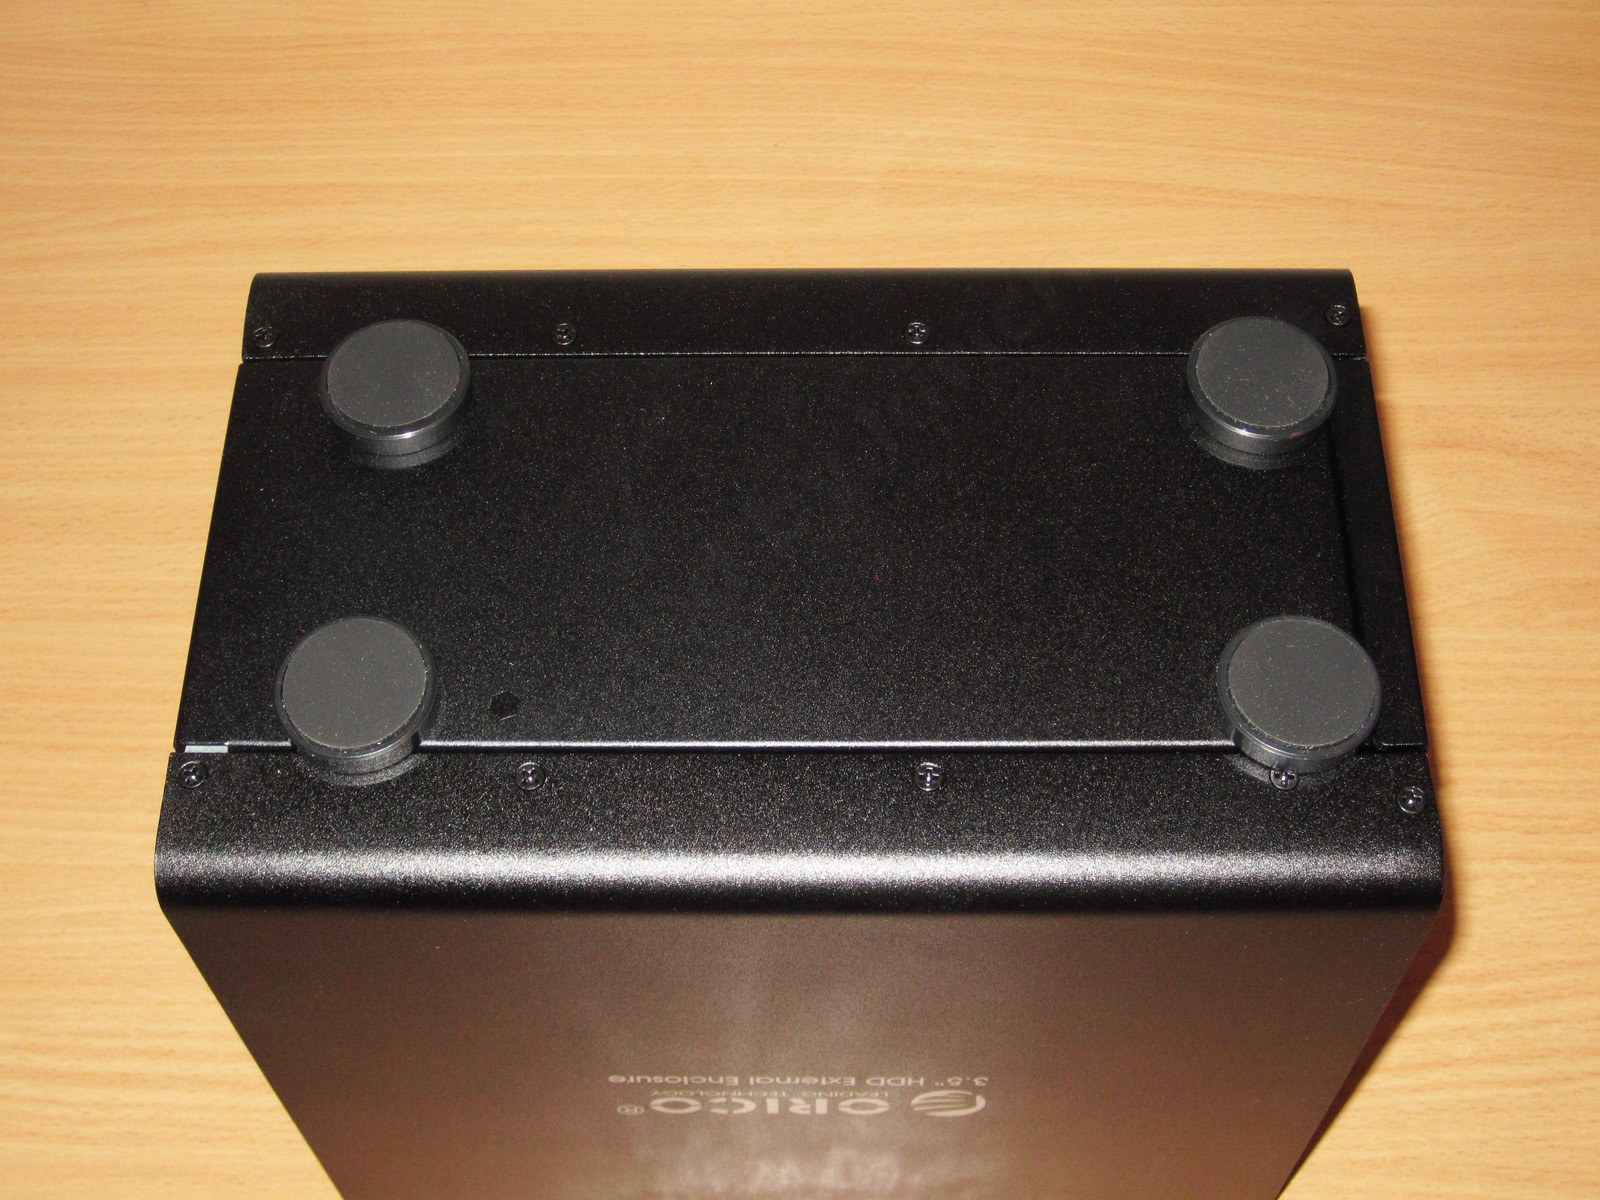
There's nothing else to inspect, so let's open it up.
This was a bit disappointing. There are quite a few screws, but a couple are hidden under the feet, so you have to peel off the rubber first, remove the feet, and only then unscrew the screws holding the cover in place.
What was more disappointing, though, is that the screws seem to have been hammered in rather than screwed in. The threads are very weak. For a product costing over $100, that seems a little odd.
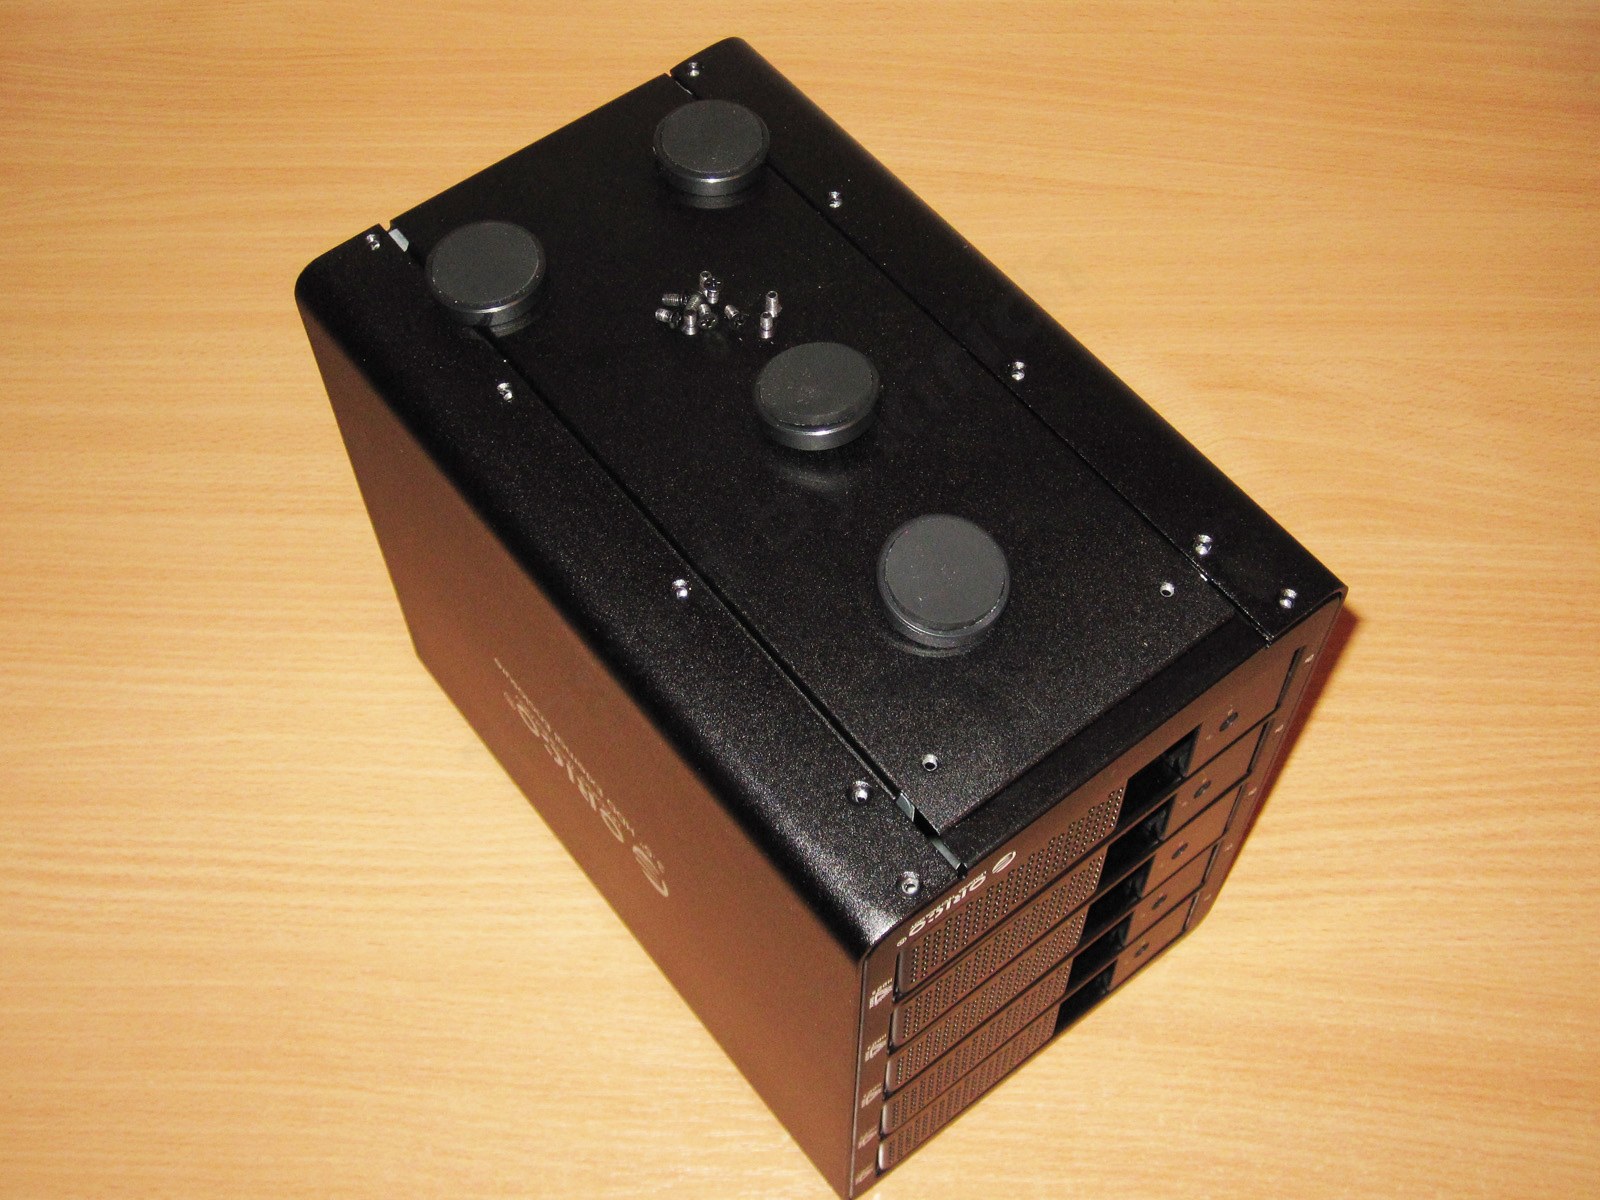
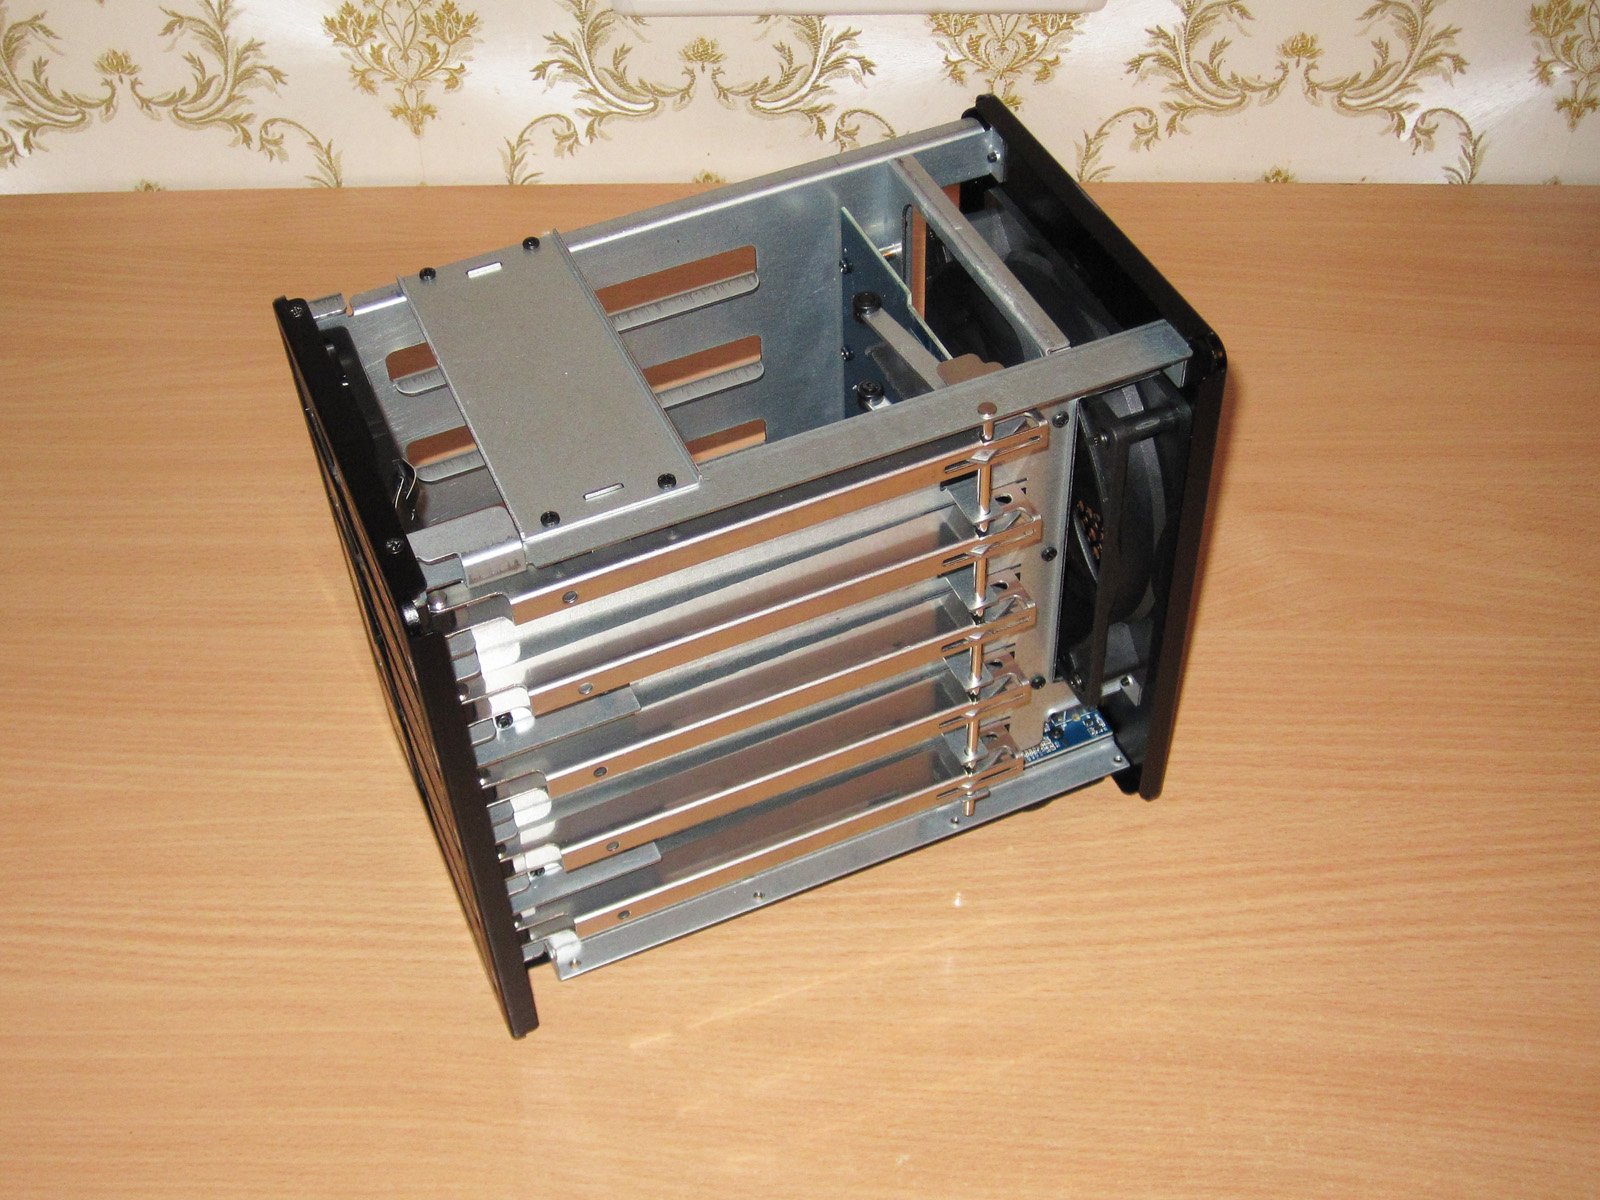
On the right side, there's a drive-eject mechanism with five horizontal pushers.
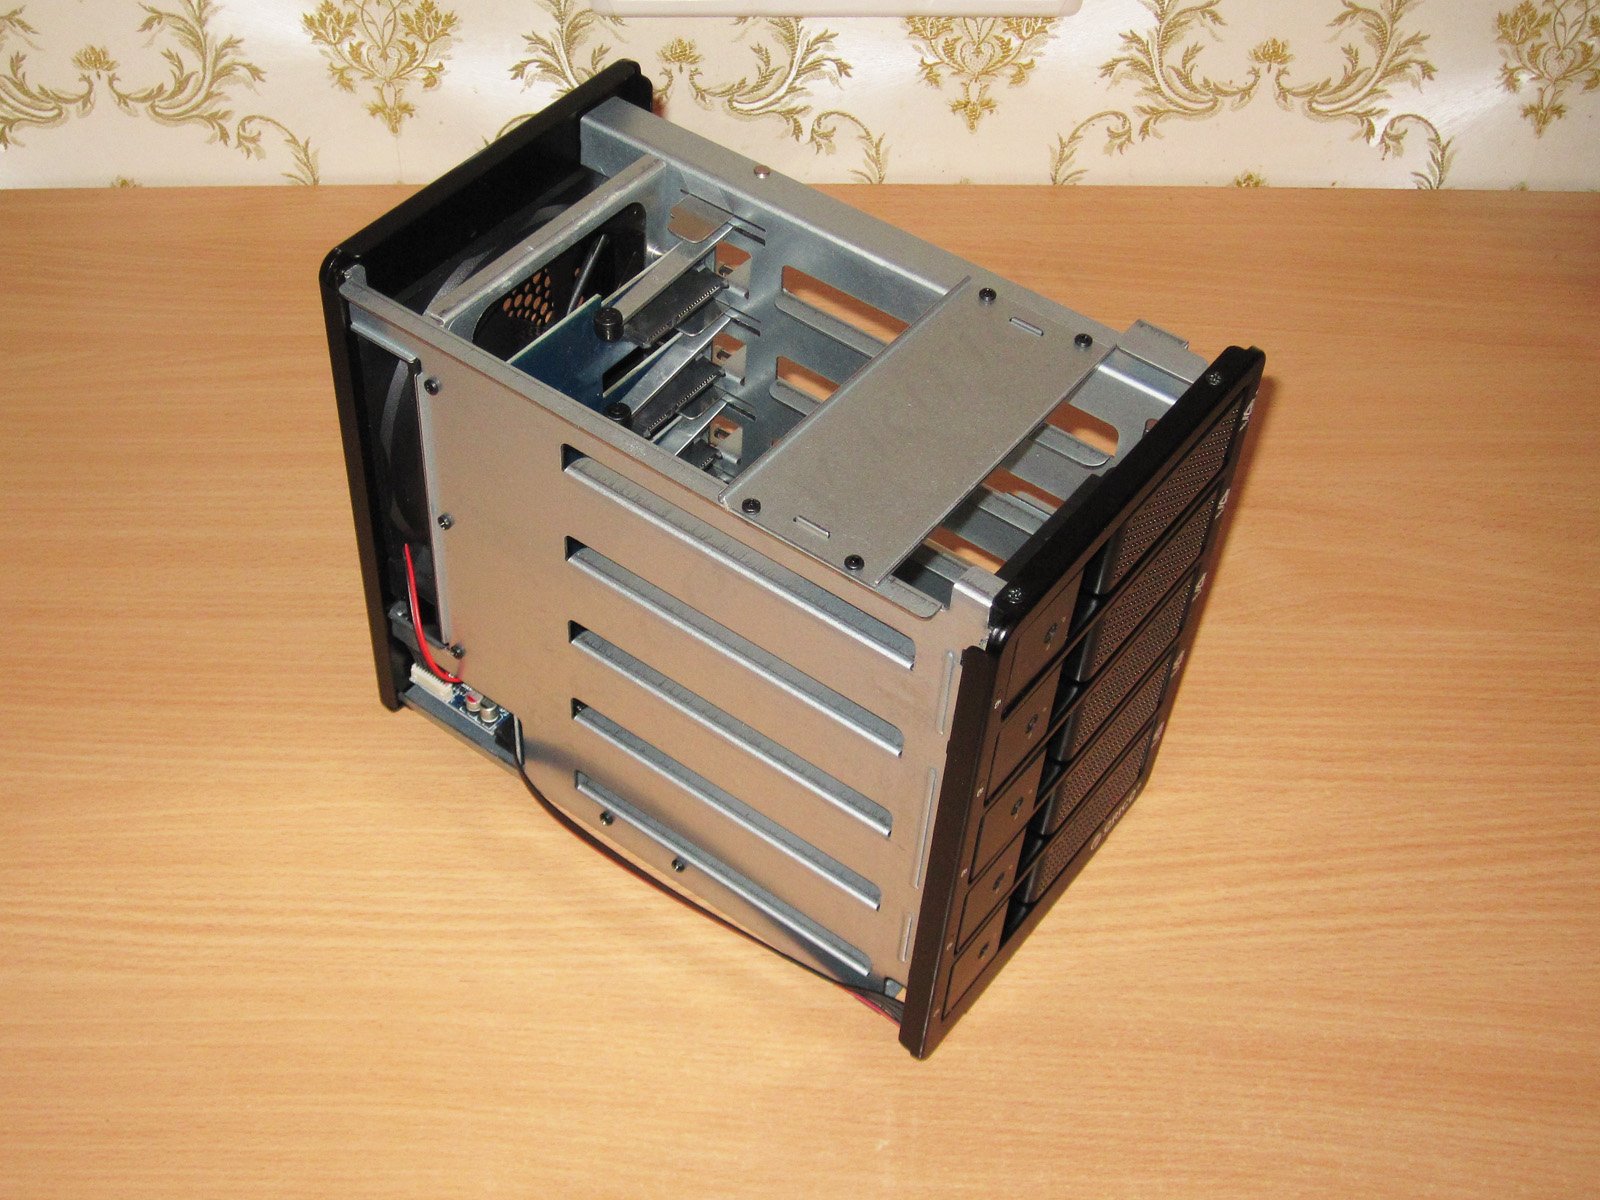
There's nothing on the left side.
The ejector mechanism actually consists of two parts.
At the top, you can see a metal plate that pushes the drive out of the connector. Just below it is an ejector with a roller, which pushes the drive out of the enclosure.
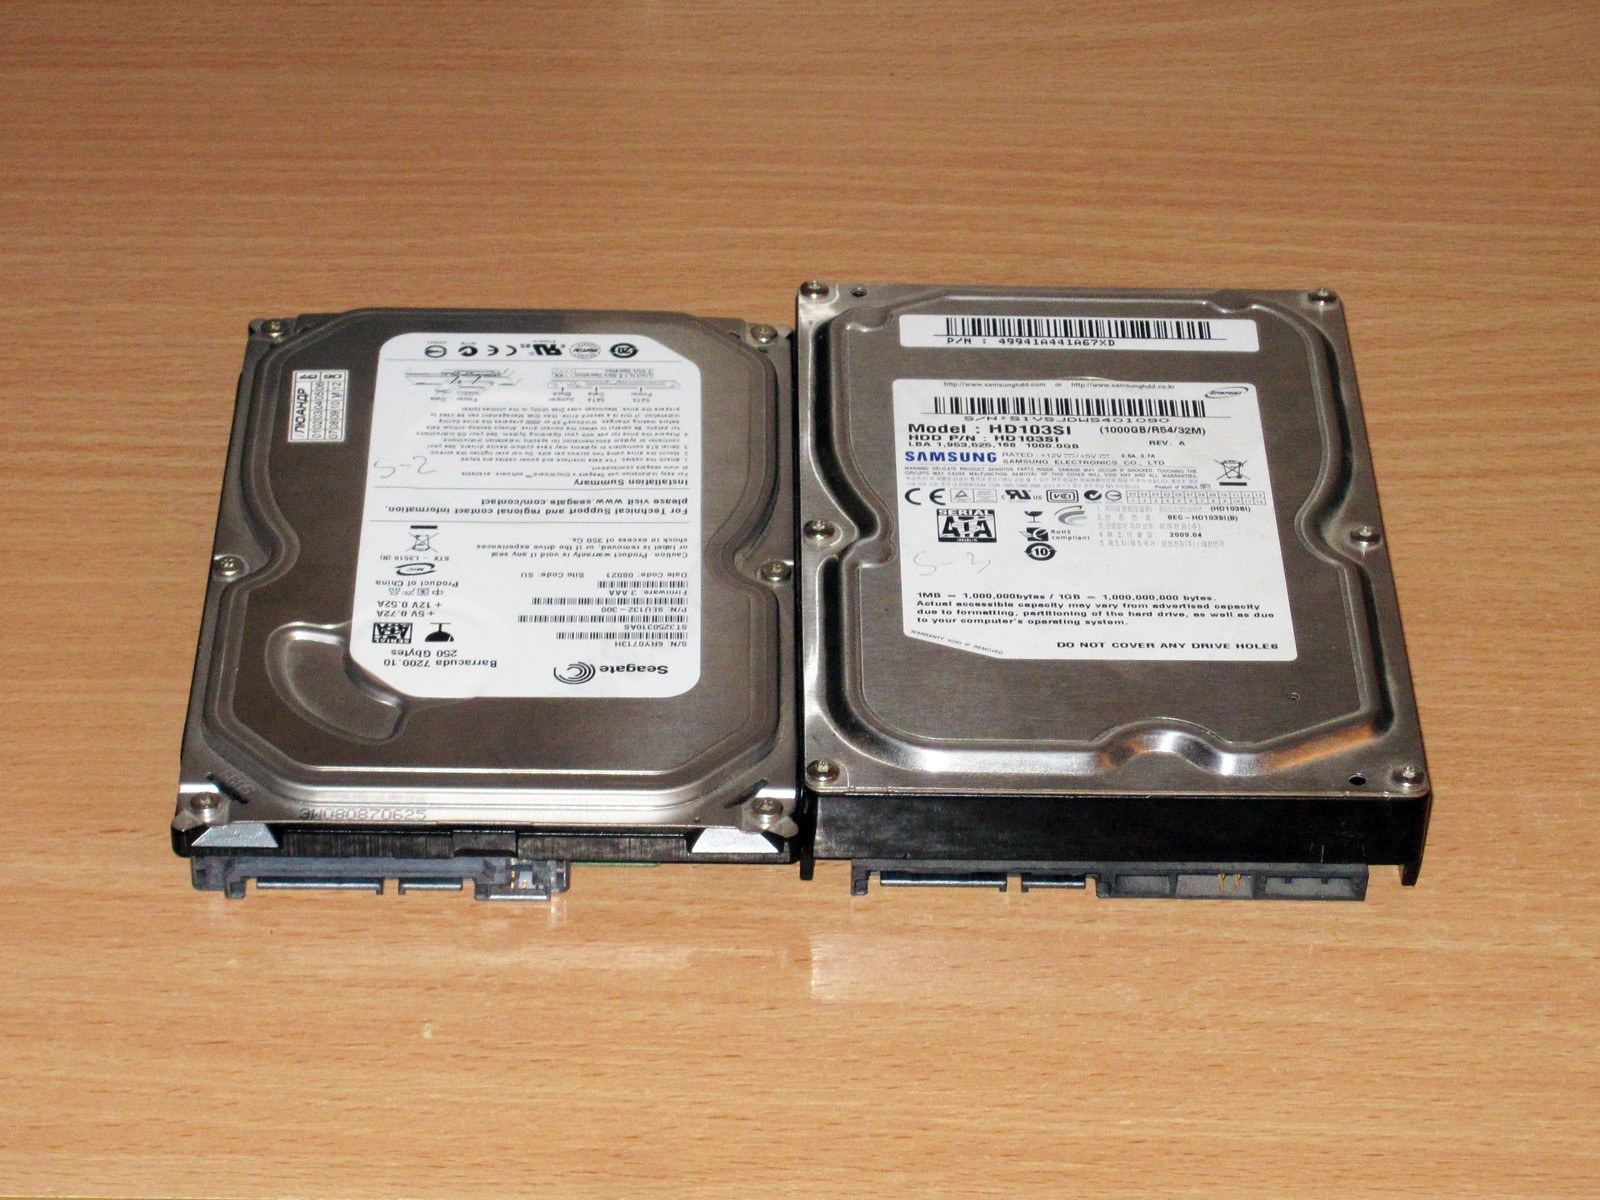
I ran into some trouble with the first part of the mechanism: it turns out that not all drives work with this enclosure. If you install a thin drive, the ejector sits above its casing, so you have to pull the drive out by hand, which is very inconvenient.
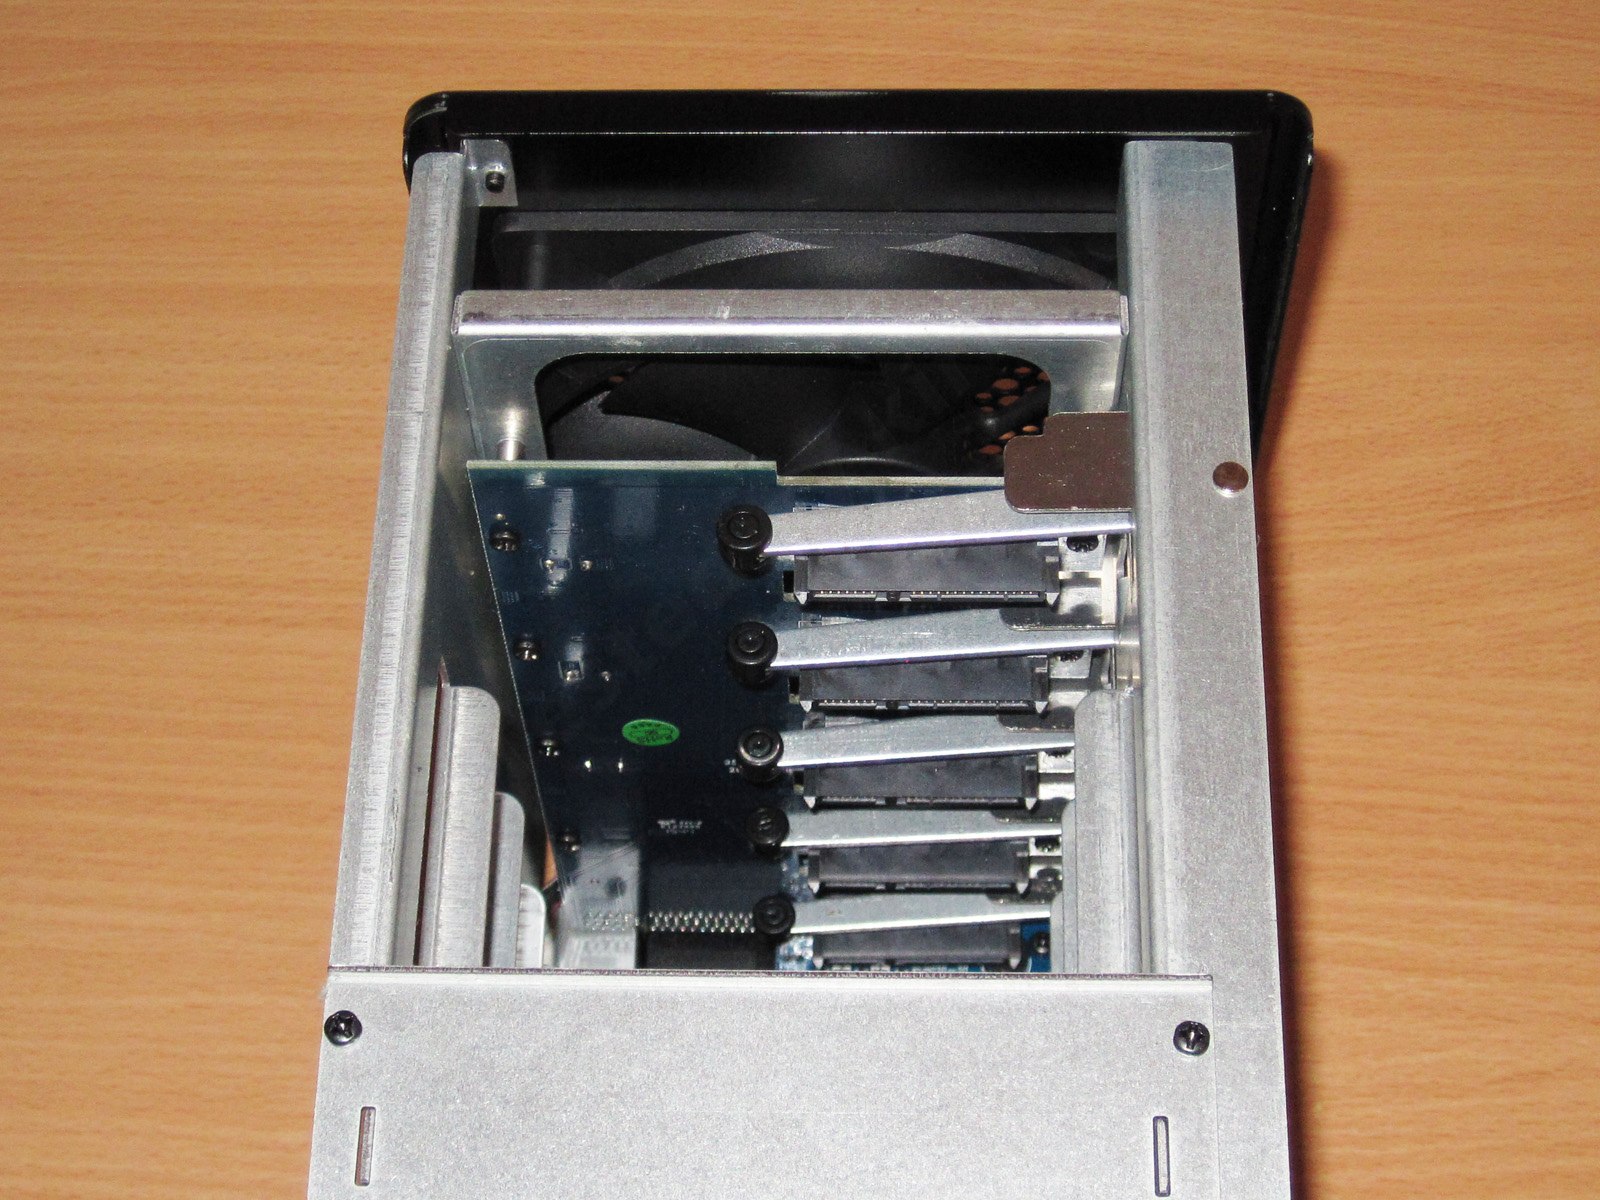
Let's remove the rear panel. One of the screws is hidden under the sticker showing the operating modes (now that sticker keeps peeling off).
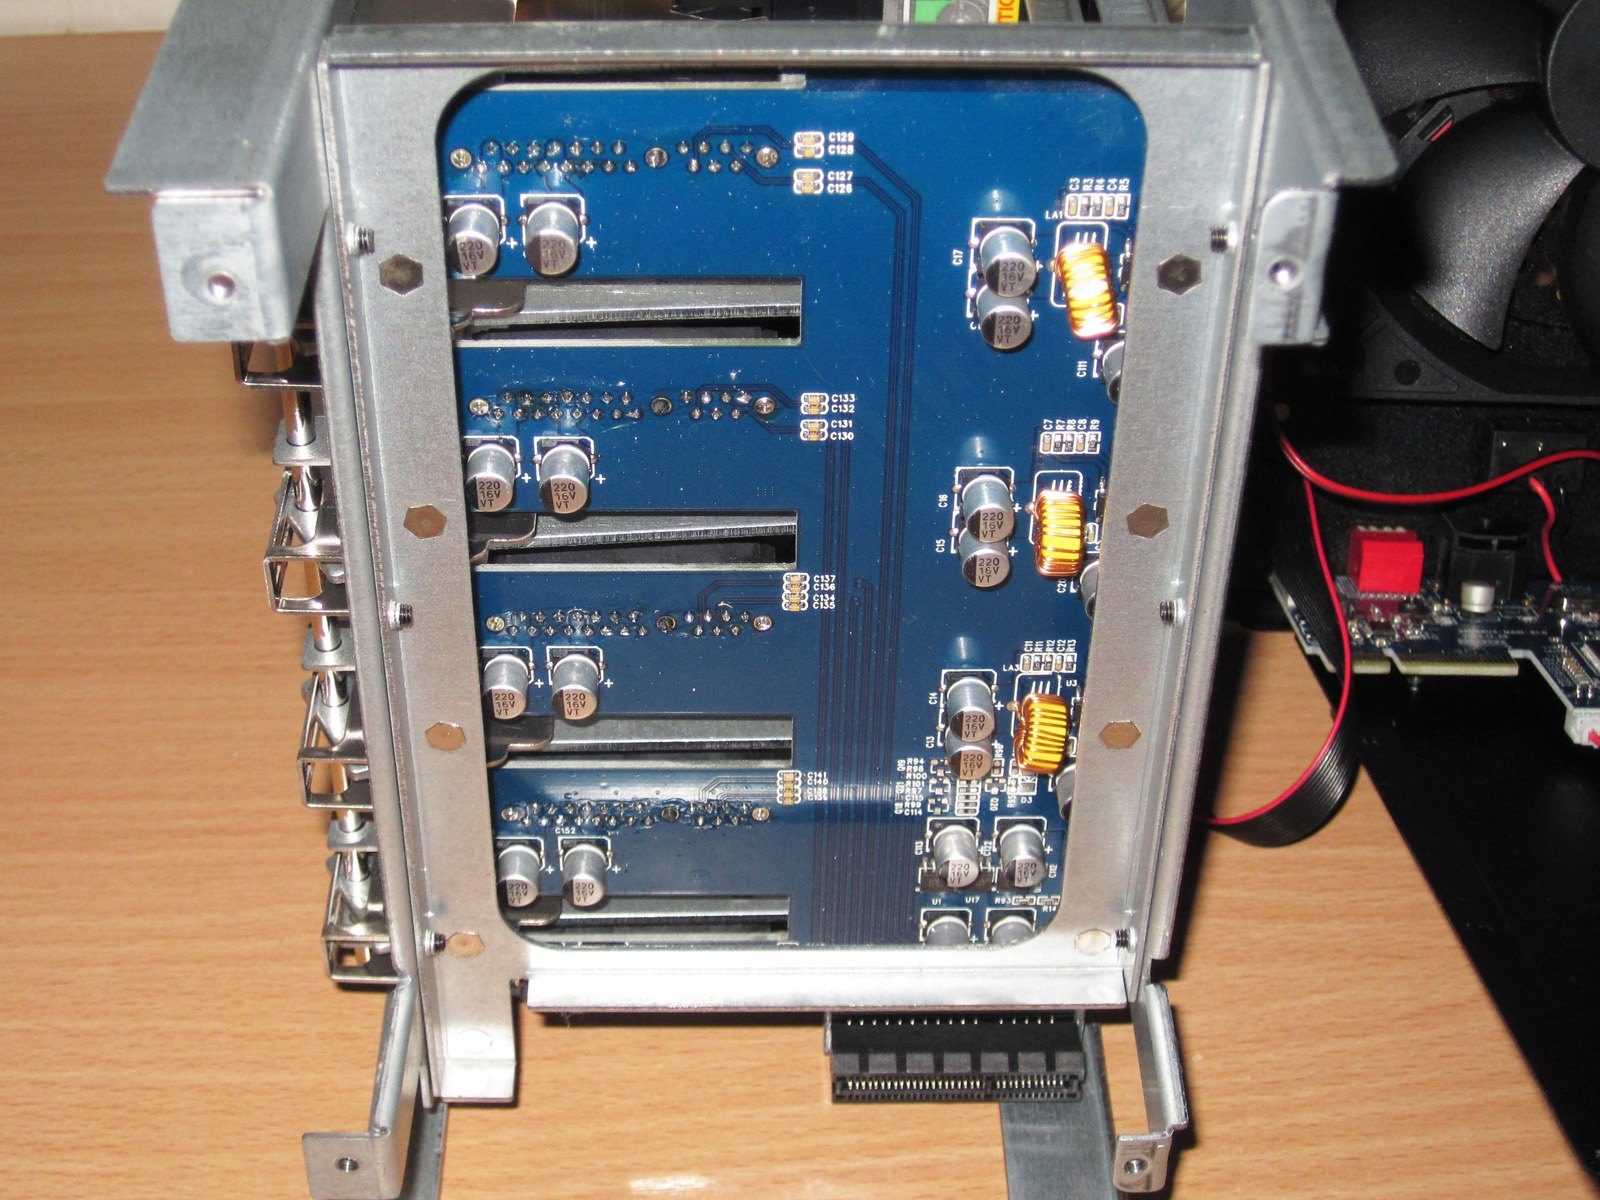
I mentioned above that the device only needs a 12 V supply. But 3.5-inch drives need two voltages: 12 V and 5 V.
The backplane has voltage converters, arranged in a somewhat unusual way: there are five drives but only three converters. In any case, it's a decent solution, though individual converters would have been preferable. Also, there are quite a lot of filtering capacitors, which is always good to see. Credit to the manufacturer for that.
The whole assembly is cooled by a large 120 mm fan. It's VERY quiet—I might even call it nearly silent, if not for the slight sound of moving air, which you can just about hear if you listen for it.
The fan is rated for 12 V and 0.2 A, but I had the feeling it was being run at a lower voltage.
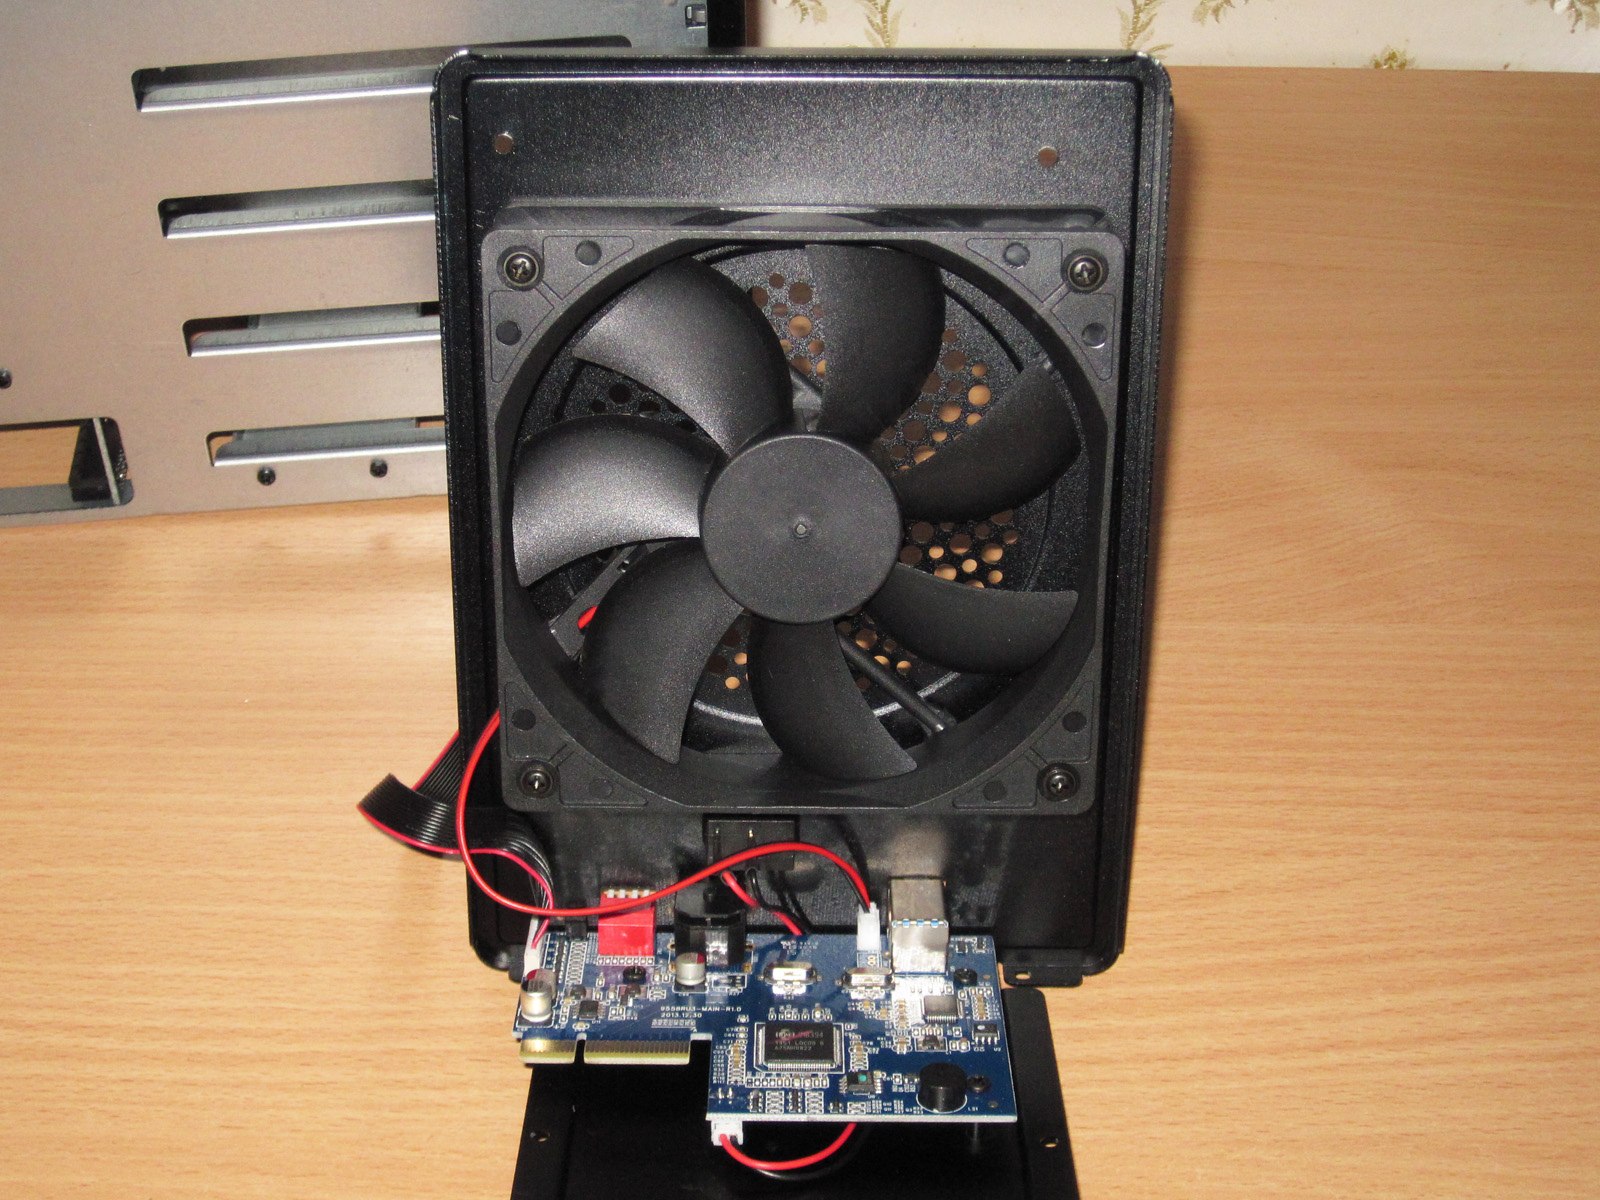
When I got to the circuit board, my reaction was: Is that it? Where's the big controller shown in the promotional picture? Where are the heatsinks and fans? :)
It's all much simpler. The entire “brain” is made up of just two main chips and a few supporting components.
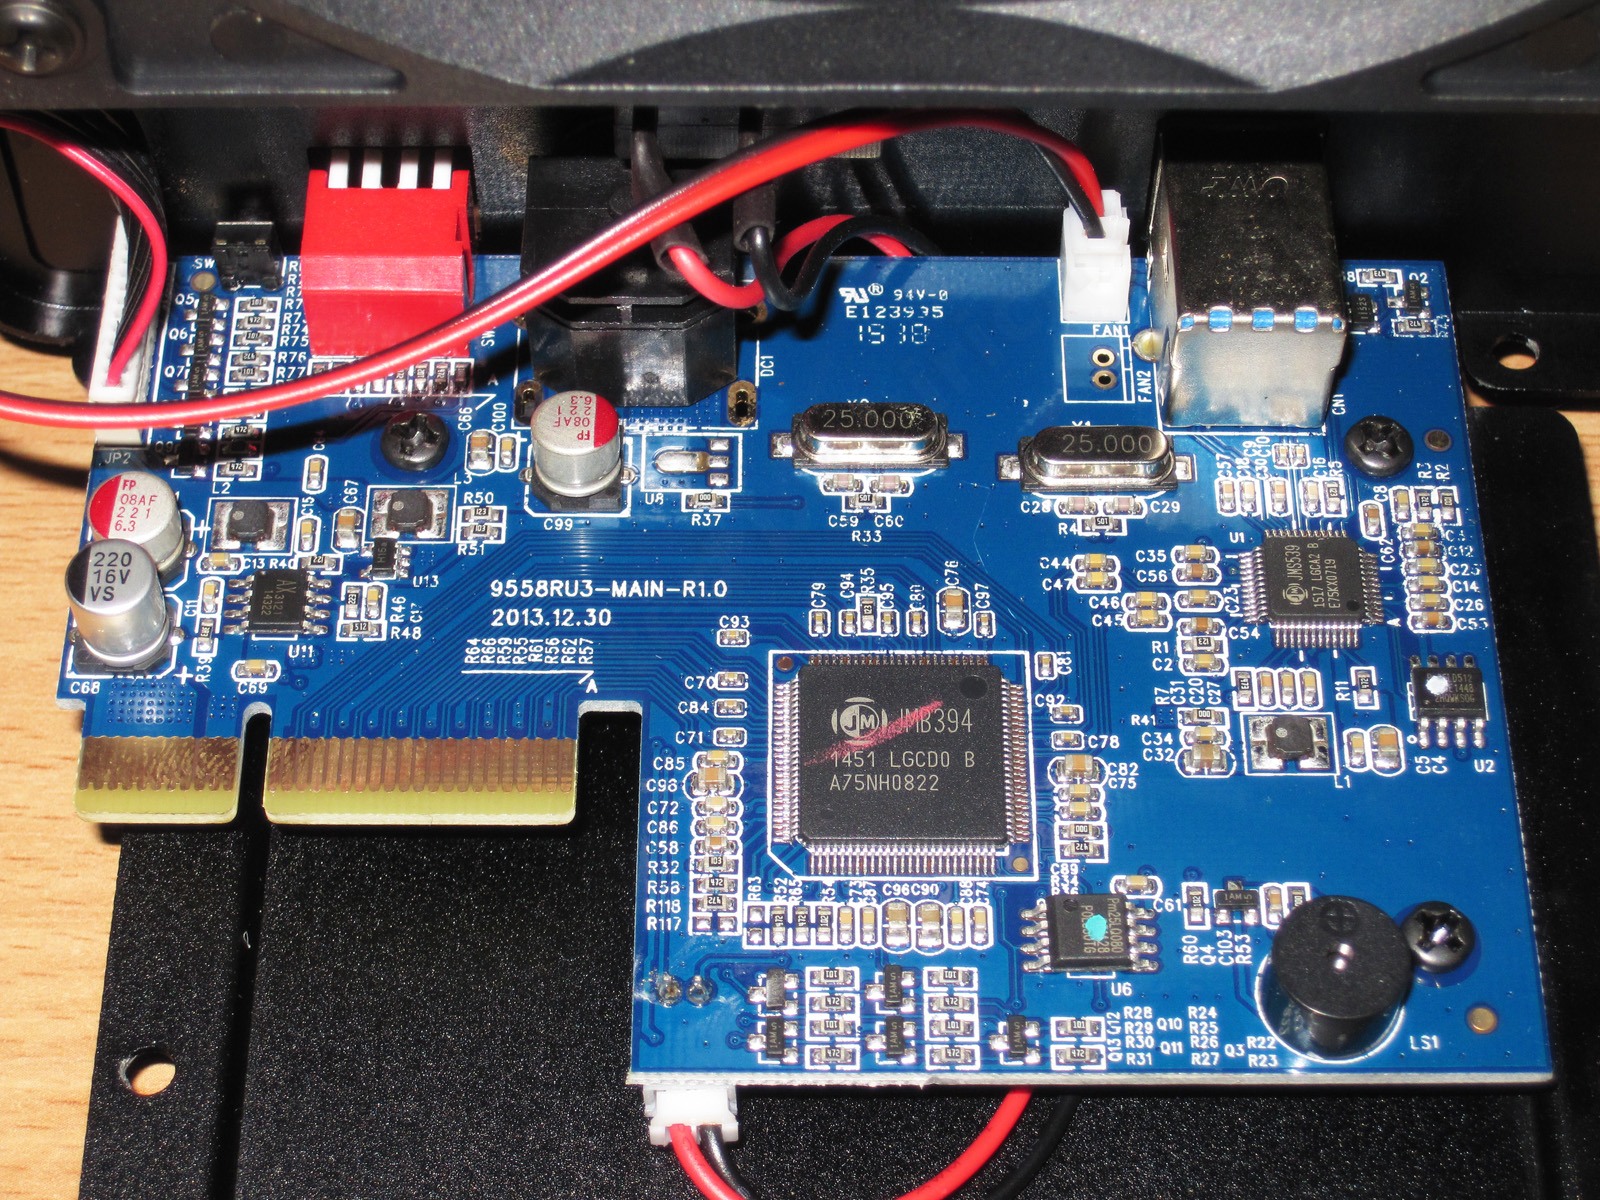
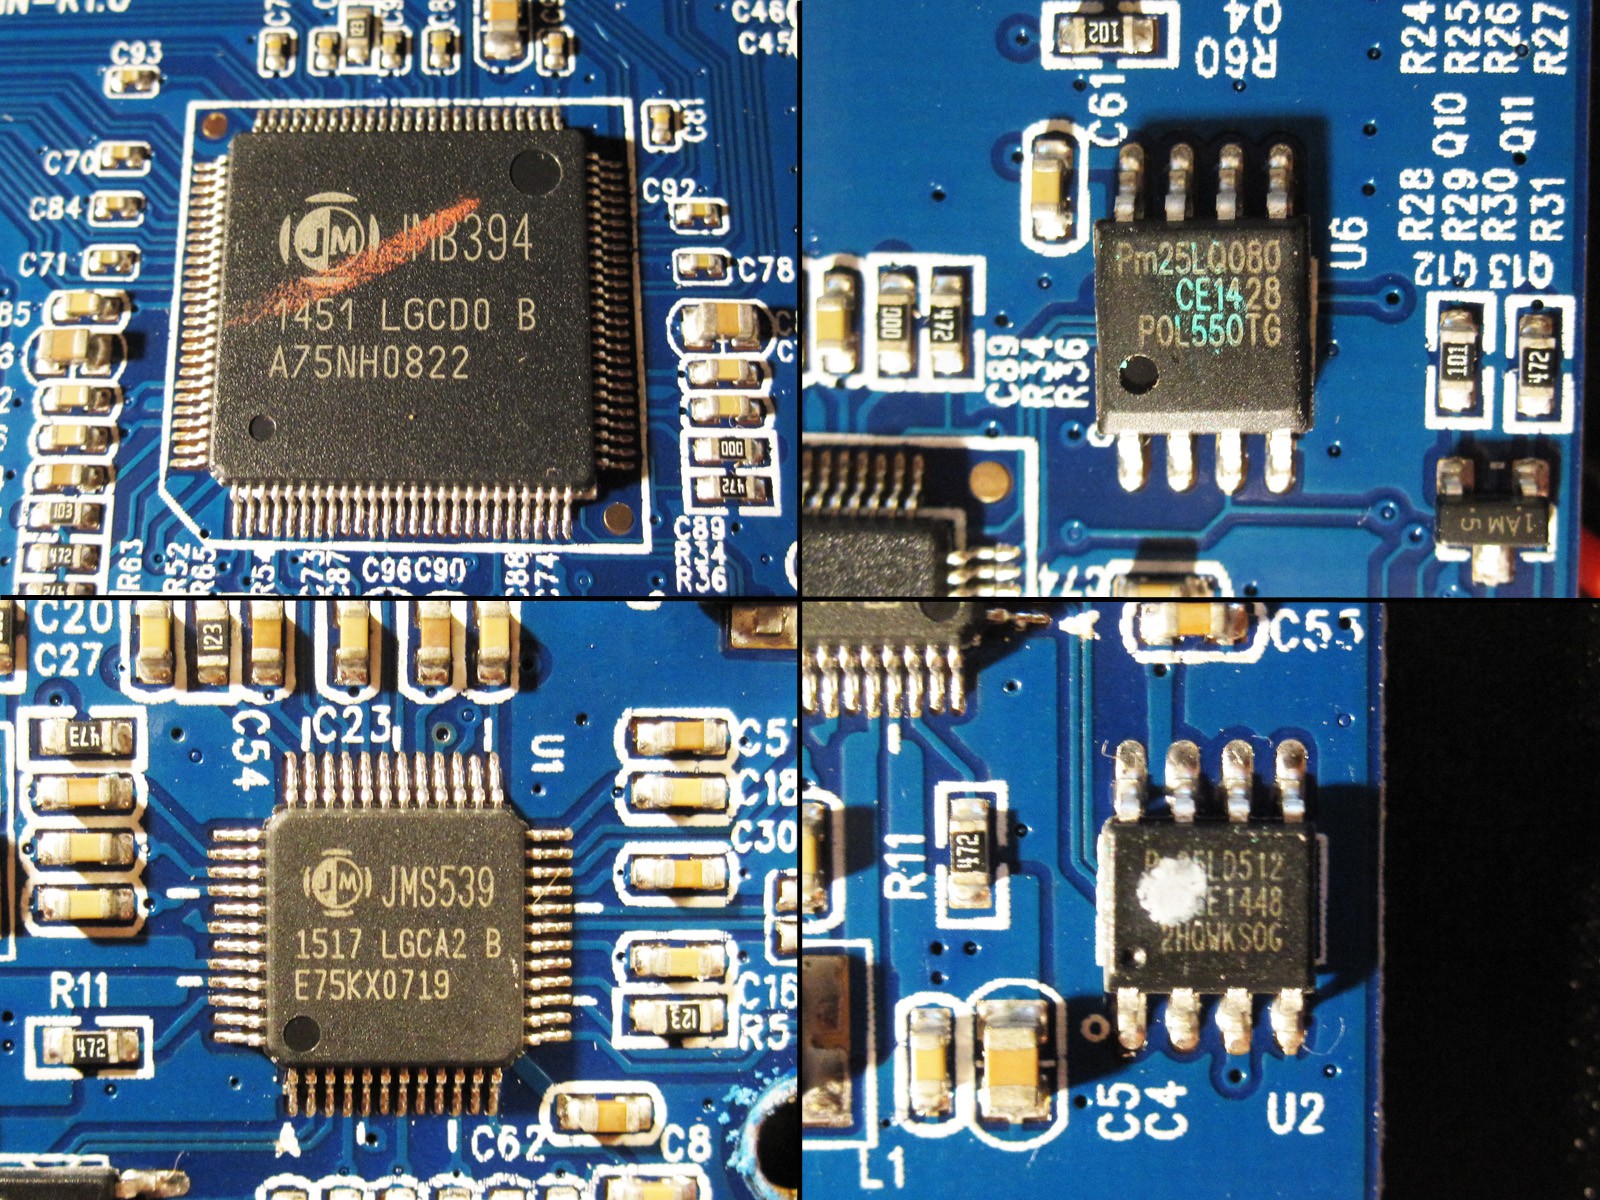
1. JMB394, a SATA multiplier combined with a RAID controller. This controller combines five drive lanes into one and also provides RAID array support.
JMicron is a fairly well-known company; its controllers are often used on motherboards. I won't criticize or praise them—they're simply common, that's all.
2. Nearby is a flash memory chip containing the controller firmware.
3. JMS539, a USB-to-SATA II converter. And you can even find firmware for this converter, though I don't know whether it's useful. Still, it exists.
4. There's also an external flash memory chip near this controller for storing its firmware.
So you could say the circuit is extremely simple:
5 drives — a 5-to-1 SATA multiplier, a SATA-to-USB converter, and that's it.
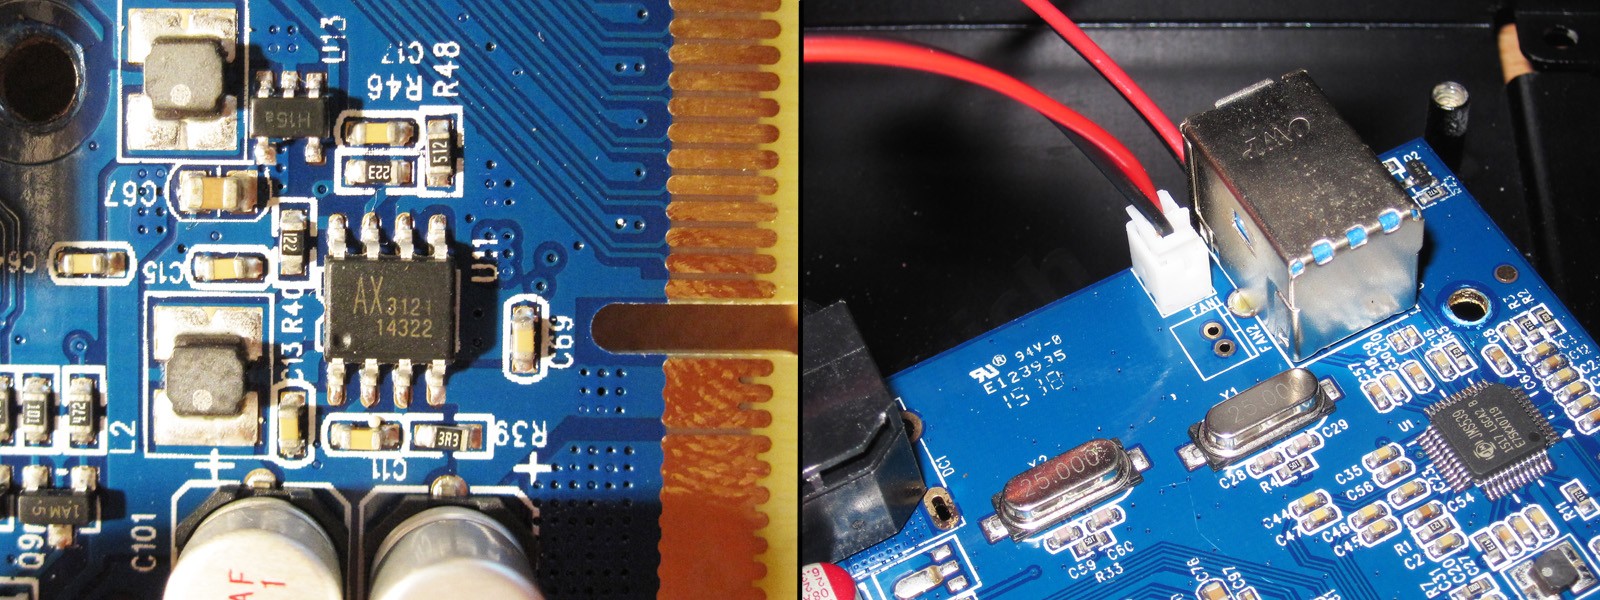
Since the chips require a voltage other than 12 V, the board has a power converter. There are actually two, but the second one isn't in the shot.
There's also a spot for connecting a second fan—or, more precisely, a connector for one—but I can assure you that a single fan is more than enough.
Here's a photo to show which drives fit without any problems and which ones are difficult to remove from the enclosure.
The thinner drive is on the left, and a standard one is on the right.
The mechanism's tab ends up right against the top cover, so it doesn't help—in fact, it gets in the way, rubbing against the drive's casing. Also, with this kind of drive, you can't close the door all the way. The manufacturer could have used an L-shaped tab to solve this problem, but apparently they haven't come across drives like these.
This isn't an issue for me, since I won't be using drives like these in this enclosure, but it's worth keeping in mind.
That's it for the hardware. Now I'll move on to the software and tests.
No software disc was included. The idea is that users will visit the manufacturer's website and download the appropriate program themselves; the manual mentions it and describes it.
Anyway, I found the ORICO-RAID-Manager software on the manufacturer's website, as well as a firmware update, JMS539B_Firmware, but I didn't test the update. The update list isn't important to me, and mostly concerns standalone use.
Anyway, I downloaded this program. There were two versions on the website; I linked to the newer one, which is the one I tested.
The program has two tabs—Basic Mode and Advanced Mode. I'll show you everything.
Basic Mode has three tabs. The first simply shows information about the installed drives.

The second shows all notifications, such as drive installation, failures, and so on. It's still empty in this screenshot because the software has just been installed.

But before describing the third tab, I'll take a moment to explain what you'll see in its screenshot.
The device supports RAID (Redundant Array of Independent Disks).
First, a dry description of the modes supported by this device:
RAID 0 — a high-performance striped disk array with no fault tolerance. Strictly speaking, it isn't a RAID array, since it has no redundancy
RAID 1 — a mirrored disk array
RAID 10 (1+0) — a RAID 0 array built from RAID 1 arrays
RAID 3 — a striped disk array with a dedicated parity disk
RAID 5 — a striped disk array with no dedicated parity disk.
The device also supports two more modes, Large and Clone, but they aren't RAID modes, so I'll get to them later.
I don't consider myself an expert—or even just a specialist—in RAID systems, but I'll try to explain in simple terms what they are.
I'll start with level 0.
As mentioned above, technically this type isn't a RAID array, since RAID implies redundancy to improve reliability. Here, the opposite is true: the reliability of this type of array decreases in proportion to the number of disks used.
Some readers are probably wondering: why use an array that's less reliable?
Although these arrays are still used today, they were more popular in the past, when disks were very slow.
Imagine you need to capture video from a camcorder in real time, but the disk system can't keep up. In that case, you take two (three, four, and so on) disks and combine them so that data is written to all of them at the same time, split across the disks: some to one disk, some to another, and so on.
In this case, the speed is equal to the speed of the slowest disk multiplied by the number of disks. The array's capacity is twice the capacity of the smallest disk.
This setup isn't very reliable, but it's a simple way to get high speed. Afterward, you can easily move the data to even a slow disk.

Next is level 1.
This array is called a “mirror.” That's because data is also written to two or more disks at the same time, but identical data is written to each one. In other words, each disk holds a mirror copy of the data.
The array runs at the speed of the slowest disk, but the biggest drawback is that its capacity is also equal to that of the smallest disk.
The advantage is greater data storage reliability: data will only be lost if all the disks fail.

RAID 10.
A hybrid mode (there's also a similar 01 mode, by the way), combining RAID 1 and RAID 0.
This gives us twice the speed and greater reliability, but requires at least four disks. The speed is twice that of the slowest disk, and the capacity is twice that of the smallest disk.
This mode is often used in servers where both speed and reliability are needed.

RAID 3.
A slightly different type of array. Data is stored across several disks, with an additional disk dedicated to storing parity information. Parity information lets the system correct errors that occur on the disks, but there are drawbacks too—for example, the extra disk is under heavy load.
The advantages are high speed (as I understand it, the speed of the slowest disk multiplied by the number of disks, excluding the parity disk) and capacity (also equal to the capacity of the smallest disk multiplied by the number of disks, excluding the parity disk).
I didn't test this mode because I wasn't very interested in it, and it's unlikely to be useful to anyone anyway.

RAID 5.
One of the most interesting modes for using the device as a home data storage system.
This mode is similar to mode 3, but there is no dedicated drive; recovery information is distributed evenly across all the drives in the array.
Put simply, the array's total capacity is the capacity of the smallest drive multiplied by the number of drives minus one. In other words, it's just like RAID 3, but without the extra drive wearing unevenly, and the whole setup looks a little more elegant.
This mode is very well suited to video surveillance systems, home media libraries, and storing large amounts of data.
It will be slower than modes 0 and 10, but offers savings in cost and capacity. Its reliability will be slightly lower than that of 1 or 10, though.
If you install five 4 TB drives in this enclosure, RAID 5 gives you 16 TB with improved reliability and speed.

Now let's take a closer look at these modes.
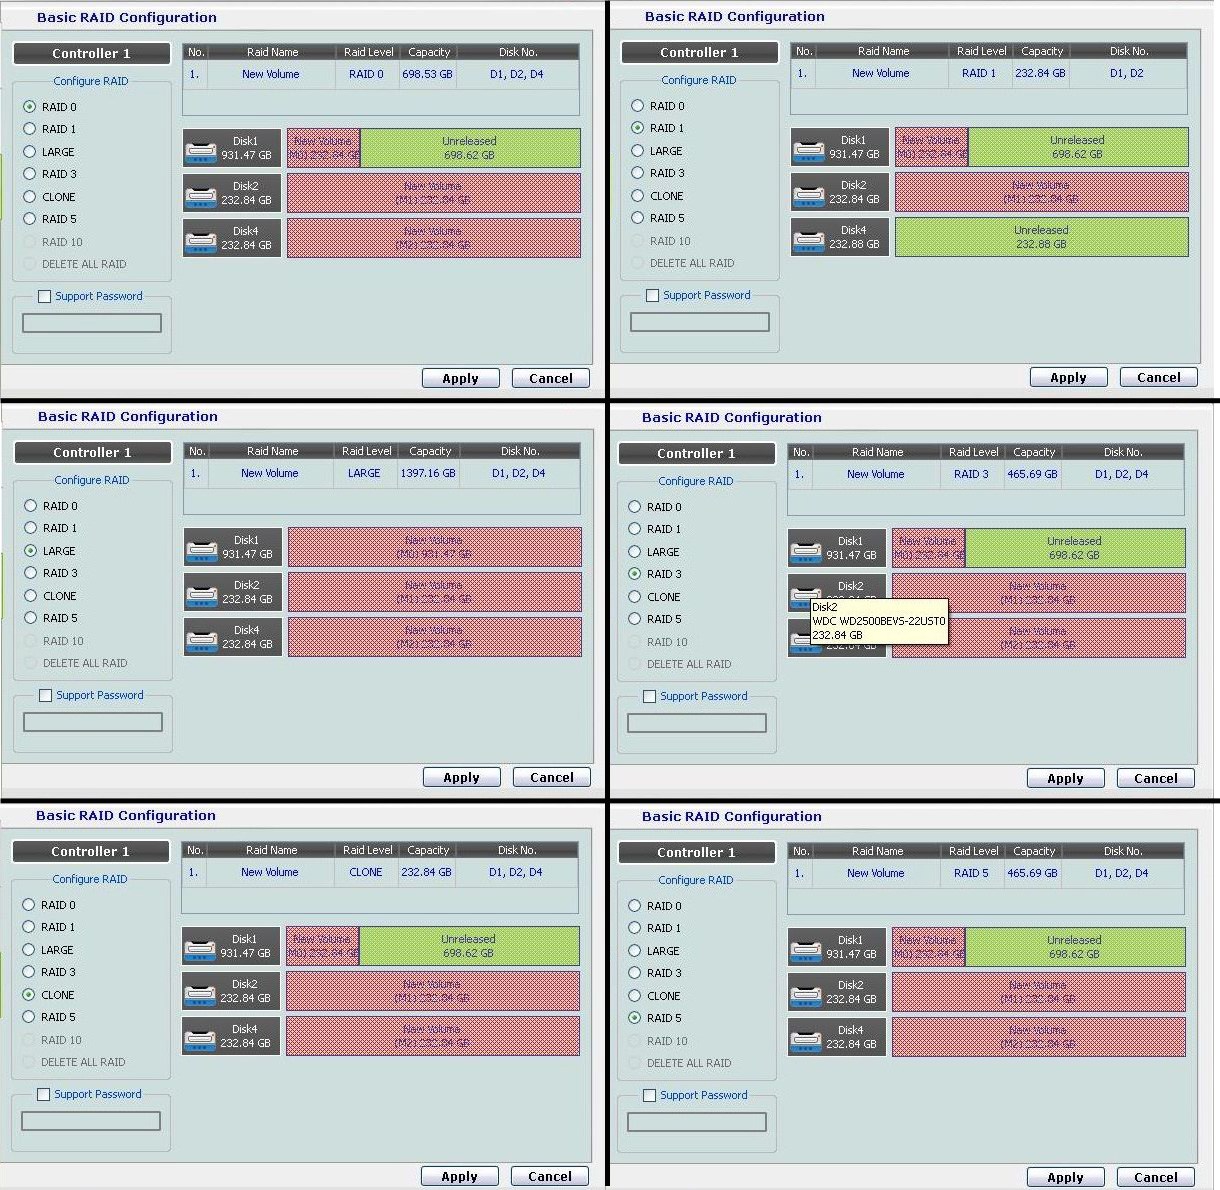
The software menu lets you choose from different modes and shows the resulting array capacity.
Click to enlarge the screenshot.
Three drives are installed in the enclosure: 250+250+1000 GB.
1. Level 0 — total capacity of about 700 GB
2. Level 1 — all three drives are used, but the total capacity is only about 230 GB
3. Large mode: all the drives are simply presented as one. Technically, though, data is written sequentially across the drives, so this isn't a RAID array. Still, this mode is handy when you want one large drive with a capacity equal to the combined capacity of all the installed drives.
4. Level 3: total capacity equals that of the two smallest drives, or 465 GB
5. Clone mode. Data is simply duplicated across all the drives.
6. Level 5, with about 465 GB available, just like level 3.
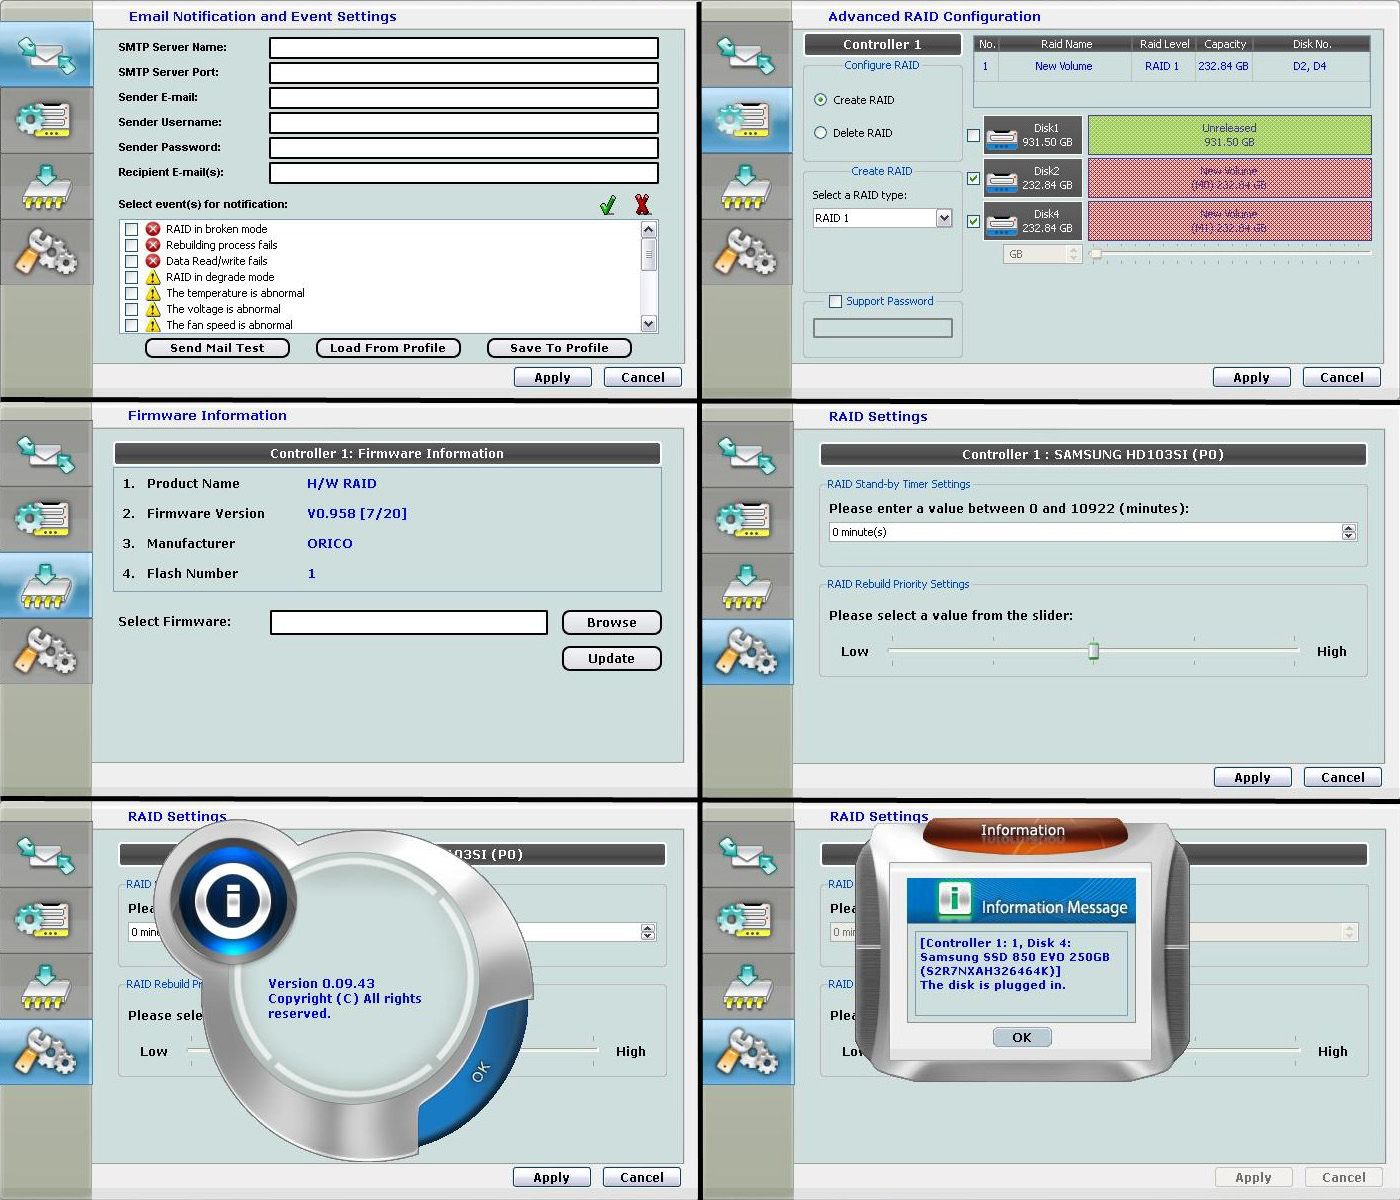
Advanced settings tab.
1. Configure notifications about everything that happens to the enclosure: overheating, drives being disconnected or connected, and so on.
2. Tab for creating RAID arrays at different levels, with the option to select specific drives.
3. Update the device firmware.
4. Tab for configuring the array rebuild priority
5. Software information. As I understand it, this is actually a beta version, since its version number starts at zero. The manufacturer may well update the software, as there are a few issues.
6. I connected the fourth drive, and a notification popped up.
After installing the fourth drive, the option to create a level 10 array became available. It requires at least four drives.
The capacity also increased in Large mode.

In Disk Management, the whole setup looked something like this.
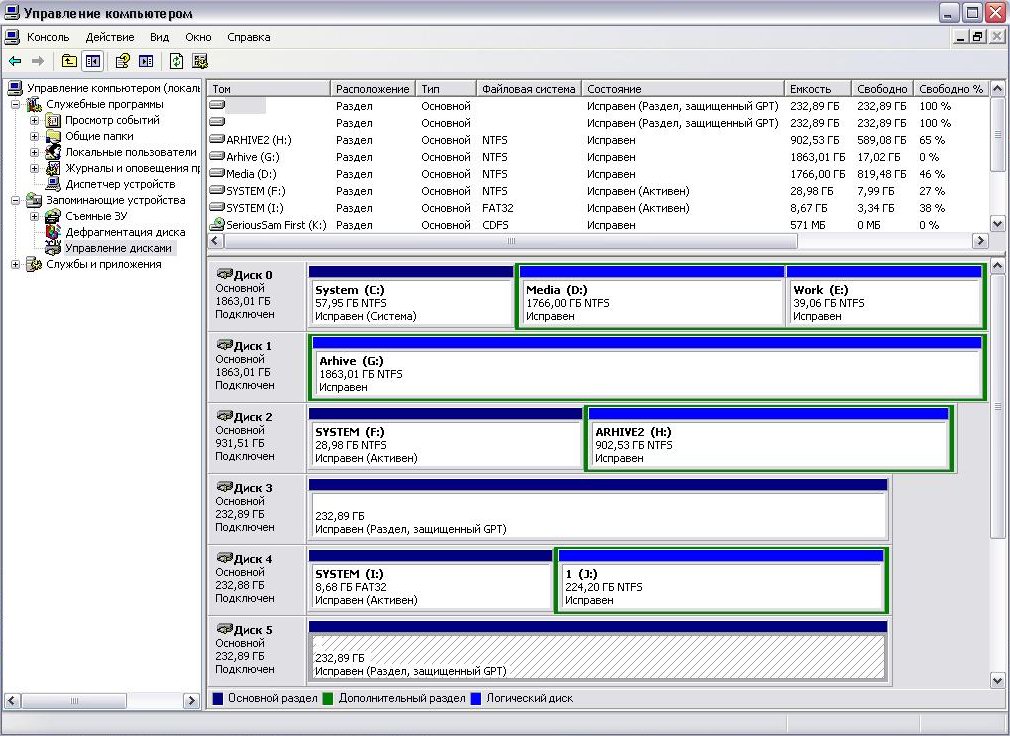
And this is how it looks in the software, with the drives listed in the order they're installed in the enclosure.

For the tests, we run Crystal Disc Mark. Since it displays all logical drives, things look even more confusing here.
By the way, I had to run the tests in Windows 7 because XP couldn't see GPT partitions, and I didn't really want to format them.

The screenshots include comments on the tests, but I'll add a few details to make things clearer.
1. Samsung 250 GB SSD
2. Samsung 3.5-inch 1 TB “green” hard drive.
3. 4: two 250 GB test drives, one 2.5-inch and the other 3.5-inch

Next, I decided to try creating an array, but ran into a bit of a problem.
I installed all the drives, launched the software, and selected the drives for the array in advanced mode. The software then created the array and asked me to reboot, and... I got nothing. Everything was still as it had been :(
In other words, the software didn't create anything in this mode—not even format the drives.
By the way, I almost forgot: all the tests were done with the mode switch in the “default” position.
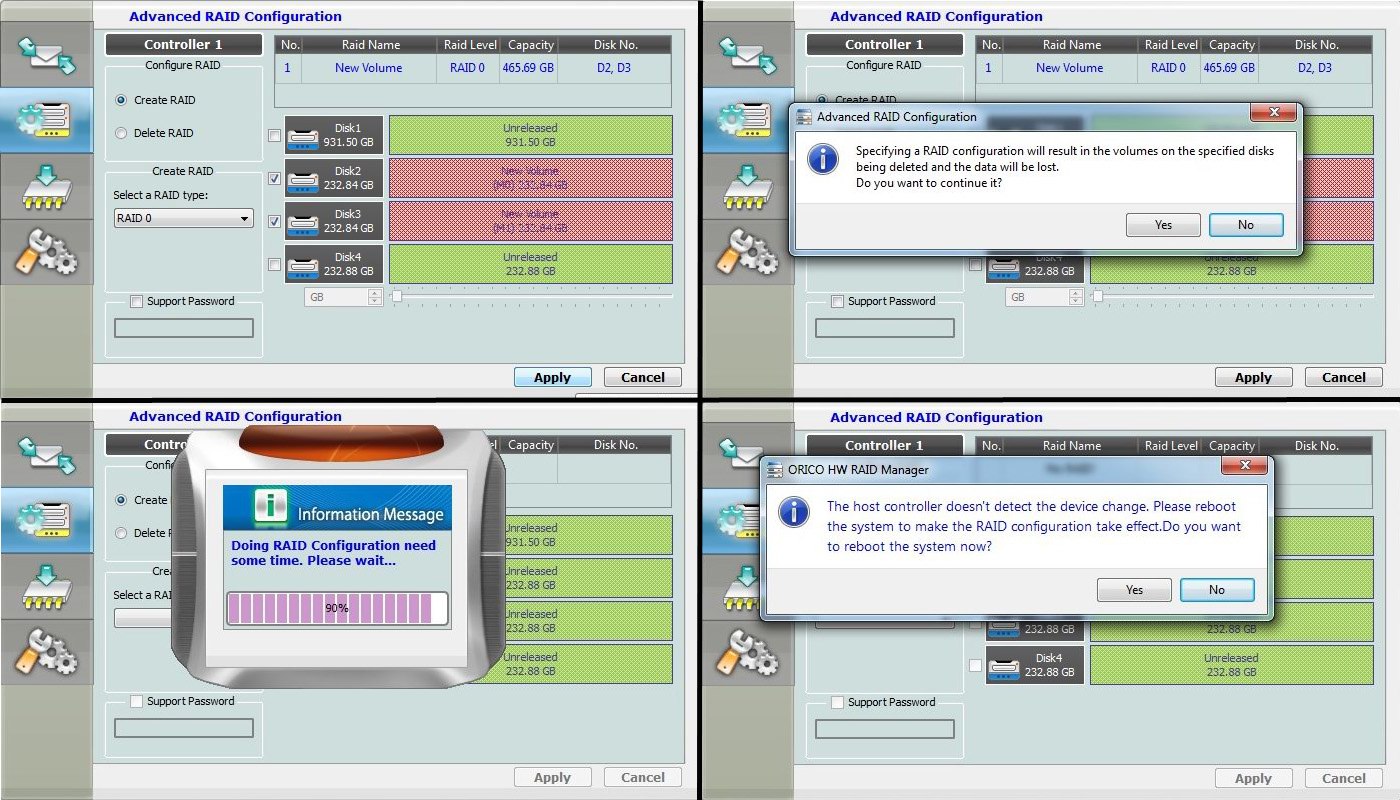
After that, I tried doing the same thing in the software's basic mode.
The difference between the modes is that advanced mode lets you select individual drives, while basic mode applies the action to all installed drives. For example, if you want to create a RAID 10 array and leave one drive outside the array, install four drives, create the array, and then install the fifth.
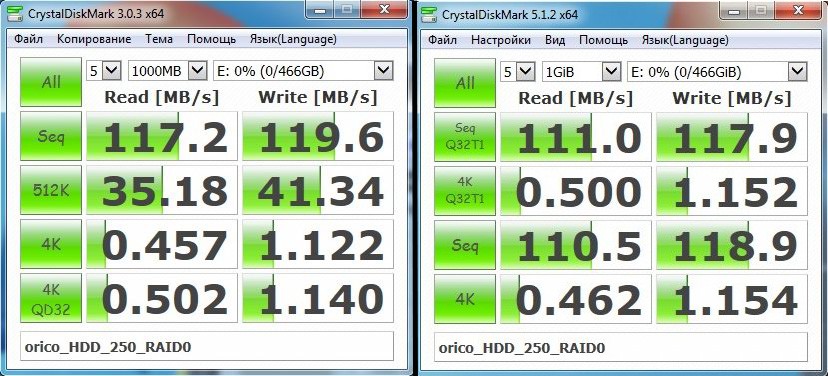
This time, the array was created without any problems. I ended up with an unpartitioned 465 GB drive, configured as RAID 0.
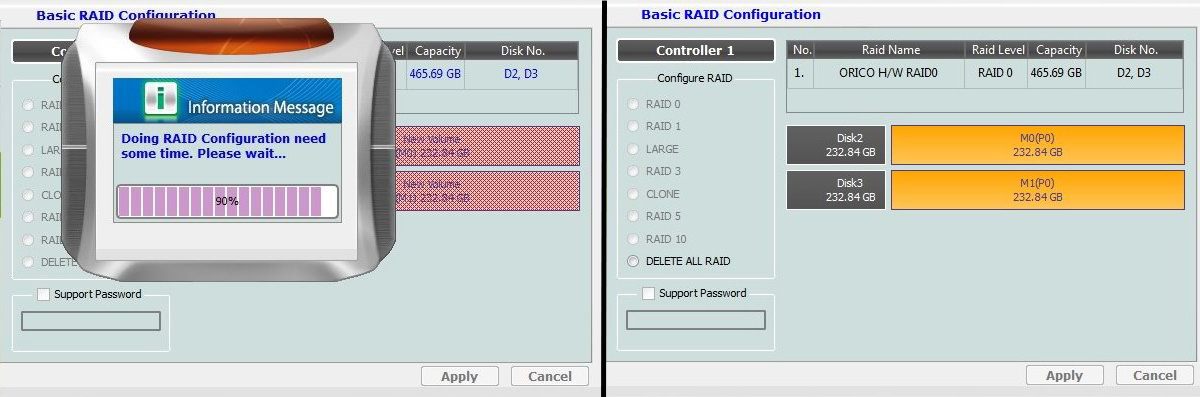
In the previous tests, the drives were running at around 55–65 MB/s. In RAID 0, the speed increased to 117–120.
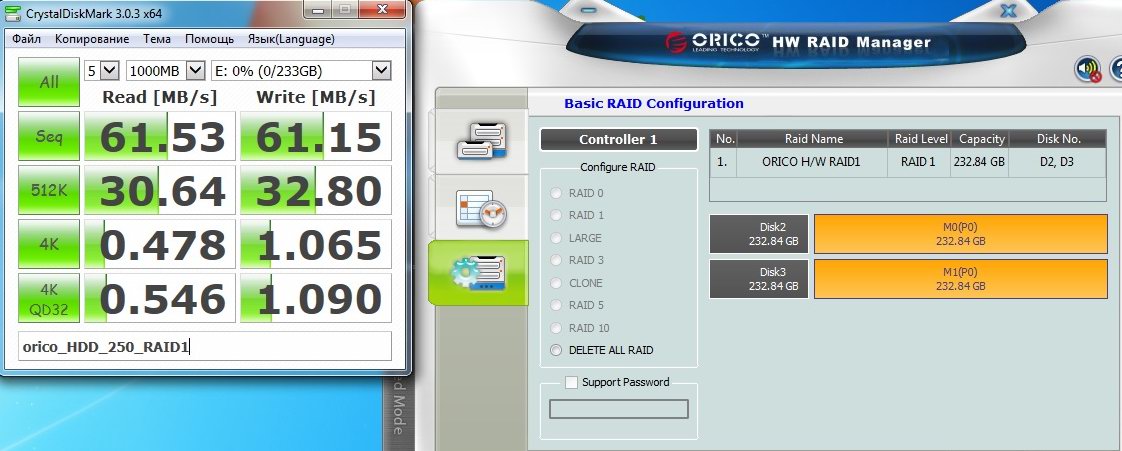
Now let's try creating a RAID 1 array with the same drives.
The capacity and speed predictably dropped by half, but reliability improved.
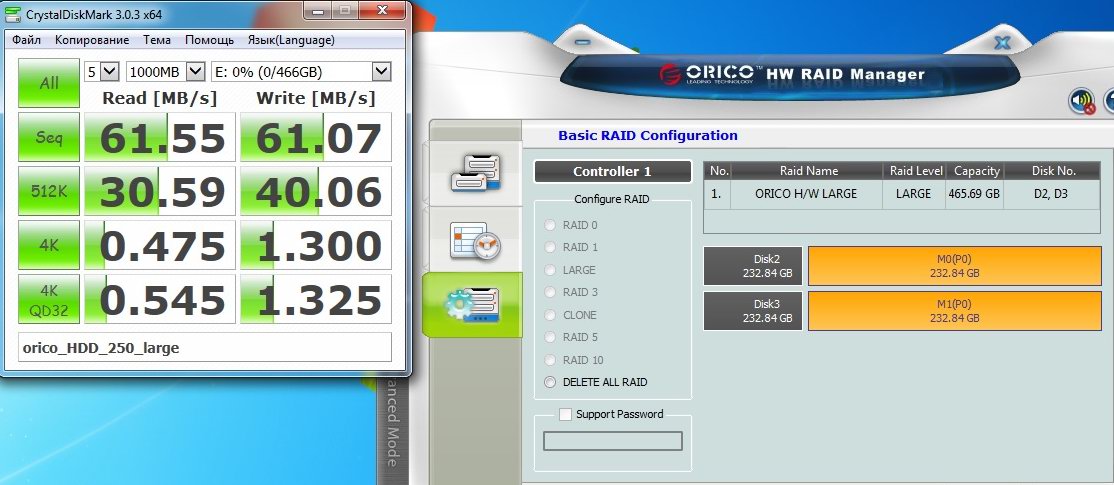
In Large mode, speed depends on which drive we're currently using, since all the drives are independent. Even during the speed test, only the first drive in use was tested.
All right, let's install a third drive and create a RAID 5 array. The speed is comparable to RAID 0, and the capacity equals the combined capacity of two drives, but with improved reliability.
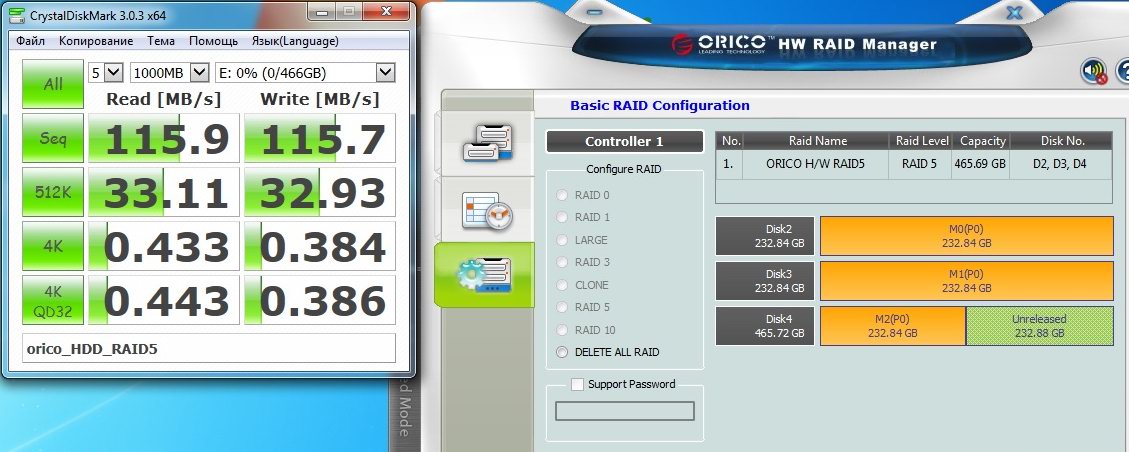
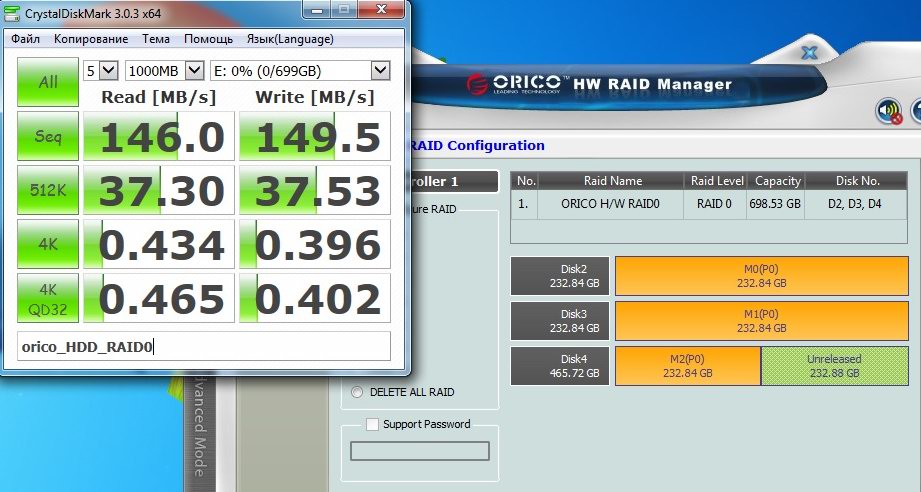
Now let's see how RAID 0 performs with this setup.
The speed is almost equal to the combined speed of all three drives, though there's no protection at all.
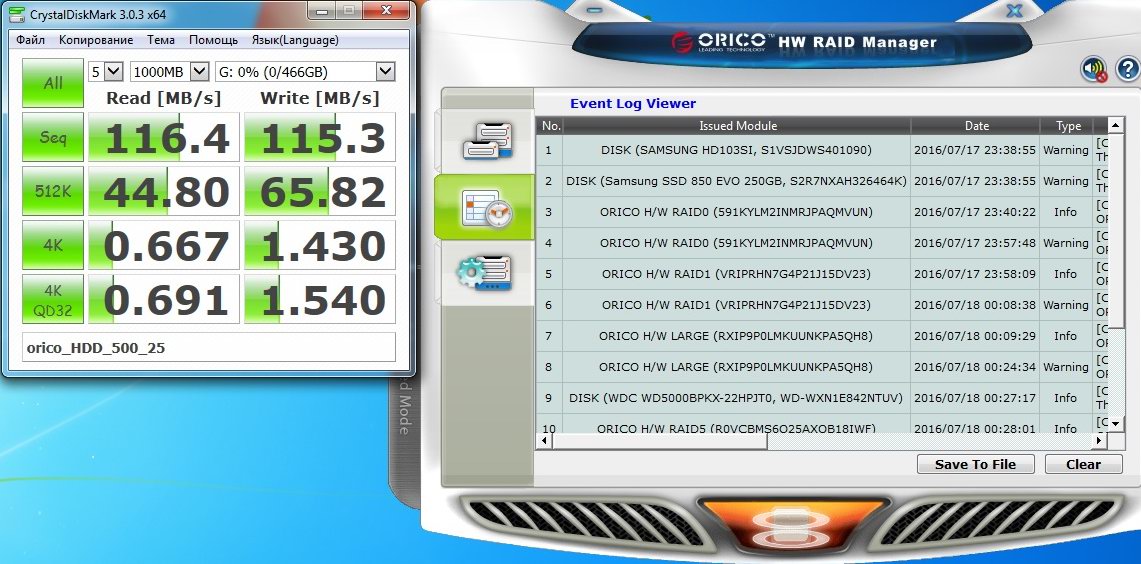
More as an experiment, I installed a 2.5-inch, 500 GB drive just to see how fast it was.
You can also see the logs of my “activities” in the screenshot :)
The drives show up as full-fledged devices in Device Manager.

Benchmarks are all well and good, but real-world tests still matter—especially since I had to transfer fairly large amounts of data between drives.
1. Copy speed from one drive to another inside the enclosure.
2. Read speed from the enclosure to the computer's SSD.

But then I ran into some odd behavior.
1. I started copying files from two drives in the enclosure to the computer's SSD. But the speeds were distributed unevenly, which was more than I expected.
2. Once copying from one drive finished, the speed on the other quickly returned to normal.
3. At first, I thought the drive whose read operation started earlier was simply faster.
But it turned out to be much more interesting: the drive installed in the bay with the higher number read faster, and by a noticeable margin. I repeated the test, this time starting the copies in the opposite order, and again the drive installed lower down copied faster.
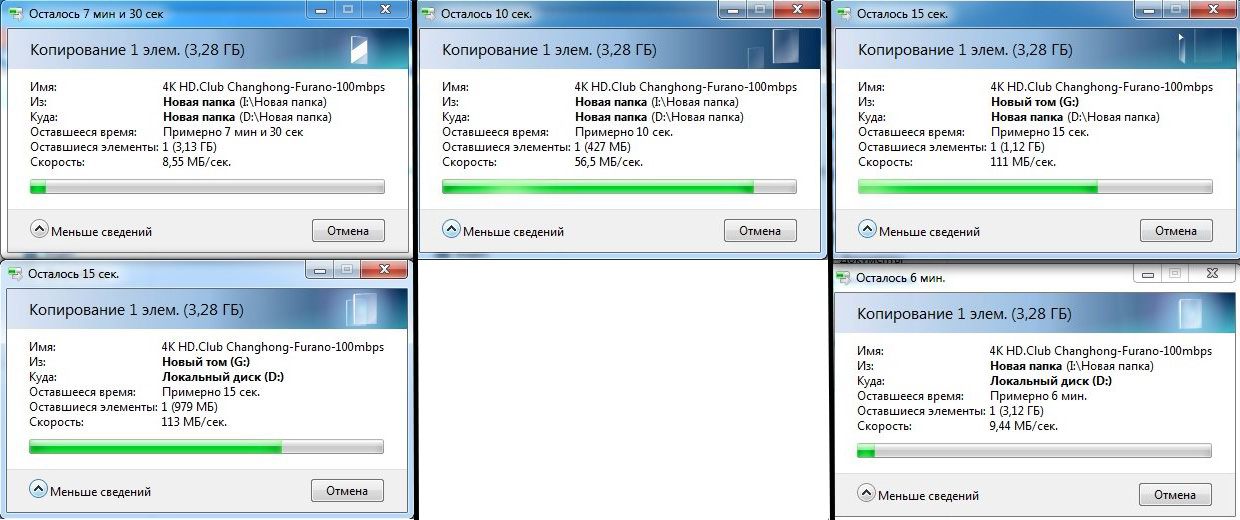
This test was run with a RAID 5 array. Two files were copied from the array to the computer's SSD at the same time.
Based on the tests, I can say that this enclosure is better suited to single-threaded operations. As the number of threads increases, the speed drops noticeably. However, keep in mind that if you have a drive where read/write speed matters, it's best to install it in the bottom slot

But then I ran into a fairly serious problem.
I've been using this device for almost a week now, but I still haven't figured out what causes it.
After installing the enclosure in its usual spot, I hot-swapped in an old 1.5 TB Seagate. A scan for autorun files started, and a couple of minutes later the enclosure rebooted.
Okay, I thought, maybe it was a fluke. I started copying files, and five hours later it happened again. But this time I suspected the air conditioner had been switched on; it's on the same circuit, not far from where the enclosure is installed. The power supply is decent, though, and I'm confident in it, so I started suspecting a potential difference in the interface cable (more precisely, between the computer and the enclosure).
I kept copying, and about 12 hours later the enclosure rebooted while nothing was actively happening. That is, I connected to the computer using Radmin and opened the drive (I'm not sure, possibly the same 1.5 TB Seagate).
I went out to the balcony, removed all the drives, cleaned the contacts with an eraser, started everything up again, and began copying. But 12–14 hours later, the same thing happened.
This was about three days ago, and the problem hasn't happened again since. I can't figure out what caused it; there's not enough information, just guesses. For now, I suspect the old hard drive or the interface cable, but I'll keep collecting data.
A reboot while watching a movie is annoying but not a big deal. But if you're using the drive as a network drive, it could have unpleasant consequences.
To give you an idea of how much data was tested, here's a screenshot showing that copying a folder of almost 700 GB works without any problems. The average speed dropped because there were so many small files.

The enclosure provides full SMART information for the installed drives. The screenshot shows the problematic drive, which is reported to be in good condition.
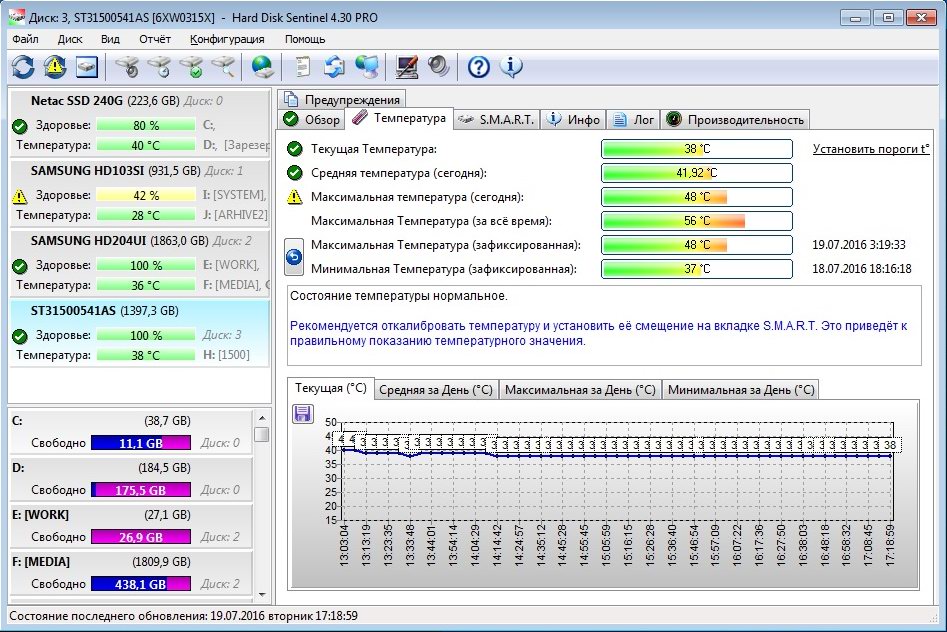
The drive has been running continuously for almost 7 years, out on the balcony, through both hot and freezing weather.
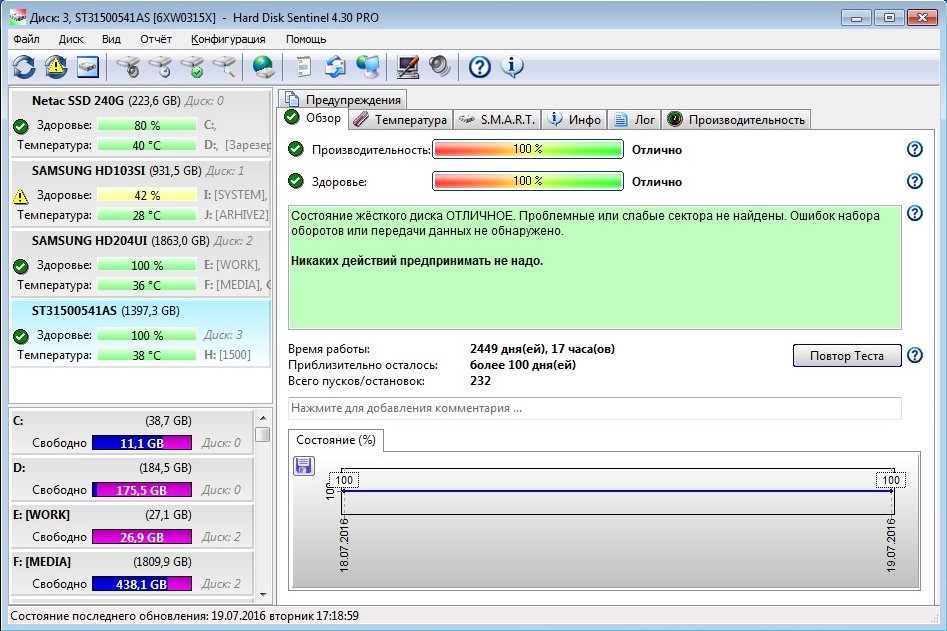
A few times in summer I forgot to leave the cabinet door ajar, and the drive warmed up to 56 degrees.
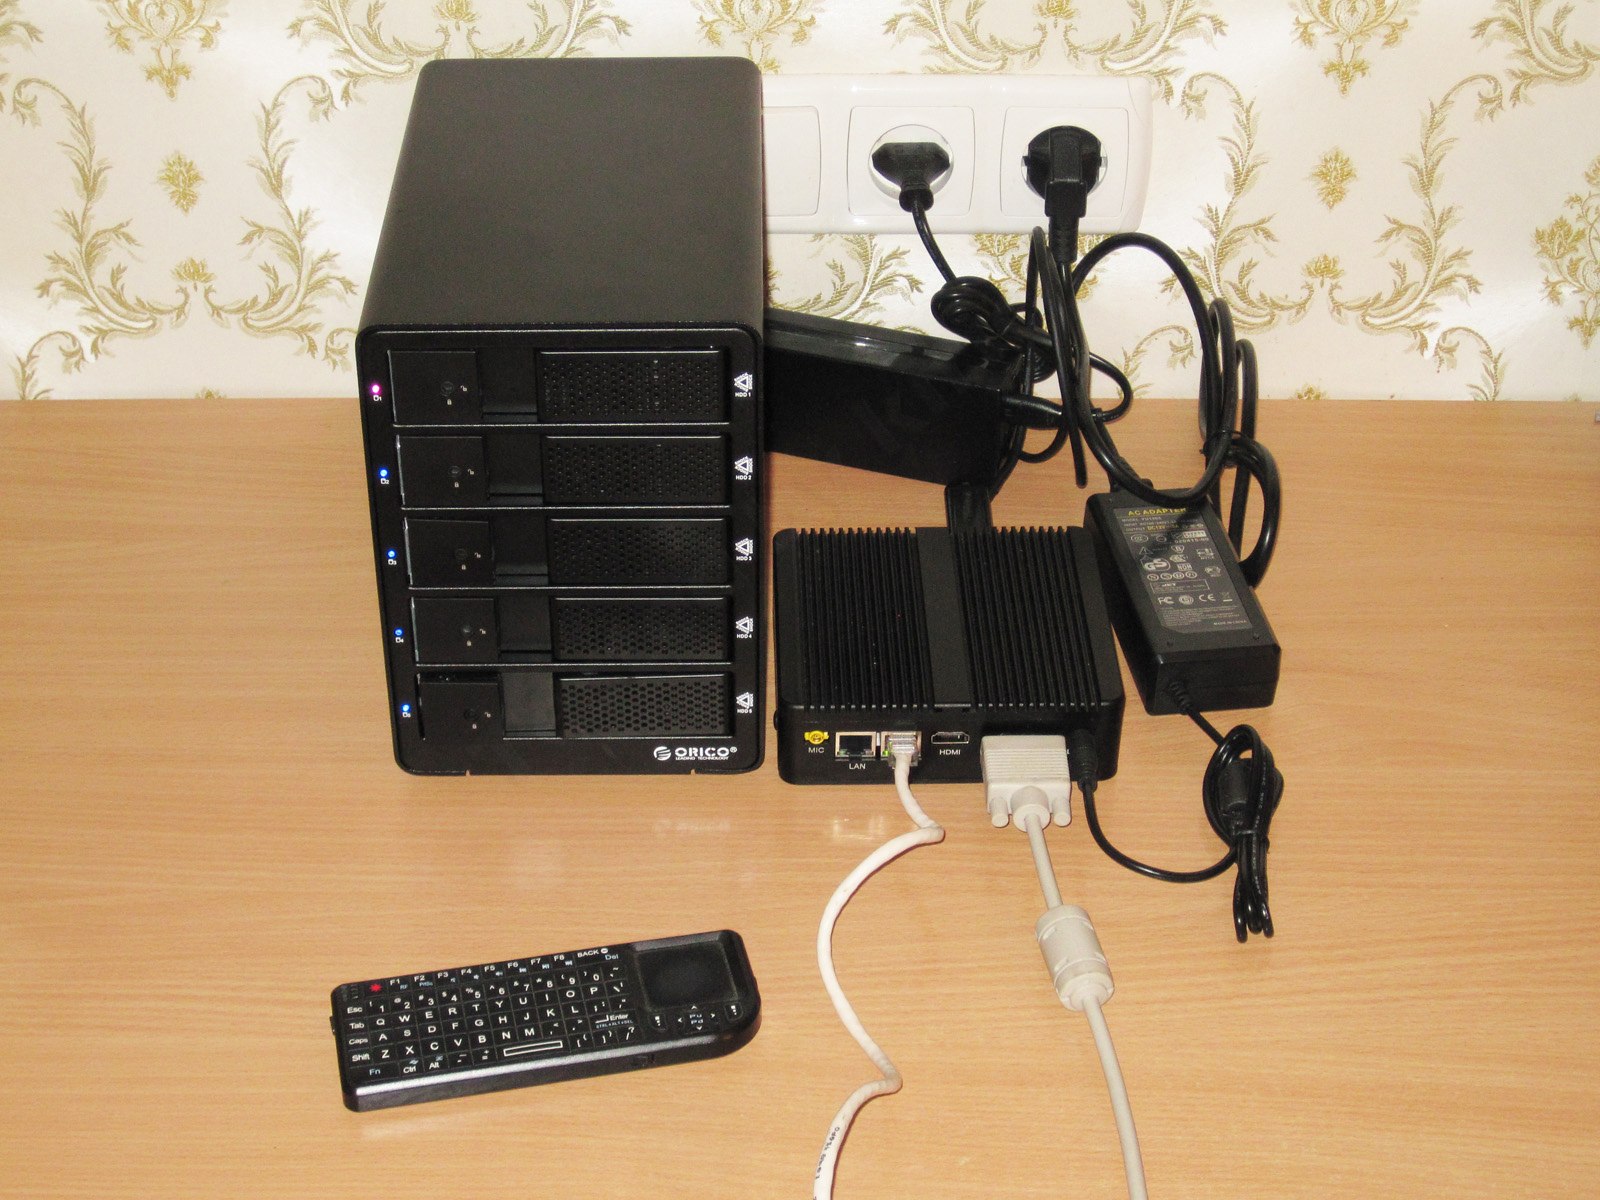
The setup before installation in its “work area.” This is an intermediate photo: all the drives are installed, but in actual use I left only one in place; the others were used just for testing.
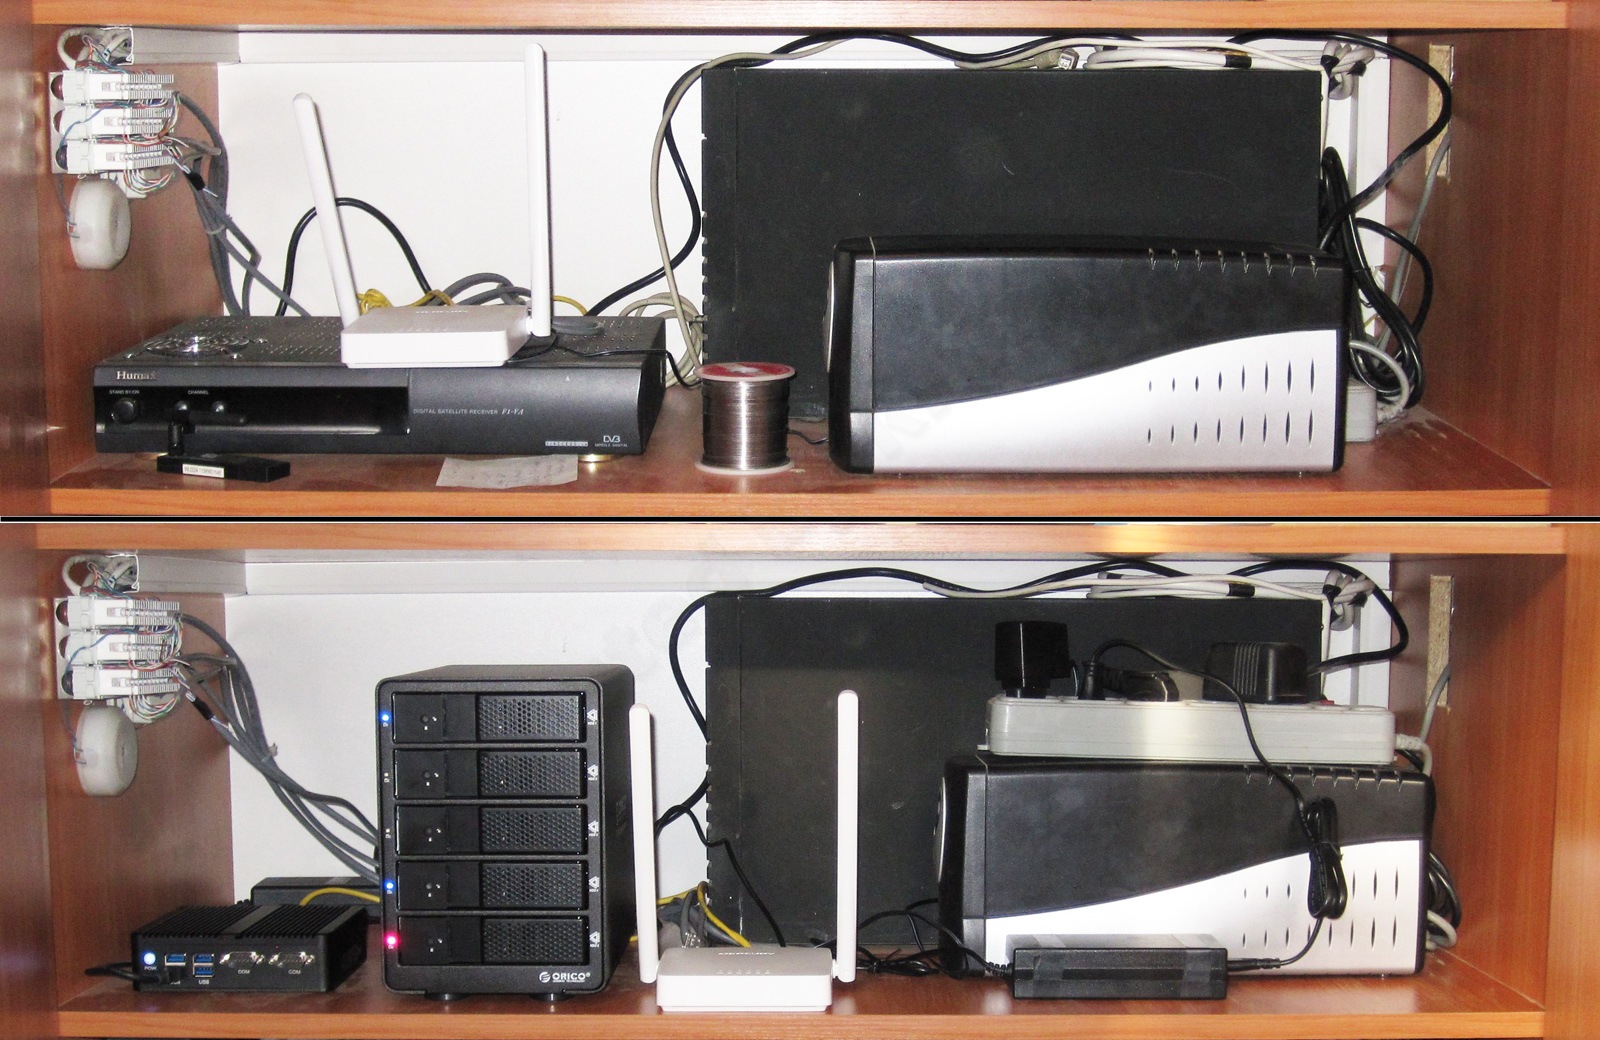
Photos before and after the upgrade.
The previous computer is in the top photo; I described it in this review.
The photo below shows how it looked after the move. Although it now has a gigabit switch, and 4 bays in the enclosure are occupied instead of 3. My home computer had two 2 TB drives; one of them was moved to its new location after the photo shoot.
In the background is a 1000 VA online UPS. It powers my main computer, but the UPS is temporarily disconnected at the moment.
And this is what the previous computer looked like. It will probably be retired now, although I think it will still have to work for a while, since my programmers only support COM and LPT ports.
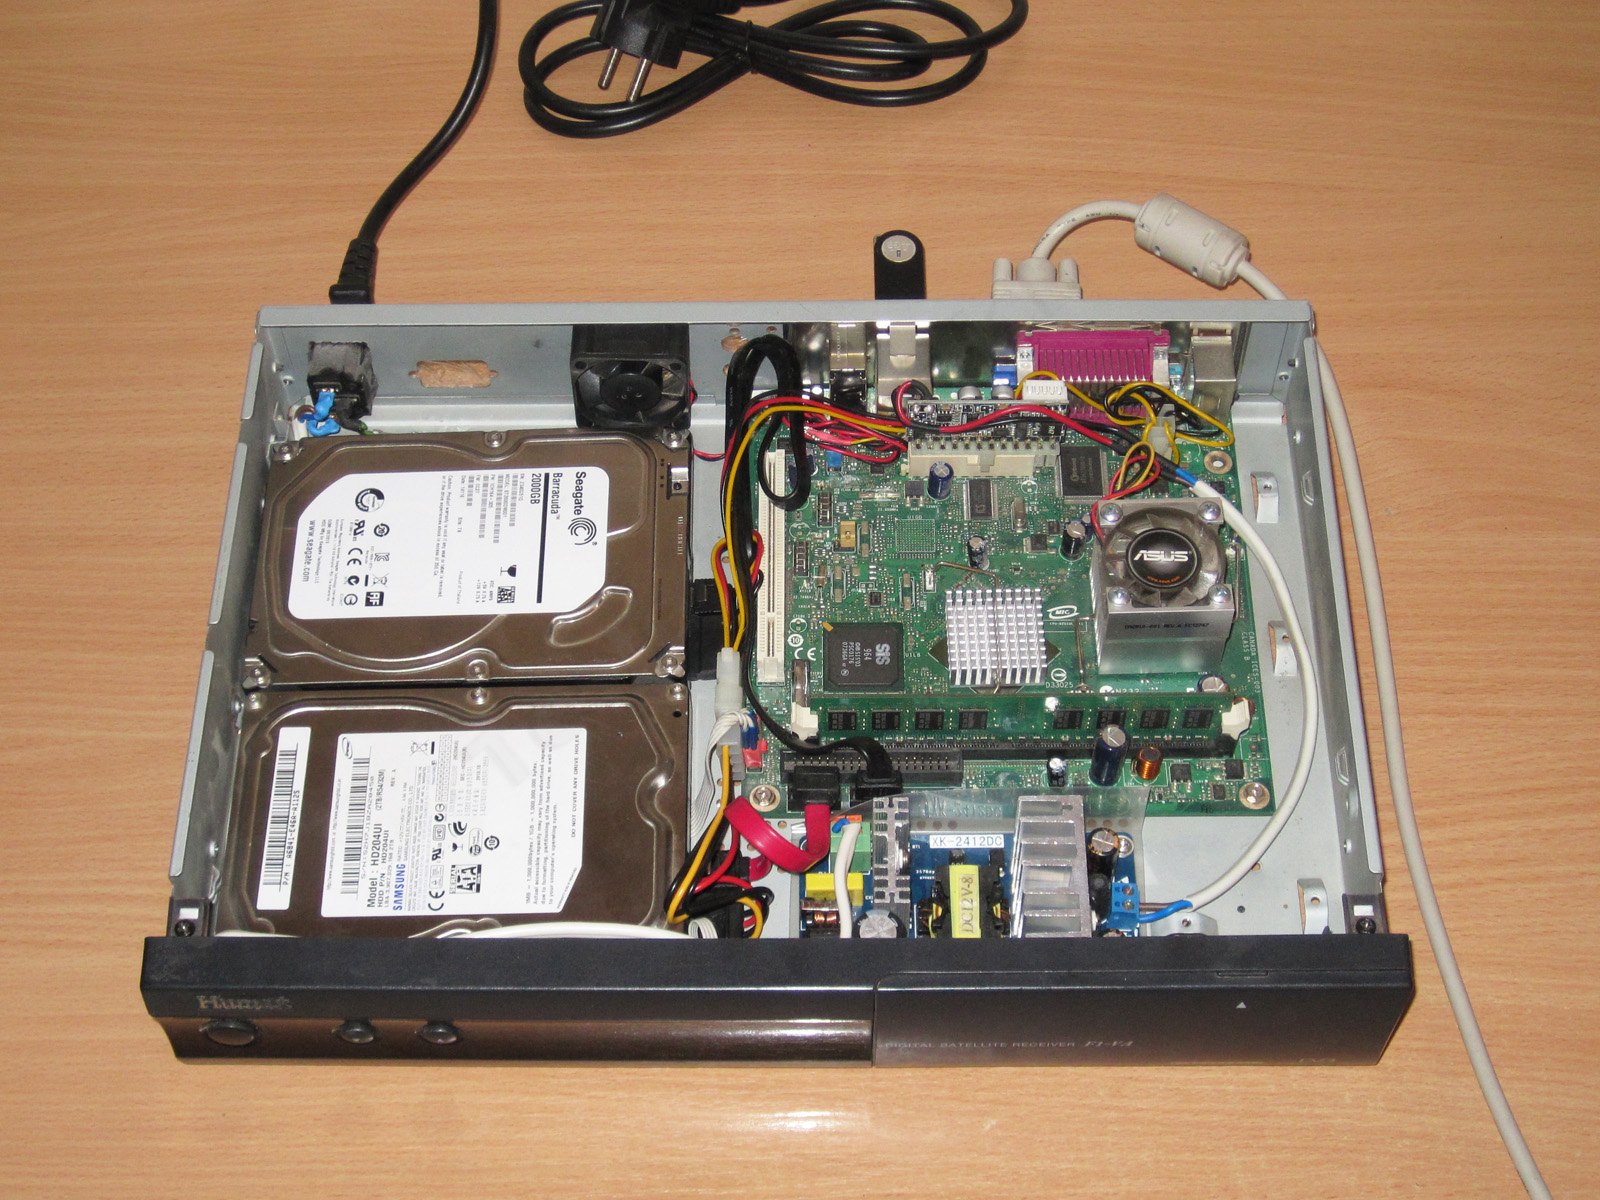
A little about power consumption, by the way.
There are four drives installed now: two 2 TB 7200 rpm drives, one 1.5 TB 5900 rpm drive, and one 1 TB 5400 rpm drive. Power consumption is 85 W at startup, 30 W while scanning all the drives, and 25 W once the drives settle down.
What would be useful is sequential startup for the hard drives. That would reduce the load on the power supply.
In normal operation, the power supply is just a little warmer than body temperature, which is very good—excellent, in fact.
Everything is also much quieter now—in fact, almost silent. The temperature in the cabinet has dropped noticeably, too. I didn't measure it precisely, but I clearly remember the wave of heat when I opened the cabinet door. There are now twice as many drives, but less heat.
Even in a closed cabinet and under heavy load, the mini PC warmed up to a maximum of 65–66 degrees.

So, here's the verdict.
Pros
Almost silent operation
Sturdy construction
Supports RAID arrays at various levels.
Quality components and a fairly well-thought-out circuit design.
Can hold up to 5 hard drives with a total capacity of up to 40 TB.
Low power consumption and heat output
Cons
Problems installing “slim” hard drives.
Software needs work
Low copy speed when transferring multiple files at once.
Paid shipping
My take: I'll say right away that I liked the enclosure, so I enjoyed writing this review.
I was impressed by a lot of things: the appearance, the very quiet operation, and the lack of overheating. I was a little disappointed that speed drops noticeably during multithreaded operations, especially since this enclosure will be used as a network drive for three home computers. But so far there have been no problems; everything works.
By the way, when copying from one drive to another, it first reads a chunk of the file from one drive, then writes it to the other. The read/write intervals can be as long as 5–7 seconds, which suggests chunks of around 500–700 MB are being cached in RAM. At first I suspected the enclosure's controller, but when I connected an external USB 3.0 drive, I saw exactly the same thing while copying files to it. So this appears to be a characteristic of how the USB 3.0 controller works.
The software is a little rough around the edges, but it works and lets you create arrays at the required RAID level without much trouble. Creating an array from 250 GB drives takes about 10 seconds, and there's no need to reboot—it all happens on the fly.
The only thing I'd do to improve reliability is replace the capacitors in the power supply with higher-voltage ones.
Of course, people will ask why I need an enclosure with a RAID controller if I'm just using it as 5 separate adapters.
The thing is, I do want to set up a RAID 5 array, but I can't do that yet. First, I need the required number of drives, preferably all the same capacity.
For example, with a 1+1.5+2+2+2 configuration, I'd get an array with a capacity of just 4 TB. If I replace the 1 TB drive with a 1.5 or 2 TB drive, the capacity would be 6 TB.
Also, creating an array erases all the data, so I need to copy it somewhere first. I still don't know where I'd put 6–7 TB of data.
I hope you found my review useful. As always, feel free to ask questions in the comments.
Before publishing the review, I asked the store for a discount. They gave me the ORICOGB coupon, which brings the price of the EU version to 119.99. But I'd rather choose the UK version for 119.34, apply my points, and replace the power cable—that would be cheaper.
$137.70
This page was found when searching for:
orico 95u3, тест raid5 crystaldiskmark, станция для жестких дисков на 5 или 6, orico описание инструкция, диск orico тест, orico инструкция на русском языке, orico raid5, orico 9558ru3, orico 9558ru3 прошивка, 9558ru3 инструкция orico, какие диски подходят к orico 95 серии, orico_raid_managerwin_562_v0_00_00_10.rar, дисковое хранилище orico 35 series, das станция для hdd/ssd orico 9558ru3 черный отзывы, orico 95u3 инструкция по настройке, orico hdd 5 обзор
orico 95u3, тест raid5 crystaldiskmark, станция для жестких дисков на 5 или 6, orico описание инструкция, диск orico тест, orico инструкция на русском языке, orico raid5, orico 9558ru3, orico 9558ru3 прошивка, 9558ru3 инструкция orico, какие диски подходят к orico 95 серии, orico_raid_managerwin_562_v0_00_00_10.rar, дисковое хранилище orico 35 series, das станция для hdd/ssd orico 9558ru3 черный отзывы, orico 95u3 инструкция по настройке, orico hdd 5 обзор
The figures from this review are in the measurement database: Battery packs and power banks
Discounted products
You may be interested in


Discounted products
Support the project
All the content on the site and the advice are free, but we’d be grateful for your support of the project and the channel!
Discuss on the forumHave a question or some experience to share? Discuss the article with the author and readers: the forum is a convenient place to share schematics and photos.
Go to the forumOnly registered readers can comment. It takes a minute to sign up, and you can log in with the same account you use on the forum.
Log inRegister